TabularBox August 15, 2024
A widget that allows viewing and editing data in a tabular way, that is, through cells in rows and columns. Custom cells can be created (implemented) in order to display and edit data in various ways. A few cells are provided out of the box.
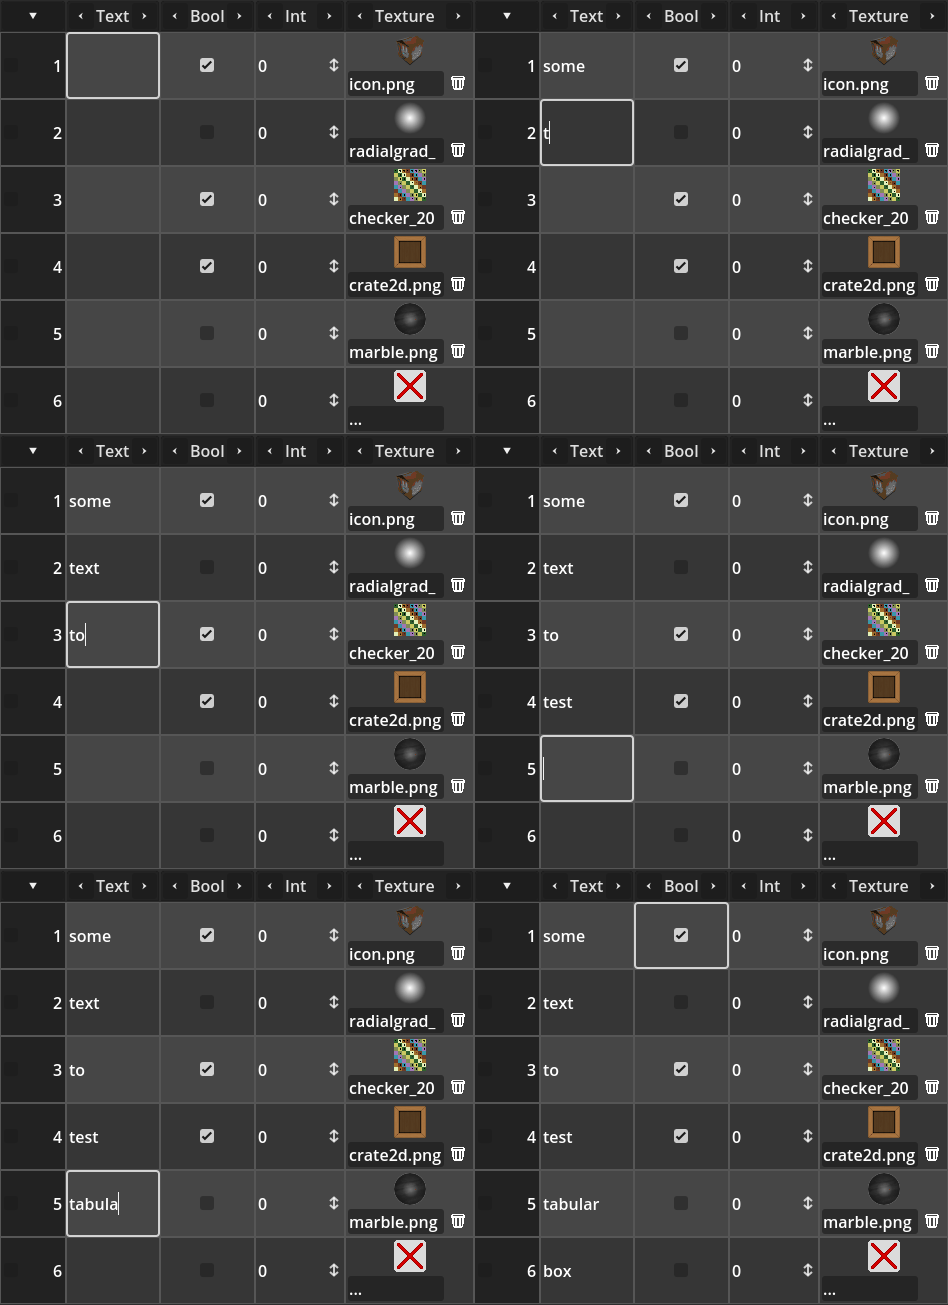
The animation bellow shows the tabular box in action, showcasing cells for text, booleans, integers and images.
Usage
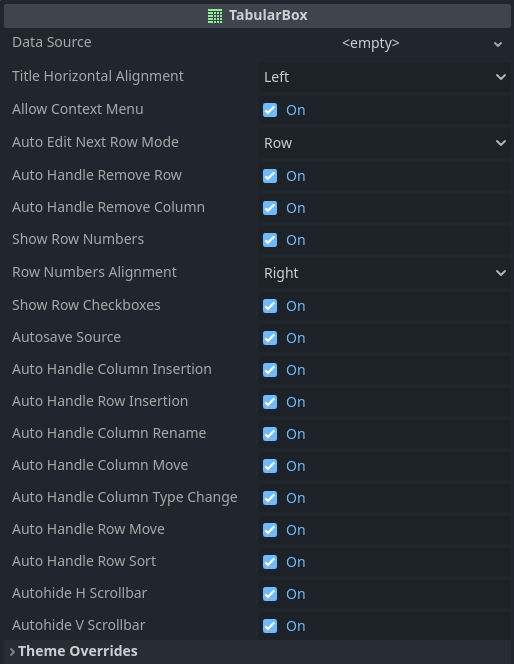
The "core" of the TabularBox is the TabularDataSource resource. This serves as a "bridge" between the stored data and what the TabularBox will display. What this means is that data storage is not necessarily handled by the data source, even though it's possible to be done like that. This plugin offers a simple implementation, TabularDataSourceSimple which provides basic data viewing/editing. Screenshots provided in the page were done while using an instance of this simple data source. Later I will talk more about the data sources and how to implement them. For the moment I want to deal with the properties provided by the TabularBox, which are:
Bellow some explanation about each one:
data_source- As explained above, this is the core of the tabular box, and is what "bridges" the stored data and the UI.
title_horizontal_alignment- Determines if the column titles should be aligned to the left, center or right.
allow_context_menu- If this is
falsethen right clicking the tabular box will not bring a context menu. auto_edit_next_row_mode- After committing a value change through keyboard input, typically with the enter key, determines which "next cell" should be selected, if any at all. Row bellow or the cell in the column to the right being the options.
auto_handle_remove_row- If this is
truethen requesting to remove a row will attempt to do so directly through the data source, otherwise a signal (row_remove_requested()) will be emitted instead auto_handle_remove_column- If this is
truethen requesting to remove a column will attempt to do so directly through the data source, otherwise a signal (column_remove_requested()) will be emitted instead. show_row_numbers- Disabling this property will hide the row numbers that are placed at the left side of the tabular box.
row_numbers_alignment- Determines the horizontal alignment of the row numbers if
show_row_numbersis enabled. show_row_checkboxes- Disabling this property will hide the check boxes that are placed at the left side of the tabular box. Selecting rows will not be possible in that case, though.
autosave_source- If this is
truethen the tabular box will attempt to automatically save the data source resource file whenever there is a change. auto_handle_column_insertion- If this is
truethen requesting to insert a column will attempt to do so directly through the data source, otherwise a signal (insert_column_requested()) will be emitted instead. auto_handle_row_insertion- If this is
truethen requesting to insert a row will attempt to do so directly through the data source, otherwise a signal (insert_row_requested()) will be emitted instead. auto_handle_column_rename- If this is
truethen requesting to rename a column will attempt to do so directly through the data source, otherwise a signal (column_rename_requested()) will be emitted instead. auto_handle_column_move- If this is
truethen requesting to move (reorder) a column will attempt to do so directly through the data source, otherwise a signal (column_move_requested()) will be emitted instead. auto_handle_column_type_change- If this is
truethen requesting to change the value type of a column will attempt to do so directly through the data source, otherwise a signal (column_type_change_requested()) will be emitted instead. auto_handle_row_move- If this is
truethen requesting to move (reorder) a row will attempt to do so directly through the data source, otherwise a signal (row_move_requested()) will be emitted instead. auto_handle_row_sort- If this is
truethen requesting to sort rows will attempt to do so directly through the data source, otherwise a signal (row_sort_requested()) will be emitted instead. autohide_h_scrollbar- If this is
falsethen the horizontal scrollbar will always be visible. autohide_v_scrollbar- If this is
falsethen the vertical scrollbar will always be visible.
Interaction can only occur if there is a valid data source assigned into the TabularBox instance. So the discussion bellow assumes that's the case.
Requesting to add columns or rows can be done by interacting with the context menu shown when a right click occurs inside the TabularBox. Provided auto_handle_column_insertion/auto_handle_row_insertion is true, then the TabularBox will directly relay the requests to the assigned data source. Specifically, the virtual functions _insert_column() and _insert_row() are used.
Now, if the "auto handle" properties are false, then signals are emitted. More specifically insert_column_requested and insert_row_requested. Both receive a single argument, which is the index where the column or row must be inserted at. When column or row is inserted in this way, it's necessary to notify the TabularBox that something has been added. This is done through the data source, by calling the functions notify_new_column() and notify_new_row(). Both functions receive a single argument, which is the index where the new column or row has been added.
This design where the TabularBox can directly request the assigned data source to insert data vs emitting a signal instead, allows some more advanced use cases. As an example, it becomes possible to create a resource type dedicated to store the data, then use the data source to relay that data to the tabular box. In fact, that's exactly what the Database Plugin does under the hood. Data is stored in the GDDatabase resource, while there is a non exposed specialized data source that mediates everything between the database and the TabularBox.
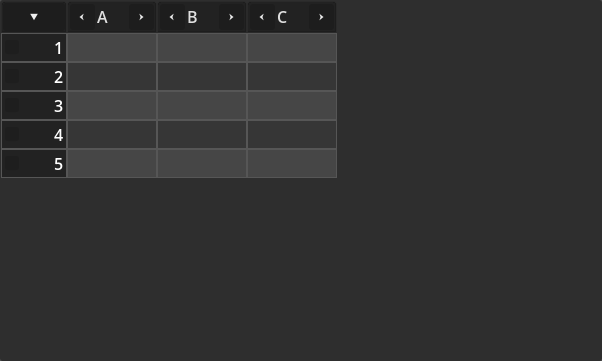
After appending three columns and five rows, this is how the TabularBox looks like (remember, using the TabularDataSourceSimple):
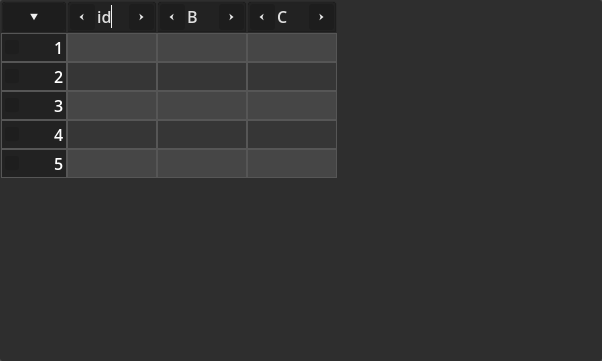
When creating a new column, the TabularDataSourceSimple automatically set the name and assigns String to be its value type. Both can be changed. Changing the name is as a simple as clicking the column header, which is basically a LineEdit:
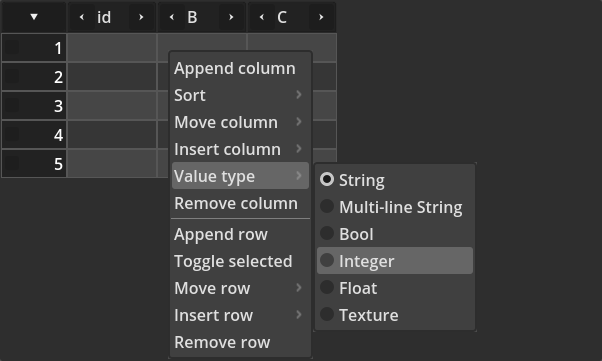
Right clicking in a column results in a context menu with additional options. One of them is to allow value type change, like this:
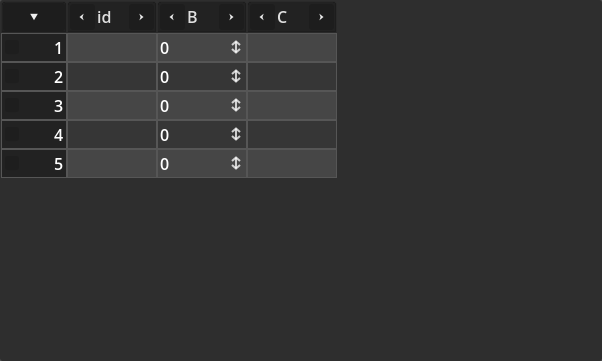
And so, when the type is changed to integer, the TabularBox will request the data source for which cell type (class) it should use to deal with that data type. At that point the cells will be replaced. In the specific case of the simple data source, the TabularBoxCellInteger is used to deal with Integer value types. This is the result after the selection:
It's possible to completely disable the context menu, by simply toggling off the allow_context_menu property. This might be useful if you want the TabularBox to show data while also not allowing it to be modified.
Now Notice the "down arrow" at the top left corner of the box. Clicking it will bring the "row selection" menu:
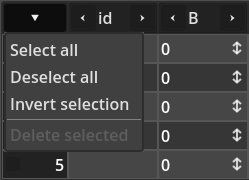
As you can see, it allows easier tasks related to row selection. Selecting a row with this widget is basically ticking that check box rendered besides the row number. The screenshot bellow shows how it looks like when all rows are selected:
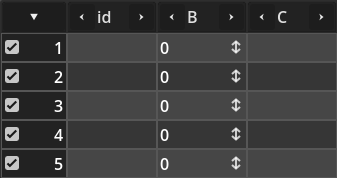
If the show_row_checkboxes property is off then that "row selection" menu will be disabled.
As mentioned early, the data source is the core of the TabularBox. Not only it might determine how the data is stored, it also controls a lot of how the UI will behave. The TabularDataSource contains several virtual functions that must be overridden. For a complete list and brief explanation of each one, please refer to the in editor documentation of the data source.
Yet, the list of functions that must be implemented is a bit big. Unfortunately this is the nature of dealing with this kind of data in a very generic way. How the data is stored is entirely up to the implementation. Still, simply changing the internal data wont do anything in the visualization of the tabular box, which must be notified about the fact. There are several functions named notify_*(), which will then trigger signals. The tabular box listen to those signals in order to update the display. Again, refer to the in editor documentation for the complete list (and information) of each of those functions.
The data source also contains a system to filter out data. This is as simple as providing a keyword through its set_filter(keyword, case_sensitive, exclude_columns) function. Giving an empty string will clear the filtering. If the second argument, case_sensitive, is true then the match must be perfect, including upper/lower cases. The third argument is an optional array of strings. the expected is that any entry should match the name of a column. Those columns will be ignored when searching data for the provided keyword.
# Apply a filter to the displayed data, not ignoring any column in the search
tabular_box.data_source.set_filter(keyword, case_sensitive)
Custom Data Source
With all this information we can now delve into the implementation of a custom data source. If you want full reference code to the snippets shown here, check the demo project, more specifically the custom_data_source.gd and tboxcelldropdown.gd files. Both of them are in the scripts subdirectory of the Godot project.
Before working on the script, we need to define:
- How the data will be stored in the data source.
- Which value types we want to allow as well as which (numeric) "code" should be assigned into each one.
When determining the data storage, one important aspect is that we must ensure the column and row orders are preserved. We know the Array container does that. With that in mind perhaps we create an Array for column and another for the rows.
For each column we need information regarding its value type, title and perhaps some settings. So each entry in the column array should be a Dictionary, which would easily allow us to store whatever information we need for each column in the data source. In this regard it would be fantastic if GDscript had Struct!
As for the rows, we want each entry to contain the values of each column. In here we have the options to store each row as an array of values or as a Dictionary where each key matches a column title, holding the corresponding value. Using the array strategy means less data storage at the cost of higher upkeep. The thing is, if columns are reordered, every single row must be updated to the new order. Going with the Dictionary route means less upkeep in exchange of a little bit of extra storage. For this example we will go with the Dictionary route not only for the fact that it's easier to deal with, but also because it results in less upkeep, which might result in better performance.
Regarding the value types, we will take advantage of the cells that are provided out of the box, which allow us to support single line strings, booleans, integers, floating point numbers, "textures" (actually paths to the texture resources) and multi-line strings. But how about a "custom" type that results in each cell containing a drop down menu, offering "damage type" as option? For that we need to create a custom cell. We will do so later. Yet we need to determine how the type will be identified. To make things easier we will use an enumeration in which each entry will be the "code" for one of the value types.
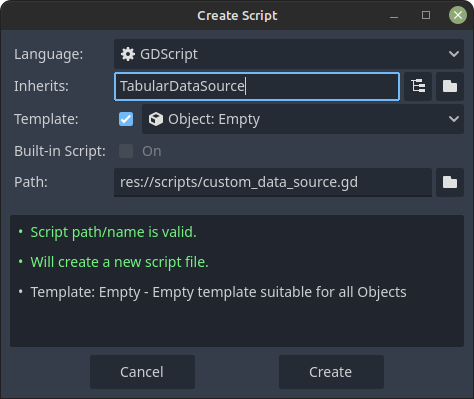
With all that in mind, we will begin by implementing the data source script. This means that it should extend TabularDataSource. So create it:
One very important aspect of the scripted data sources is the fact that it's a good idea to mark them as @tool scripts. The reason is that the TabularBox attempts to load and call the functions as soon as an instance of the data source is assigned into it. Not marking the script to be a tool one will partially work. In editor data wont be shown and, upon loading the project, error messages are likely to be shown, telling that virtual functions must be implemented before being called. Using the data source while running the game/application will work though. The tabular box will warn when a scripted data source not marked as tool is assigned into its data_source property.
Another thing is that adding a class_name will help create instances of the data source directly from the inspector. Otherwise that task has to be done through code. So, in our script we begin with:
@tool
class_name TabularDataSourceCustom
extends TabularDataSource
Now the two arrays that will hold all the data:
@export var column_list: Array[Dictionary]
@export var row_list: Array[Dictionary]
Next we declare the enumeration that will hold the "value type codes":
enum ValueType {
   VT_STRING,
   VT_BOOL,
   VT_INT,
   VT_FLOAT,
   VT_TEXTURE,
   VT_MULTILINE_STRING,
   VT_DAMAGE_TYPE,
}
One last thing is the damage type. As mentioned we want to provide drop down menus with the available options. We will need to identify those damage types through some "id" (or code, whatever). For this example we will create this "coding" within the same data source script. However consider adapting this to your needs, perhaps adding this into a singleton (auto load script). That said, the damage type ids will be done through an enumeration:
enum DamageType {
   DT_None,        # Mostly to have a "default value"
   DT_Physical,
   DT_Fire,
   DT_Cold,
   DT_Lightning,
   DT_Poison,
   DT_Arcane,
}
We can now work on the functions. We begin with the _get_type_list() function. It should return a Dictionary where each entry's key is the "code" (identification) while the value is a string that will be shown in the UI. So the keys of this returned dictionary will be direct values of the ValueType enum that we have already implemented. The values are arbitrary strings. This is the code:
func _get_type_list() -> Dictionary:
   return {
      ValueType.VT_STRING: "String",
      ValueType.VT_BOOL: "Bool",
      ValueType.VT_INT: "Integer",
      ValueType.VT_FLOAT: "Float",
      ValueType.VT_TEXTURE: "Texture",
      ValueType.VT_MULTILINE_STRING: "Multi-line String",
      ValueType.VT_DAMAGE_TYPE: "Damage Type"
   }
The _has_column() function must tell if the incoming title corresponds to a column that exists in the data source. In an advanced implementation we could create some sort of indexing or a Set of column titles, which would make querying this information rather trivial. However to simplify things we will linearly search the column list. In other words, the implementation here will iterate through stored data then comparing stored title with incoming one. If a match is found we return true, which also results in interrupting the loop. This also means that if the loop finishes normally then the title was not found, so we return false at that point. This in code:
func _has_column(title: String) -> bool:
   for col: Dictionary in column_list:
      if col["title"] == title:
         return true

   return false
Implementing _get_column_count() is actually very trivial! All we need to do is return the amount of entries in the column_list array, which is obtained by simply calling its size() function:
func _get_column_count() -> int:
   return column_list.size()
The next function, _get_column_info() is slightly more involved, but not that much. The thing is, the returned dictionary is only required to contain the title of the column, while all the rest can remain empty. Yet we still want to use a few of the entries to properly define the behavior. Bellow I list each of the expected entries of the returned dictionary and how we will use it, if at all:
flags: This key can be used to somewhat "fine tune" some aspects of the column and its cells. As an example, column reordering can be disable by simply removing theColumnFlags.AllowMovefrom the bit mask. Another example is that we can removeAllowTitleEdit,AllowTypeChangeandAllowMoveto disallow editing the title, changing the value type or moving the column. This can be useful if we wanted to create a column meant for rowIDs. Yet, for this example we wont use the flags, specially because it's rather trivial do deal with, so I don't think a practical example is necessary.type_code: In here we have to assign the code related to the value type of the column. Since we intend to store this information in the "column data" (thecolumn_listarray), we will retrieve the desired information from the container and add into the returnedDictionary.cell_class: This is the name of the class implementing the cell used to display/edit the data.move_mode: This is an option from theTabularDataSource.MoveColumnButtonsenum. This allows us to fine tune how the buttons meant to move the columns will behave. We will leave it empty, which defaults to "always visible". Note that this provides an alternative way to disallow a column from being moved, by providingTabularDataSource.AlwaysHiddenas the value. And if you want the buttons to be shown only when the mouse is over the column header, the assignTabularDataSource.ShowOnMouseOveras the value for this entry. This last case might result in a "cleaner" look of the column headers.extra_settings: We can use this to provide additional data to each cell when it's instantiated by theTabularBox. In our case we will provide the list of damage types when the column type isValueType.VT_DAMAGE_TYPE. This is what will allow the custom cell to properly populate the drop down menu.
When dealing with the cell_class we need a way to associate the value type with the cell class name. Associations are trivially done through dictionaries. Those also allow us to simply query it instead of having to manually create a match statement! So, we create such dictionary:
const type_to_class: Dictionary = {
   ValueType.VT_STRING: "TabularBoxCellString",
   ValueType.VT_BOOL: "TabularBoxCellBool",
   ValueType.VT_INT: "TabularBoxCellInteger",
   ValueType.VT_FLOAT: "TabularBoxCellFloat",
   ValueType.VT_TEXTURE: "TabularBoxCellTexture",
   ValueType.VT_MULTILINE_STRING: "TabularBoxCellMultilineString",
   # This is for a custom cell and must be implemented
   ValueType.VT_DAMAGE_TYPE: "TabularBoxCellDropdown",
}
To help build the extra dictionary we will create a simple helper function that receive the "damage type id" and returns a string that is meant to be shown in the UI. It should be pretty self explanatory so here is the function:
func _get_damage_type_string(type: DamageType) -> String:
   match type:
      DamageType.DT_Physical:
         return "Physical"
      DamageType.DT_Fire:
         return "Fire"
      DamageType.DT_Cold:
         return "Cold"
      DamageType.DT_Lightning:
         return "Lightning"
      DamageType.DT_Poison:
         return "Poison"
      DamageType.DT_Arcane:
         return "Arcane"

   return "None"
Finally to the _get_column_info() implementation. The first task we need is to ensure the incoming index is within range. After that is done we must retrieve from the stored data the information corresponding to the column index. With this retrieved data we now know the title and the value type of the column. If the type is the damage type then we must provide the entries as part of the extra_settings entry in the returned value. The final task is basically assigning the relevant values into the entries of the returned dictionary:
func _get_column_info(index: int) -> Dictionary:
   if (index < 0 || index >= column_list.size()):
      # In here perhaps print an error message?
      return {}

   var column: Dictionary = column_list[index]

   var type: ValueType = column["type"]
   var extra: Dictionary = {}

   if type == ValueType.VT_DAMAGE_TYPE:
      extra["damage_type"] = [
         { "type_id": DamageType.DT_None, "name": _get_damage_type_string(DamageType.DT_None) },
         { "type_id": DamageType.DT_Physical, "name": _get_damage_type_string(DamageType.DT_Physical) },
         { "type_id": DamageType.DT_Fire, "name": _get_damage_type_string(DamageType.DT_Fire)  },
         { "type_id": DamageType.DT_Cold, "name": _get_damage_type_string(DamageType.DT_Cold) },
         { "type_id": DamageType.DT_Lightning, "name": _get_damage_type_string(DamageType.DT_Lightning) },
         { "type_id": DamageType.DT_Poison, "name": _get_damage_type_string(DamageType.DT_Poison) },
      ]

   return {
      "title": column["title"],
      "type_code": type,
      "cell_class": type_to_class[type],
      "extra_settings": extra,
   }
Now the _insert_column() function. Iit's expected this function can deal with an incoming empty title. Because of that we must have a way of generating a column title. For this simple case we will create a function that will attempt to generate a title that is simply an alphabet character. Each time all characters have been iterated through without finding a valid one, we append a number to it and go over the alphabet again. Note that by valid it's a non existing title. This is not a hard requirement by the TabularBox, however the way we are storing the data means that we have to ensure this uniqueness.
The info parameter is typically used to provide additional settings meant to be directly associated with the column itself, like the flags and move_mode, for example. The extra_settings is used to provide additional data to the cells of the column. In our example here none of the two parameters will be used. The thing is, those exist so additional tooling can provide that information through code. In here we are interacting with the TabularBox almost exclusively through the context menu. In this case both parameters will always be empty.
So, before working on the _insert_column() we work on the function meant to "generate" the column title. Its functionality has already been explained, so here is the code:
const _alphabet: String = "ABCDEFGHIJKLMNOPQRSTUVWXYZ"

func _generate_title() -> String:
   var attempt_count: int = 0
   var done: bool = false

   while !done:
      for l: String in _alphabet:
         var attempt: String = "%s%s" % [l, str(attempt_count) if attempt_count > 0 else ""]
         if !_has_column(attempt):
            return attempt

      # If still here, all characters have been iterated through
      attempt_count += 1

      # Put a hard limit on the number of attempts
      if attempt_count == 15:
         done = true

   return ""
There is one additional "helper function" that we must create though. When adding a column, we must take into account the fact that rows might already exist. This means that we must ensure those possibly existing rows must be updated to contain the entry for this new column. For that to work we need default values. However each value type have its own set of requirements. So we create a function that requires the "value type code" then returns the default value for that type. The implementation should be pretty self explanatory, so here it goes:
func _get_default_value_for(type: int) -> Variant:
   var ret: Variant
   match type:
      ValueType.VT_STRING, ValueType.VT_MULTILINE_STRING, ValueType.VT_TEXTURE:
         ret = ""
      ValueType.VT_BOOL:
         ret = false
      ValueType.VT_INT:
         ret = int(0)
      ValueType.VT_FLOAT:
         ret = 0.0
      ValueType.VT_DAMAGE_TYPE:
         ret = DamageType.DT_Physical

   return ret
As mentioned, we have to deal with empty incoming title. This will always be the case when _insert_column() is called after requesting a new column through the context menu. So the first task is to verify if the parameter is empty or not. If so, we call the _generate_title() we have just created. Otherwise we have to check if the incoming title is indeed available to be used.
The next task is related to the desired index where the column should be added. If negative then the column must be appended. Otherwise it's expected to be inserted between two existing columns. Yet, we must verify if the index is above expected bounds. If so we simply ensure the column will be appended.
Then we have to verify the validity of the incoming value type. If invalid we default to string.
The rest is basically creating the column data (the Dictionary), inserting into the column_list array, updating the existing rows then notifying the TabularBox that a column has been inserted:
func _insert_column(title: String, type: int, index: int, _info: Dictionary, _extra: Dictionary) -> void:
   if title.is_empty():
      title = _generate_title()

      if title.is_empty():
         # Perhaps an error message could be printed here?
         return
   else:
      if _has_column(title):
         # Perhaps an error message?
         return

   if index < 0 || index > column_list.size():
      # Perhaps an error message here?
      index = column_list.size()

   if type < 0:
      type = ValueType.VT_STRING

   var column: Dictionary = {
      "title": title,
      "type": type,
   }

   @warning_ignore("return_value_discarded")
   column_list.insert(index, column)

   # Update rows to contain the new column
   for row: Dictionary in row_list:
      row[title] = _get_default_value_for(type)

   notify_new_column(index)
Implementing _remove_column() should be rather simple, really. We first have to check if the incoming index is valid. Provided it is, we must update any existing rows, remove the column element from the column_list array then notify the TabularBox about the change! That's it:
func _remove_column(index: int) -> void:
   if index < 0 || index >= column_list.size():
      return

   var column: Dictionary = column_list[index]
   var title: String = column["title"]

   # Update the rows
   for row: Dictionary in row_list:
      @warning_ignore("return_value_discarded")
      row.erase(title)

   column_list.remove_at(index)

   notify_column_removed(index)
For the _rename_column() we first need to verify the validity of the incoming column index. Provided it is, we then need to check if the provided new name is available. If it's already in use we have to notify that the rename has been rejected. Then, provided the column can be renamed, we have to update any possibly existing rows, which basically consists in "renaming" the corresponding column title's key in each row's dictionary. Normally this is done by copying the old value into the "new key" then deleting the old one. However the extension pack provides ExtPackUtils.change_dictionary_key() function, which automates this. After that we can finally update the column info in the column_list array. We must not forget to notify the TabularBox. The code:
func _rename_column(index: int, new_title: String) -> void:
   if index < 0 || index >= column_list.size():
      return

   if _has_column(new_title):
      # New title already exists
      # An improvement here could be done, by only notifying about the rejection if the incoming column index
      # is different from the already existing column
      notify_column_rename_rejected(index)
      return

   var column: Dictionary = column_list[index]
   var old_title: String = column["title"]

   # Column can be renamed, so update existing rows
   for row: Dictionary in row_list:
      ExtPackUtils.change_dictionary_key(row, old_title, new_title)

   column["title"] = new_title
   notify_column_renamed(index)
Implementing _change_column_value_type() is probably the most laborious here. The thing is, we must deal with value conversion. Provided the incoming column index is valid, we must then iterate through each row and convert the stored value from the old type into the new one. After that we have to update the stored column data. Of course we can't forget to notify the TabularBox about the change!
To help with the value conversion task we will break down into several functions, one meant to convert the incoming value into a specific "output" type. Basically we will create one "converter" function for each supported value type.
The first converter will take the incoming value and convert it into string. In this function we take the original type and the value itself as parameters. Through a match statement we perform the conversion accordingly:
func _convert_to_string(from_type: int, value: Variant) -> String:
   var ret: String = ""

   match from_type:
      ValueType.VT_BOOL:
         var bval: bool = value
         if bval:
            ret = "True"
         else:
            ret = "False"

      ValueType.VT_INT:
         ret = "%d" % value

      ValueType.VT_FLOAT:
         ret = "%f" % value

      ValueType.VT_DAMAGE_TYPE:
         # We will deal with this conversion later, after implementing the custom cell
         var dtv: DamageType = value
         ret = _get_damage_type_string(dtv)

      _:
         # Texture and multi-line string are already stored as strings, so no conversion is needed here
         ret = value

   return ret
The next converter is to output booleans. This should be simpler than the string case, since not everything can be easily converted into a boolean type. Here is the code:
func _convert_to_bool(from_type: int, value: Variant) -> bool:
   var ret: bool = false

   match from_type:
      ValueType.VT_STRING:
         var strval: String = value
         if strval.to_lower() == "true":
            ret = true

      ValueType.VT_INT, ValueType.VT_FLOAT:
         if value > 0:
            ret = true

      # No sense in dealing with the other possible source types

   return ret
Converting to integer must take in consideration the fact that a string might contain a valid numeric value. Even if it's representing a fractional number, we can truncate it into an integer. Alternatively, instead of simply truncating the value we could use round(). I will leave this as an exercise. That said, the implementation:
func _convert_to_integer(from_type: int, value: Variant) -> int:
   var ret: int = 0

   match from_type:
      ValueType.VT_STRING, ValueType.VT_MULTILINE_STRING:
         var strval: String = value
         if strval.is_valid_int():
            ret = strval.to_int()
         elif strval.is_valid_float():
            ret = int(strval.to_float())

      ValueType.VT_BOOL:
         var bval: bool = value
         if bval:
            ret = 1

      ValueType.VT_FLOAT:
         var fval: float = value
         ret = int(fval)

      ValueType.VT_DAMAGE_TYPE:
         var dt: DamageType = value
         ret = dt

   return ret
The same idea of the integer, but for floating point numbers. A separate function is used because there are a few differences in how things are done depending on the incoming value type.
func _convert_to_float(from_type: int, value: Variant) -> float:
   var ret: float = 0.0

   match from_type:
      ValueType.VT_STRING, ValueType.VT_MULTILINE_STRING:
         var strval: String = value
         if strval.is_valid_int():
            ret = float(strval.to_int())
         elif strval.is_valid_float():
            ret = strval.to_float()

      ValueType.VT_BOOL:
         var bval: bool = value
         if bval:
            ret = 1.0

      ValueType.VT_INT:
         var ival: int = value
         ret = float(ival)

   return ret
Converting to texture is rather simple. Internally we will store textures as paths to the image resources. Or in other words, strings. However there is absolutely no sense in converting a numeric value into a "path", so we can ignore several cases. That said, when the incoming value is of any string type, we must verify if it represents a valid path:
func _convert_to_texture(from_type: int, value: Variant) -> String:
   var ret: String = ""

   match from_type:
      ValueType.VT_STRING, ValueType.VT_MULTILINE_STRING:
         var strval: String = value
         if strval.is_absolute_path() || strval.is_relative_path():
            ret = strval

   return ret
We then have the multi-line string. Well, if we consider this as an "ordinary" string, then we can convert pretty much anything into it. Even though we could have reused the _convert_to_string(), we add a dedicated one just in case we decide to do something special with it. Also, I wanted to show a slightly different way to convert the values into string form:
func _convert_to_multil_string(from_type: int, value: Variant) -> String:
   var ret: String = ""

   match from_type:
      ValueType.VT_STRING, ValueType.VT_INT, ValueType.VT_FLOAT, ValueType.VT_TEXTURE:
         ret = value

      ValueType.VT_BOOL:
         var bval: bool = value;
         if bval:
            ret = "True"
         else:
            ret = "False"

      ValueType.VT_DAMAGE_TYPE:
         var dt: DamageType = value
         ret = _get_damage_type_string(dt)

   return ret
The final converter for this example is to output the DamageType. This function is slightly bigger than the others, however it's also the most self explanatory of the converters!
func _convert_to_damage_type(from_type: int, value: Variant) -> DamageType:
   var ret: DamageType = DamageType.DT_None

   match from_type:
      ValueType.VT_STRING, ValueType.VT_MULTILINE_STRING:
         var strval: String = value
         match strval:
            "Physical":
               ret = DamageType.DT_Physical
            "Fire":
               ret = DamageType.DT_Fire
            "Cold":
               ret = DamageType.DT_Cold
            "Lightning":
               ret = DamageType.DT_Lightning
            "Poison":
               ret = DamageType.DT_Poison
            "Arcane":
               ret = DamageType.DT_Arcane

      ValueType.VT_INT:
         var ival: int = value
         match ival:
            DamageType.DT_Physical:
               ret = DamageType.DT_Physical
            DamageType.DT_Fire:
               ret = DamageType.DT_Fire
            DamageType.DT_Cold:
               ret = DamageType.DT_Cold
            DamageType.DT_Lightning:
               ret = DamageType.DT_Lightning
            DamageType.DT_Poison:
               ret = DamageType.DT_Poison
            DamageType.DT_Arcane:
               ret = DamageType.DT_Arcane

   return ret
Ok, now that we have all those converters, we can actually work on the _change_column_value_type() function. Much of its requirements have been explained already. Nevertheless, the most notable thing in this function is the fact that I have used a Callable to call the correct converter function. Based on the new_type parameter, this callable is assigned to a proper function. Then, when iterating through the rows, this callable is used instead of having to check for the new_type every time. The function:
func _change_column_value_type(index: int, new_type: int) -> void:
   if index < 0 || index >= column_list.size():
      return

   var vt: ValueType = column_list[index]["type"]
   if vt == new_type:
      # "New type" matches current one. No need to do anything else so bail
      return

   # This will be called during the row iteration to perform the conversion. The actual function depends on the "new_type"
   var converter: Callable
   match new_type:
      ValueType.VT_STRING:
         converter = Callable(self, "_convert_to_string")
      ValueType.VT_BOOL:
         converter = Callable(self, "_convert_to_bool")
      ValueType.VT_INT:
         converter = Callable(self, "_convert_to_integer")
      ValueType.VT_FLOAT:
         converter = Callable(self, "_convert_to_float")
      ValueType.VT_TEXTURE:
         converter = Callable(self, "_convert_to_texture")
      ValueType.VT_MULTILINE_STRING:
         converter = Callable(self, "_convert_to_multil_string")
      ValueType.VT_DAMAGE_TYPE:
         converter = Callable(self, "_convert_to_damage_type")

   if !converter.is_valid():
      return

   column_list[index]["type"] = new_type

   var title: String = column_list[index]["title"]
   for row: Dictionary in row_list:
      var stored: Variant = row[title]
      var converted: Variant = converter.call(vt, stored)
      row[title] = converted

   notify_type_changed(index)
The next function is _move_column(). First we need to perform a few checks. The two indices must be different and within valid bounds. Then the task of moving the column data in the column array is rather easy. First we cache the data, remove from the array the insert again into the "new index". We could implement another method if the difference between the two indices is exactly 1. In this case we can basically "swap" the values instead of first removing something from the array. We wont do that in this example though. Once the operations are done we have to notify the TabularBox about the change:
func _move_column(from: int, to: int) -> void:
   if from == to:
      return

   if from < 0 || from >= column_list.size():
      return

   if to < 0 || to >= column_list.size():
      return

   var column: Dictionary = column_list[from]
   column_list.remove_at(from)

   @warning_ignore("return_value_discarded")
   column_list.insert(to, column)

   notify_column_moved(from, to)
_get_row_count() is extremely trivial! We simple return the size of the row_list array:
func _get_row_count() -> int:
   return row_list.size()
The _insert_row() must be able to deal with an empty incoming values dictionary. For that we already have a helper function to retrieve default values based on the value type. That said, the first task is to verify the desired index. If negative or above bounds then we set things so the row is appended into the row_list array. We then build the row data Dictionary by iterating existing columns and extracting the values from the incoming values parameter. Once the data is built we insert it into the array then notify the TabularBox about the change:
func _insert_row(values: Dictionary, index: int) -> void:
   if index < 0 || index > row_list.size():
      index = row_list.size()

   var ccount: int = column_list.size()
   var new_row: Dictionary

   for c: int in ccount:
      var title: String = column_list[c]["title"]

      var value: Variant = values.get(title)
      if !value:
         var type: ValueType = column_list[c].get("type", ValueType.VT_STRING)
         value = _get_default_value_for(type)

      new_row[title] = value

   @warning_ignore("return_value_discarded")
   row_list.insert(index, new_row)

   notify_new_row(index)
Removing a row (_remove_row()) is rather simple. Obviously we first have to ensure the incoming index is within bounds. Provided it is, we simply remove it from the array then notify the TabularBox about the change!
func _remove_row(index: int) -> void:
   if index < 0 || index >= row_list.size():
      return

   row_list.remove_at(index)
   notify_row_removed(index)
The _move_row() contains a few similarities to the _move_column(). First we have to make sure the incoming indices are different and both within bounds of the row_list array. Then we perform the task of temporarily storing the row data, removing from the "old index" then inserting again into the "new index". Of course, must not forget to notify the TabularBox about the change:
func _move_row(from: int, to: int) -> void:
   if from == to:
      return

   if from < 0 || from >= row_list.size():
      return

   if to < 0 || to >= row_list.size():
      return

   var row: Dictionary = row_list[from];
   row_list.remove_at(from)

   @warning_ignore("return_value_discarded")
   row_list.insert(to, row)

   notify_row_moved(from, to)
Next is the _get_value() function. First we have to make sure both column and row indices are within bounds. Then we retrieve the title of the column corresponding to the incoming index and retrieve the stored value in the row, using the retrieved column title:
func _get_value(column_index: int, row_index: int) -> Variant:
   if column_index < 0 || column_index >= column_list.size():
      return null

   if row_index < 0 || row_index >= row_list.size():
      return null

   var title: String = column_list[column_index]["title"]
   return row_list[row_index].get(title, "")
As for _set_value(), as usual we first verify if the column and row indices are valid. Provided it is, we retrieve the column title so the appropriate entry in the row data can be accessed, overwriting the existing value. Not forgetting to notify the TabularBox about the change:
func _set_value(column_index: int, row_index: int, value: Variant) -> void:
   if column_index < 0 || column_index >= column_list.size():
      return

   if row_index < 0 || row_index >= row_list.size():
      return

   var title: String = column_list[column_index]["title"]
   row_list[row_index][title] = value

   notify_value_changed(column_index, row_index, value)
Finally, the _get_row() function. This is another trivial function. First, ensure the incoming index is within bounds. And if so, return the stored data. But a duplicate of it. Thing is, dictionaries are given as "reference". Changing one "copy" of the dictionary will result in all of them also being changed. We don't want to accidentally change something that is stored because the returned data was changed outside:
func _get_row(index: int) -> Dictionary:
   assert(index >= 0 && index < row_list.size(), "Attempting to retrieve row data, but incoming index is not valid")

   return row_list[index].duplicate()
Custom Cells
At this point an instance of this custom data source can be created and assigned into the TabularBox. We can also interact and add, remove and change the data. However, if we attempt to change a column value type to DamageType, we will be greeted by a message telling that the specified class can't be instantiated. To prevent further errors the TabularBox will default the cell creation to TabularBoxCellString.
The error message is obvious. We didn't implement the custom cell, TabularBoxCellDropdown (refer to the type_to_class dictionary that we declared above). Implementing a custom cell requires less functions to be implemented than the data source!
While we could easily tailor this custom cell to deal exclusively with DamageType, we will implement this in a more generic way. Hence the name TabularBoxCellDropdown. The reason for that is reusability and showcase the extra_settings.
So, create a new script, inheriting from TabularBoxCell. Since there is a chance this control might be instanced when in editor, we will have to mark this script as a @tool one in order to ensure it will work and without error messages. And we also need the class_name. It should match the one we specified in the custom data source (or change the data source to the name used here). With that, the first lines are:
@tool
class_name TabularBoxCellDropdown
extends TabularBoxCell
We will use the OptionButton (find its documentation here ) to handle the drop down menu for us. This control fits perfectly the purpose since the button text is changed to the currently selected entry. This means very easy display and editing capabilities. That said, the button must be declared and instantiated. Then, in the _init() function we ensure it's added into the tree while also setting up its anchoring. I did attempt to set both anchor and offset at the same time, but for some reason the button does not respect the given values. If the anchors are set before then things work as expected. That said, the anchor value are meant to place the option button vertically in the center while fully using the horizontal space. Which results in this code:
var _optbutton: OptionButton = OptionButton.new()

func _init() -> void:
   add_child(_optbutton)

   _optbutton.set_anchor(SIDE_LEFT, 0)
   _optbutton.set_anchor(SIDE_TOP, 0.5)
   _optbutton.set_anchor(SIDE_RIGHT, 1)
   _optbutton.set_anchor(SIDE_BOTTOM, 0.5)
Now we can move to the virtual functions. The first to be done is _check_theme(). It will be called shortly after instantiating and it's meant to ensure the correct styling is applied into any internal control, if any. In our case we do have one, the _optbutton. We want to respect the cell margins. For that the TabularBoxCell provides four functions that return the relevant internal margins. Those are:
get_internal_margin_left()get_internal_margin_top()get_internal_margin_right()get_internal_margin_bottom()
I believe those self explanatory, right? If you refer to the list of functions provided by the TabularBox, you will probably notice that it also contains several functions that return the styles of buttons, background and so on. Yet, there is a handy function named apply_button_style() that can be used to style a button using those same theme entries. We will use that!
Once we apply the styling into the button, we set its offsets. The top offset should be minus half button height while the bottom one must be half button height. We can use the get_button_height() to obtain the height of a button that uses the styling set by apply_button_style().
Finally, in the function we call set_min_height() so the TabularBox can adjust the row height accordingly. In here we need the button height plus the top and bottom margins. The button height can be obtained by calling get_button_height().
All of that in code:
func _check_theme() -> void:
   var im_left: float = get_internal_margin_left()
   var im_top: float = get_internal_margin_top()
   var im_right: float = get_internal_margin_right()
   var im_bottom: float = get_internal_margin_bottom()

   apply_button_style(_optbutton)
   var btheight: float = get_button_height()
   var half_btheight: float = btheight * 0.5

   _optbutton.set_offset(SIDE_LEFT, im_left)
   _optbutton.set_offset(SIDE_TOP, -half_btheight)
   _optbutton.set_offset(SIDE_RIGHT, -im_right)
   _optbutton.set_offset(SIDE_BOTTOM, half_btheight)

   set_min_height(int(im_top + btheight + im_bottom))
The next function is _apply_extra_settings(). When a cell is created, the TabularBox takes the info retrieved from the data source (_get_column_info()) and relay the extra settings entry directly to the newly instantiated cell. Remember that we implemented that function to contain the list of options that we want in the drop down menu. More specifically, the incoming extra parameter should contain a single entry named damage_type, which is an array of dictionaries. Each inner dictionary contains type_id and name.
The task of the function here basically becomes:
- Retrieve the
damage_typesarray from the incoming dictionary parameter - Iterate through its entries. For each one add a new item to the
_optbutton. The label should be thenameand theidthetype_idkeys from each damage type.
Yes, that's it! This is the code:
func _apply_extra_settings(extra_settings: Dictionary) -> void:
   var type_array: Array = extra_settings.get("damage_type", Array())

   for type: Dictionary in type_array:
      var tpname: String = type["name"]
      var tpid: int = type["type_id"]

      _optbutton.add_item(tpname, tpid)
For the _assign_value() we want to take the incoming parameter and ensure the _optbutton holds the corresponding entry. The option button control allows us to specify which item we want to be selected through code by simply assigning the selected property. However it deals with indices while the incoming value parameter is the id of the item. So we first have to query the index of the item given its id, which can be done by calling get_item_index() in the option button. Tha said, the code looks like this:
func _assign_value(value: Variant) -> void:
   var id: int = value
   var index: int = _optbutton.get_item_index(id)

   _optbutton.selected = index
None of the other remaining TabularBoxCell virtual functions are required for our case. I will still comment a little bit about each one.
The _commit_changes() would be used to "forcefully" take any possibly pending change and apply it. The dropdown does not have this kind of "pending change". When an item is selected it's meant to immediately apply the new value. If we were dealing with an input box, such as LineEdit we would almost certainly need to implement this function. However the task would be somewhat simple. Indeed, all we would need to do is take the value from the input box and "notify a change". How this notification is done will be shown shortly.
Next function is _selected_changed(). This is called by the TabularBox whenever the "selected state" is changed in the relevant cell. A "selected cell" shows, by default, a white border to highlight it. The idea of this function is to ensure that any internal control receives input focus when the selected is true, while also removing any input focus when it's false. In our case we could easily request the _optbutton to grab focus. I somewhat decided to skip it, but please feel free to implement it!
We then have the _requires_file_dialog(). This function should return true if this cell might request the FileDialog to be shown. Since we don't need it we can ignore this function. Yet, supposing we wanted this feature, requesting the file dialog itself can be done through calling request_file_dialog(). This function requires three parameters. The first one is the title that will be assigned to the dialog. The second argument is the list of file filters. The last argument is a Callable, which will be the event handler when a file is selected.
The next two functions _setup_shared() and _share_with() are meant to "work together". This feature allow cells in a column to share common data. To better explain this, I will use an example that I have implemented in the Database plugin. In that case I have added support for database tables to reference values in a different table. However to make the selection of the other table easier I wanted to show a drop down menu containing all the values of the other table. Because of the potential somewhat high amount of rows, I decided to create a separate PopupMenu containing the entries and share it with all the cells.
In that case, when the _setup_shared() is called, the cell creates and populates the PopupMenu then attaches it into the incoming control, which is given as parameter. Then when the _share_with() is called, the created PopupMenu is provided to the incoming cell parameter through a special internal function meant to assign that into its own popup menu variable.
To make things work properly, each cell still contains its own button meant to request the popup menu to be displayed. The only difference is that the popup menu instance is shared among all cells of that column. We could have done something like that in this example, but I decided to go into a simpler approach.
All that said, if we test things now we can indeed create columns of DamageType value type. The drop downs will be shown and we will be able to interact with. However there are two things that must be worked on:
- Changing the value through the drop down menu will not relay the change to the data source. Thing is, we didn't add an event handler to the drop down! We have to do that!
- You may have noticed that interacting with the drop down menu does not change cell selection. Indeed, the
_optbutton"eats" the mouse interaction. - As mentioned, the data source has a filtering system. However if we attempt to provide a damage type string into the filter, it wont work as expected.
Solving (1) means that we need an event handler to the item_selected of the _optbutton. This signal provides the index of the selected item. We must notify that the value has been changed, but provide the id. We can easily convert the index to id by calling _optbutton.get_item_id(). So, here is the event handler:
func _on_item_selected(index: int) -> void:
   var id: int = _optbutton.get_item_id(index)
   notify_value_changed(id)
We still need to connect this function to the event. We will do shortly as in the same code update we can also solve (2). Dealing with that "selection issue" can be done in two different ways. One is that we can connect a function to the pressed event of the button and in it request the TabularBox to select the cell. This request is done by calling notify_selected() function. The other and simpler way is to change the mouse filter of the _optbutton, setting it to pass. That said, we update the _init() function to both connect to the item_selected and change the mouse filter:
func _init() -> void:
   add_child(_optbutton)
   _optbutton.mouse_filter = Control.MOUSE_FILTER_PASS

   _optbutton.set_anchor(SIDE_LEFT, 0)
   _optbutton.set_anchor(SIDE_TOP, 0.5)
   _optbutton.set_anchor(SIDE_RIGHT, 1)
   _optbutton.set_anchor(SIDE_BOTTOM, 0.5)

   @warning_ignore("return_value_discarded")
   _optbutton.connect("item_selected", Callable(self, "_on_item_selected"))
Issue (3) occurs because damage types are stored as numbers. When the filter is processed, it will compare the keyword to the number, which obviously will not match and hide the line. We can somewhat fix that, though. Basically, the filter system retrieves all rows by calling the _get_row() function of the data source. In the returned dictionary we can replace the damage type ID with its corresponding string. However it's important we only perform this replacement if filtering is occurring, otherwise the tabular box might behave incorrectly. We can call is_filtering() in the data source to query if the filter system is currently being processed. With that in mind we can update the data source:
func _get_row(index: int) -> Dictionary:
   assert(index >= 0 && index < row_list.size(), "Attempting to retrieve row data, but incoming index is not valid")

   var ret: Dictionary = row_list[index].duplicate()
   if (is_filtering()):
      for cinfo: Dictionary in column_list:
         if (cinfo["type"] == ValueType.VT_DAMAGE_TYPE):
            var cname: String = cinfo["title"]

            var dt: DamageType = ret[cname]
            ret[cname] = _get_damage_type_string(dt)

   return ret
It's possible to improve this piece of code by caching the names of columns that are of damage type values, which would prevent having to iterate through all columns.
And now all three issues have been fixed. Both the custom data source and custom cell are implemented and working as expected.
Other
The table bellow lists all available theming options for the TabularBox widget. Remember, overriding any of those is easily done through the Inspector. Creating a Theme resource to customize these elements require manually adding the desired entries within the theme editor. Please refer to the introduction for more information on how to customize the widgets using a Theme resource.
| Style Name | Type | What |
|---|---|---|
background | StyleBox | Determines the style that will be used to draw the background of the entire TabularBox |
header | StyleBox | The background of each column header |
row_number | StyleBox | The "cells" used to drawn row numbers and checkboxes |
odd_row | StyleBox | Background of odd rows |
even_row | StyleBox | Background of even rows |
focus | StyleBox | Style used to highlight selected cells |
h_scrollbar | StyleBox | Directly assigned into the scroll style of the horizontal scroll bar |
v_scrollbar | StyleBox | Directly assigned into the scroll style of the vertical scroll bar |
scrollbar_grabber | StyleBox | Directly assigned into the grabber style both scroll bars |
scrollbar_highlight | StyleBox | Directly assigned into the grabber_highlight style of both scroll bars |
scrollbar_grabber_pressed | StyleBox | Directly assigned into the grabber_pressed style of both scroll bars |
button_normal | StyleBox | Possibly assigned into the normal style of buttons |
button_pressed | StyleBox | Possibly assigned into the pressed style of buttons |
button_hover | StyleBox | Possibly assigned into the hover style of buttons |
checked | Icon | Used as "checked state" in checkboxes |
unchecked | Icon | Used as "unchecked state" in checkboxes |
left_arrow | Icon | Assigned to the button meant to move a column to the left |
right_arrow | Icon | Assigned to the button meant to move a column to the right |
down_arrow | Icon | Assigned to the drop down menu related to "row selection" |
trash_bin | Icon | Out of the box assigned to the button meant to clear value in a texture cell |
no_texture | Icon | Out of the box used in texture cells when no texture is assigned into it |
header_font | Font | Font assigned to column headers |
cell_font | Font | Font assigned to cells |
header_text | Color | Font color of the column headers |
header_selected | Color | Font color used when header title is selected |
header_selection | Color | Color of the highlight shown when header title is selected |
cell_text | Color | Font color assigned to cells |
cell_selected | Color | Font color assigned to cells when text is selected |
cell_selection | Color | Color of the highlight shown when cell text is selected |
caret | Color | Color of the caret assigned into all text input boxes |
header_font_size | Integer (font size) | Font size assigned to column headers |
cell_font_size | Integer (font size) | Font size assigned to cells |
separation | Integer (constant) | Internal spacing used within cells. As an example, space between move buttons and column title input. Some cells use this to separate internal controls |
