AutoInterpolate August 15, 2024
The work in this plugin is largely based on Lawnjelly's Smoothing addon . The main goal here is to help keep fixed physics updates while achieving smoother animations through interpolation. The key differences added by this plugin are:
- Each part of the transform (translation, orientation and scale) can be independently set to either fully interpolate, don't interpolate or be completely ignored.
- There is one Node that can be used for both 2D and 3D, depending on the target node, which can be chosen. This node will optionally interpolate its children and also a list that can be assigned within the editor.
- All 3 nodes provided here will use global transform which ensures correct behavior regardless of the hierarchy.
Why
This plugins allows for much smoother animations, specially when dealing with monitors with faster refresh rates than the physics updates per second. It's also one of the ways to keep things running in a networked multiplayer game while the client is waiting for new server state.
We already know that physics simulations must run at fixed time steps. The frequency itself may change from project to project, but once the game is running it should remain the same. Generally speaking, if the entire visual representation of the game is directly tied to its actual physics state problems may arise when the update frequency is lower than that of the refresh rate of the screen. The animation will be noticeable choppy.
One of the proposed solutions that "pop around" often is to dynamically change the physics frequency and keep it the same as the refresh rate of the screen where the game is running. This is not an ideal solution because it will lead to the game behaving differently depending on the update frequency. Basically, this falls back into the original problem of not having a fixed physics time step. It also brings another problem, which is the fact that generally speaking, input is gathered at the physics update. If the physics is running faster because of the screen, players with those conditions will have more input data gathered and processed than others, which obviously is not exactly fair.
Enter interpolation. The basic idea is to use it to only change the visual representation of the game at screen refresh rate (or as fast as possible), while the physics state remains updated only at the designed fixed physics frequency. The basic idea, problem discussion and solution are described by Glenn Fiedler in his Fix Your Timestep! article.
Usage
The first thing to keep in mind is that there is one option in the project that must be disabled. To be more specific, the Physics Jitter Fix. To disable it, this value must be set to 0.0, from the default 0.5. To do that:
- Open
Project Settingswindow and make sure theAdvanced Settingsis turned on - Then navigate to the
Physics -> Commoncategory - In there you should find the
Physics Jitter Fix. Set it to0.0then close the window and save the project.
Interestingly there isn't much that is needed to use this plugin! Normally speaking you just attach one Smooth* node between the physical object and the visual representation of that object.
Two very common node hierarchies for game objects are depicted bellow (note that it doesn't matter if 2D or 3D):
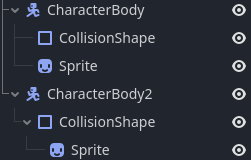
To obtain the smoothed (interpolated) visual representation those two hierarchies would then become like this (again, it doesn't matter if 2D or 3D):
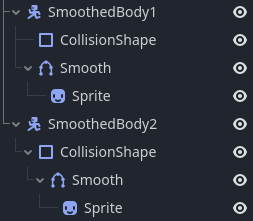
With this the physical object can remain tied to the physics tick while the visual representation of the object becomes "automatically" interpolated. Indeed the visual representation will have a small delay when compared to the actual physical state. Some people may think this is unacceptable, however think about this. The amount of delay here is really small. Normally a fraction of a single physics tick. If you configure the game to run at only 30 physics updates per second, then the interpolation will result in a delay of at most 33.33 milliseconds. However, because the objects are moving between the physics ticks (ideally tied to the screen's refresh rater - IE.: VSync enabled), there won't be a sense of delay.
With the hierarchy shown in the previous screenshot, the Smooth* node will target its direct parent. Yet this can be changed. When you select the interpolator node, you can see a target property in the Inspector. Clicking it will bring a window that allows you to select any other node in the hierarchy. This brings a lot of flexibility regarding the organization of the nodes.
There are another three properties that are shown in the Inspector. Those allow to enable, disable or ignore interpolation of each component of the transform. By default it will be setup like this:
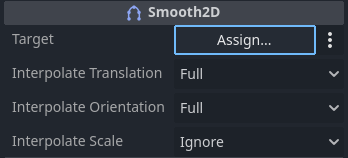
Each of the properties will provide the exact same list of options (shown in the screenshot bellow). That is, you can select Snap, Full or Ignore individually for each part of the transform.
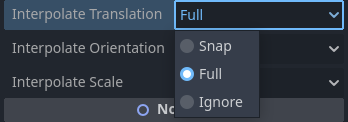
To better explain what each of these options do:
Snap: When this is selected, that part of the transform will not be interpolated, yet it will still follow that of the target node.Full: Interpolation will occur normally.Ignore: That part of the transform will be completely ignored, meaning that the specific component of the transform can be set independently of the target.
In the default setting you can scale the target node (physical body) but the interpolated one (visual node) will not be changed at all. This kind of granularity can be very useful depending on the use case.
Both the Smooth2D and Smooth3D provide the same options. Also, both have two functions. Let's see each one of them.
First is the snap_to_target(). When this function is called, the interpolated nodes (the children of Smooth*) will be directly "moved" to the target. Well, this call will still somewhat respect the individual transform settings of Snap, Full and Ignore. Namely, if the component is set to Ignore then that wont be changed at all.
Then there is the teleport_to(). This function receives a transform as sole argument. Obviously it must match Transform2D in Smooth2D and Transform3D in the Smooth3D node. That said, this behaves similarly to the snap_to_target() however allowing an arbitrary transform to be given.
AutoInterpolate
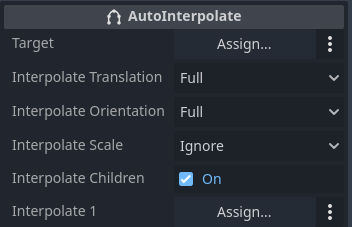
There is a third node in this plugin, named AutoInterpolate. If you take a closer look into it you might notice that it isn't a Node2D nor a Node3D. This is because this node will automatically switch "modes". If its target is a 2D node, then it will interpolate 2D transforms. There are another two properties besides those that can be found in Smooth2D and Smooth3D.
The interpolate_children property allows direct children of the AutoInterpolate node to be interpolated. If this property is disabled then children will be ignored.
But note the Interpolate 1 property. It allows an arbitrary node to be assigned and be interpolated by the AutoInterpolate. When that occurs, another property will be added allowing selection of another node to be interpolated. In other words, it's possible to create a list of arbitrary nodes in the hierarchy to be affected by AutoInterpolate.
Besides all that, the AutoInterpolate behaves exactly like Smooth2D and Smooth3D nodes!

