Radial ImpulseJanuary 3, 2024
This addon provides two new nodes, RadialImpulse2D and RadialImpulse3D. Both of them will apply an impulse to each RigidBody that is within radius, away from the RadialImpulse's center.
One possible use case of this is to attach the RadialImpulse node into a projectile node. When the projectile impacts something then we can request the node to apply the impulse into the rigid bodies within radius. This would indeed result in something resembling an explosive effect.
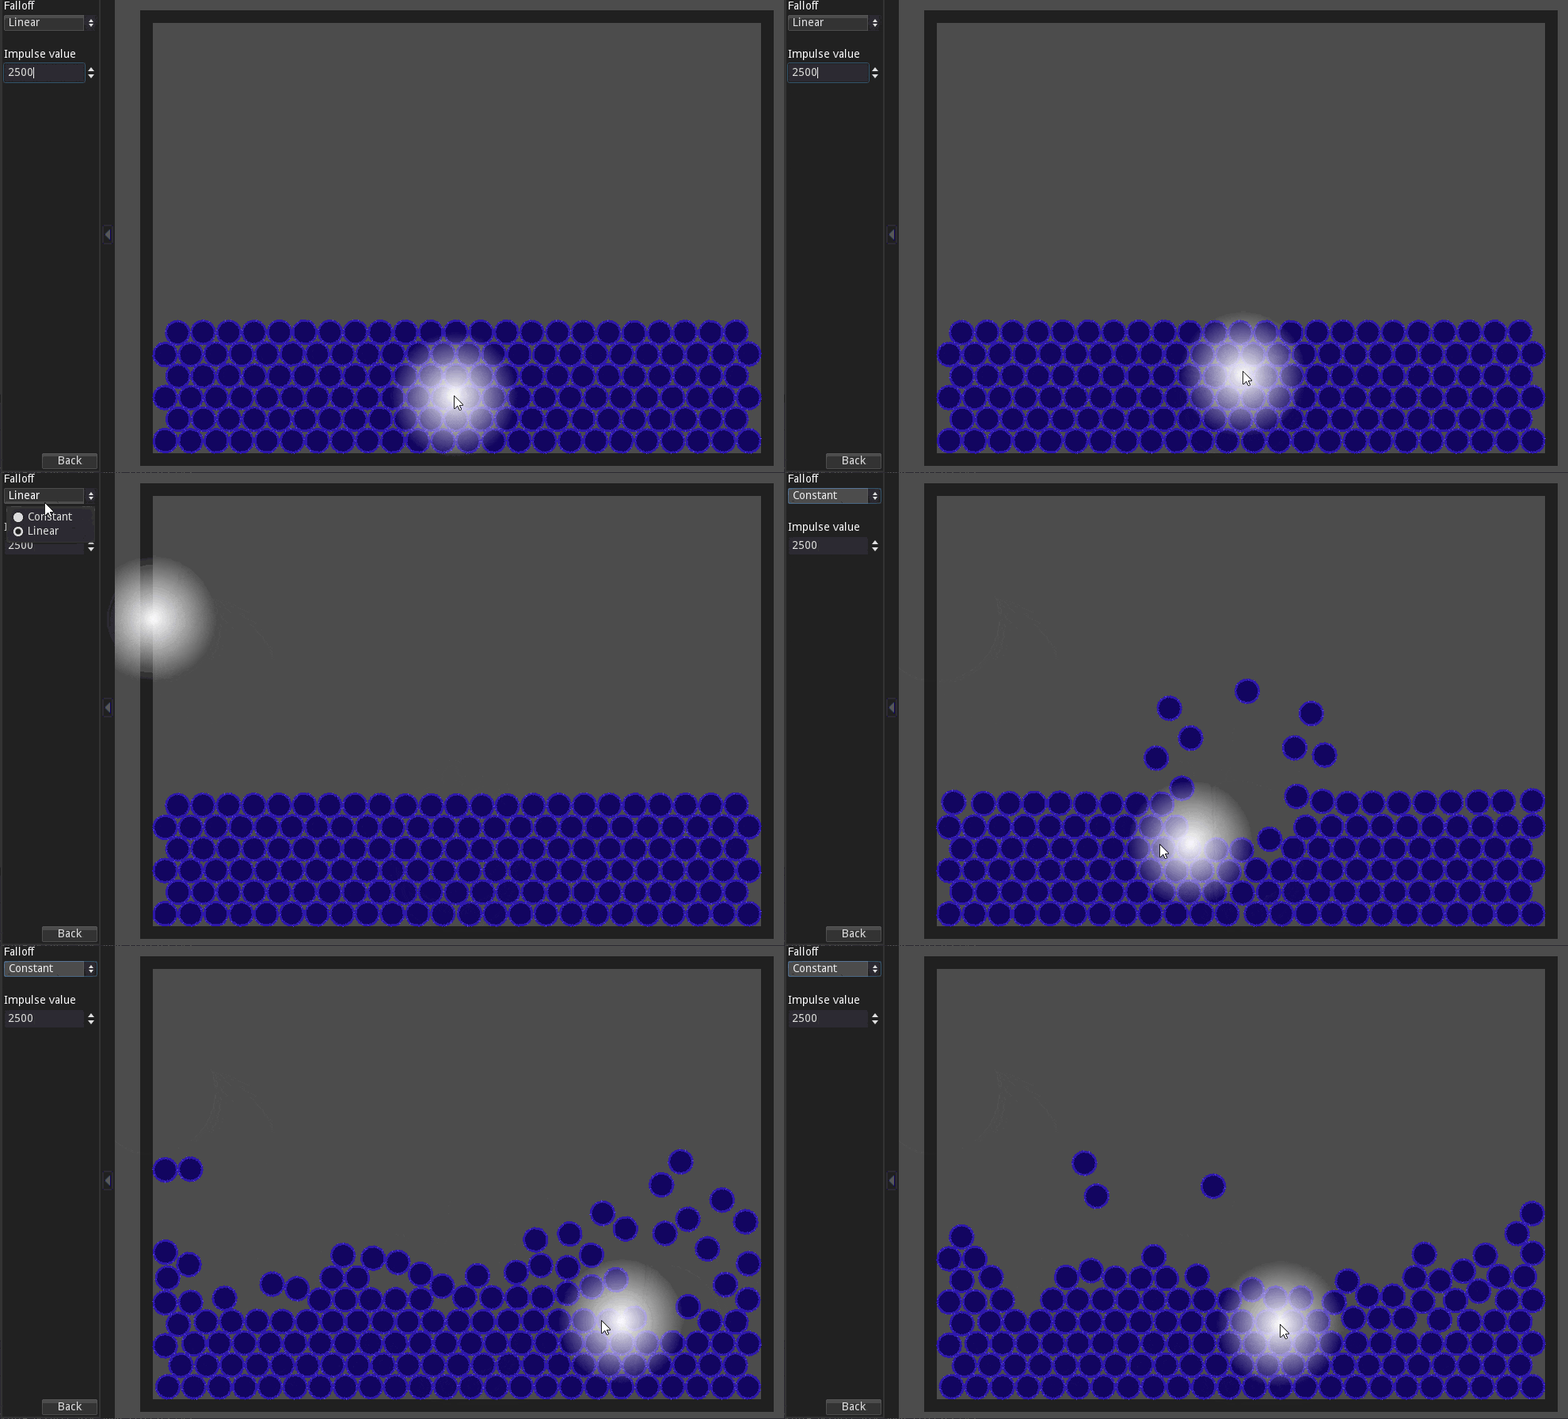
The animation bellow showcases the RadialImpulse2D in action. Within it there is one visual "hint" that showcases the moment a mouse click occurs. That is the moment the impulse is applied within the area.

RadialImpulse2D Example
The basic usage of this addon is like this:
- Attach the relevant (2D or 3D)
RadialImpulsenode into the scene. - Setup its properties like radius, impulse value (which appears as Force in the Inspector), falloff and physical layers.
- Call the node's
apply_impulse()function whenever it's required that it applies the impulse into the rigid bodies in radius.
That's it!
Ok, for some more explanation. Note that the apply_impulse() function does not receive any parameter. Indeed, it uses the values set within the node's properties.
I believe the radius and force properties are pretty self explanatory. The falloff might need some explanation. It offers two modes that will determine the actual impulse value applied to the nodes.
- In the
CONSTANTthe "force" will be the exact same regardless of distance from the center of theRadialImpulsenode. - In the
LINEARmode the "force" will linearly decrease as the distance from theRadialImpulse's center increases, until it becomes 0 atradiusdistance.
Limitations
There are two limitations that must be mentioned here.
The first I want to discuss will be depicted by a 2D drawing, however it applies to both 2D and 3D. The limitation in question relates to a specific situation that will either result in the RadialImpulse either applying the impulse inaccurately or completely missing the rigid body that is indeed within radius. In the How it Works there is some explanation as to why this happens. In here I want to showcase the situation and the result.
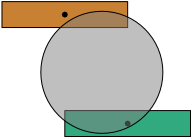
That said, consider the image bellow. The circle represents the RadialImpulse and its acting area (controlled by the radius). The two rectangles represents two rigid bodies. Each rectangle has its "center of mass" depicted by a dot.

In a situation like this, it's expected that both rectangles would start to spin after having the impulse applied to them. However that's not what happens. The important aspect here is that the impulse will always be applied into the "center of mass" of the detected rigid body.
But there is another thing. If the FallOff mode is set to Linear then the rectangle above will not receive any force. Notice that the rectangle in question has its "center" outside of the radius. The rectangle bellow will get the impulse applied to it since its center is inside the affecting circle.
The second limitation is related to the node lifetime. Notice at the top of this page that I have mentioned one possible use case for the RadialImpulse, which is to attach it into a projectile then call the apply_impulse() when there is an impact. However there is one aspect here that the projectile will probably be destroyed as soon as it impacts something, also destroying the RadialImpulse.
This situation might result in the impulse not being applied at all. What happens is that this node internally needs to sort of "wait" until the physics is properly updated otherwise it will not correctly detect the rigid bodies. Depending on the situation even a call_deferred() might not help with the projectile destruction.
All is not lost, however. The RadialImpulse has a signal called impulse_applied. It will be emitted once it's done applying the impulse into the rigid bodies. In the projectile script listen to the impulse_applied event and in its handling function destroy the projectile. Within the impact, instead of destroying the projectile, hide its visual representation (mesh, sprite...).
Both nodes (2D and 3D) work in the exact same way. The first thing is that internally there is an "area" node. Its purpose is exactly to detect which bodies are within the radius. Whenever the area's body_entered signal is given, the RadialImpulse caches the incoming node if it's a rigid body. Likewise, when the body_exited signal is given, that body is removed from the internal cache (which is simply an array).
When the apply_impulse() function is called the node simply enables the physics_process. The impulses must be applied within the physics update otherwise it might deal with outdated data within the internal cached array.
Now note that both process and physics_process are disabled by default. The physics_process will run a single time when the apply_impulse() is called, but then it's disabled again. Nevertheless, within the _physics_process() function, all cached bodies are iterated through. A vector is created, from the RadialImpulse into the currently iterated body's center. This vector's length is used to determine the actual impulse value in case the falloff method is set to linear. That is the reason why some rigid bodies might not get any impulse applied to (as explained in the Limitations topic in the How to Use tab). The vector is then normalized to determine the direction of the impulse.
The biggest limitation here is that the impulses are always applied into the center of the rigid bodies. Indeed this results in some non realistic simulations. Yet this is rather easy and probably the most efficient way. Perhaps a proper calculation might be set as a "TODO", provided it doesn't become too expensive to be done.
In order to allow easy configuration of the physical layers that will be used, the relevant properties fo the areas are somewhat indirectly exposed. Take a look at the _get_property_list(), _get() and _set() functions. In there both layer and mask are exposed, but then are directly set/get into/from the internal area node.
Happy forging!