Part 21 - Third PolishingApril 11, 2019
While the game is currently fully playable, with two different game modes, difficulty settings that are specific to the selected mode, three different themes and a widget system allowing us to select between all those options, there are still a few things that we can do to the UI. Namely, we have to improve the readability of the text, which already wasn't great, but got worse and noticeable when switching between the different background images. There are also some widgets that we kept with the default styling. While they work, they seem a bit off, specially when close to the styled buttons.
As well as those visual changes, we will also add some more save/loading functionality, more specifically the last selected game mode. We will also finally work with the UI_HighScore widget. And, at the end of this part, make that Settings button work on the pause menu.
Text Readability
In the previous part we had a similar problem, related to the visibility of the block image within the theme selector. We improved that by wrapping the grid panel with a border widget, setting this border to be black with some transparency. We will indeed use the border widget, but only to control a new texture image that will be used to give us some borders around the wrapped area. Later on, of course, we will use the same technique to wrap the block images within the theme selector widget. That said, I have created a 512x512 texture, as shown bellow:

Once the .tga image is imported into the project, some of its settings have to be changed, much like we have done with the button textures. As a recap, the Compression Settings must be set to UserInterface2D (RGBA), Mip Gen Settings to NoMipmaps and the Texture Group to UI. The intended use, again, is to be drawn as a box. As mentioned early in the tutorial, we will need to create a material otherwise some of the settings will not work as intended. That said, create a new material asset named M_BorderWrapper. Once the material editor is open, change Material Domain to User Interface and then Blend Mode to Translucent. This is a really simple material and all that is needed is a texture sample node, pointing to the texture shown and connecting to the output:

Ok, now we can start editing the widgets. Let's begin by changing the UI_MainMenu. In the hierarchy tab, right click the text block (the one with the title of the game) and then Wrap With -> Border. A white border will be placed, hiding the text since it's also white. Within the Brush property of the border, change the Image to the M_BorderWrapper material that we just created. Then Image Size to 256x256, Draw As to Box and Margin to 0.15. With the text selected, set the top and bottom padding to 16, while left and right are kept at 0.
Now wrap the size box holding the main page buttons and setup the border much like the previous one. Because it will use some of the settings that were set in the size box, the horizontal alignment will be Center and this will result in a box border with smaller width than the title. To fix that first change the mentioned alignment to Fill and then set the padding (not content padding) to 32. Lastly, select the size box itself and change its horizontal alignment to center.
Now wrap the sizer box with a border and then setup it much like the previous border. In this new border set the padding (not the content padding) to 32. This is how it should look like:

Again, the ideal is an image to replace the title text. Anyway, the border is serving its purpose of making the background a bit darker, thus increasing the readability of the text.
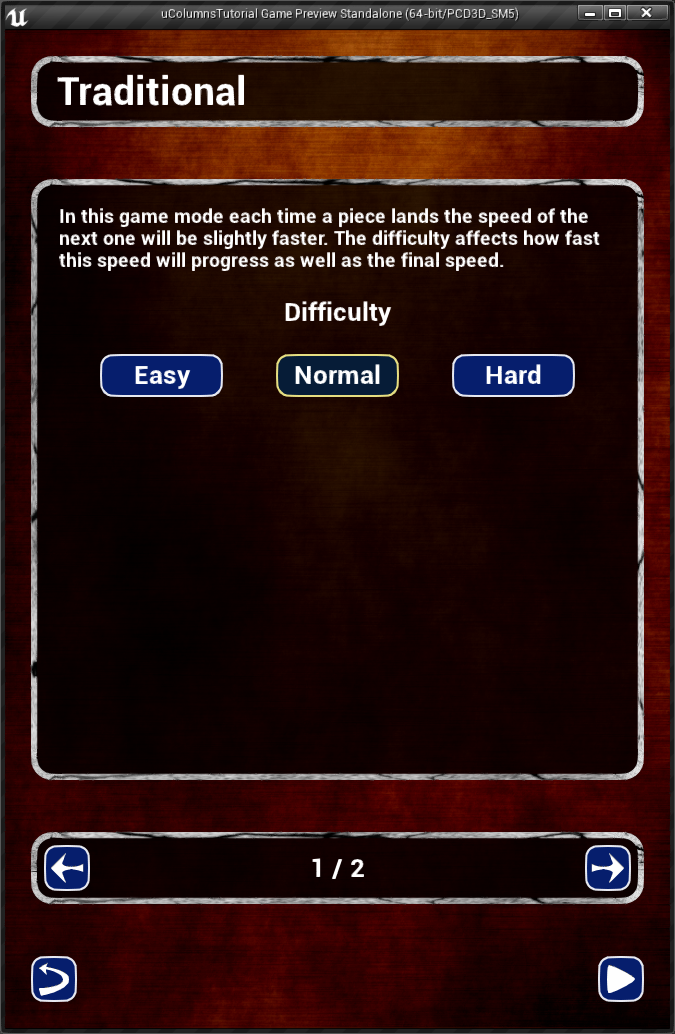
Ok, now let's edit the UI_ModeSelector. We can somewhat think about separating this helper widget in three different sections, one for the title of the game mode, another for the description plus the difficulty settings and then the last one containing the buttons and the mode counting. First we surround the title using the exact same steps we have done with the game title, only this time the title's padding should be set to 16 on all directions. Then wrap the mode switcher widget with a border, setting it up just like the other borders. Make sure both the border and the mode switcher have the padding set to 32. Then, wrap the entire horizontal box with a border. Select the horizontal box and set its padding to 16. The result, with a different theme:
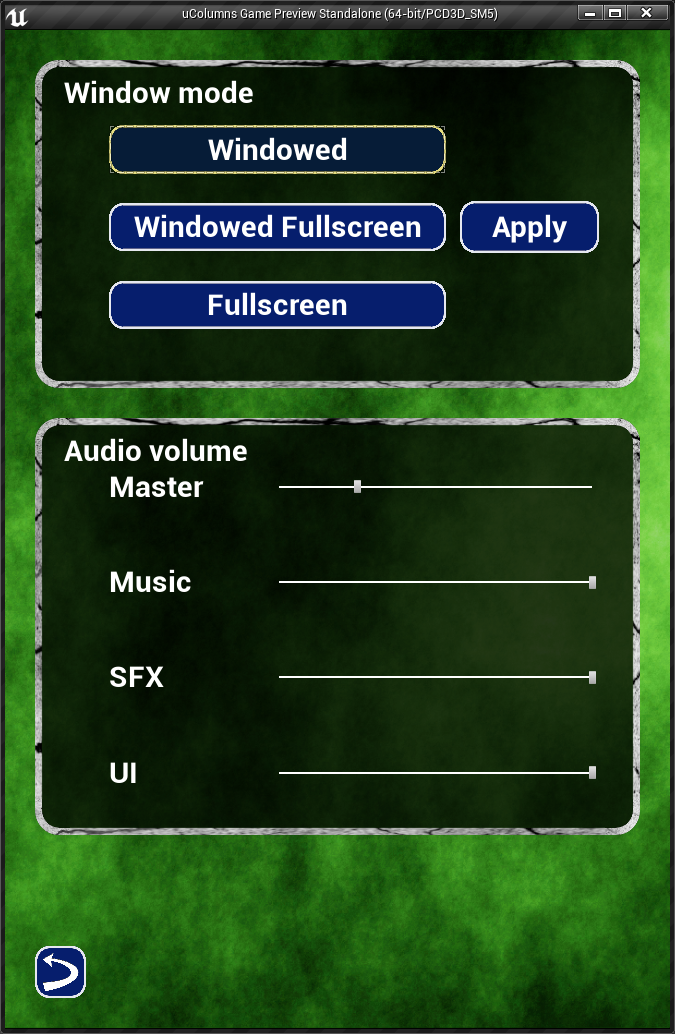
Next we work with the UI_Settings widget. We will use two borders to separate in two distinct sections, the video mode and the audio volume. Because the border widget can only accept one child widget, we will have a little bit of extra work here. First add one border. To make things easier, place it before the Window mode text widget. Then add one vertical box into this border. Drag, using the hierarchy tab, the text widget and the horizontal box holding the toggle buttons into the inner vertical box. Copy the border brush from the others we already created. Select the inner vertical box and set its padding to 16. Then select the text and set its left padding to 16.
Then add a new border, between the video mode's one and the Audio volume text, and add one vertical box inside of it. Drag the text and all of the horizontal boxes holding the sliders into this new inner box. Setup the border much like the others (copy the brush, Padding = 32 but Top Padding = 0). Select the inner vertical box and set its padding to 16. Then, the text should have its left padding set to 16, to match the Window mode. The result, with yet another theme:
Don't worry, we will deal with the sliders shortly in this part. First, let's apply this border wrapping to the theme selector, UI_ThemeSelector. First we do the same thing of wrapping the title text with a border (and applying the brush and setting the text padding to 16). The next "row" is already wrapped around a border. Just apply the brush settings into it, while resetting the brush color to fully white. Finally, the last "row", the horizontal box should be wrapped around yet another border. The box itself should have its padding set to 16, to match the settings that were done within the mode selector widget. Testing now, the block images became way too small inside that border. The first thing we do is select the grid panel and set the slot padding to 48. Then, open the Check Block Images function and locate the node where we create the block image widget. In this node we have hard coded the size to 64. Change it to 96 and then, the result should look like this:

More Styling
Now that we have fixed the readability of the text (and some other details) within the widgets, we can finish styling the widgets we have so far. More specifically, we have to deal with the sliders that control the audio volume. And then, we can deal with the progress bar in the UICH_ExtraTraditional, which indicates the speed progress of the traditional game mode.
Let's begin with the sliders. First open the UIC_Slider so we can change the internal stlNormal and stlSelected. Remember to set both of them to be Transient so Unreal Engine doesn't serialize their values within instanced objects. To style the slider we have to change the bar, Normal Bar Image and the little handle, Normal Thumb Image, while we can ignore the disabled because we won't use this state. Nevertheless, I have created 3 16x16 images, two for the bar (normal and selected) and another for the thumb:
Yes, they are tiny! Nevertheless, once the .tga images get imported into the project, the usual Compression Settings = UserInterface2D (RGBA), Mip Gen Settings = NoMipmaps and Texture Group = UI. Since we are not doing anything advanced with those images, we don't need any material so just apply these textures to the corresponding properties in the variables (again, UIC_Slider). After that, change the Bar Thickness property to 6 so the rendering displays the middle of the bar. The result looks like this:

It's now time to style the progress bar in the UICH_ExtraTraditional widget. The styling is this case will be relatively simple as all we will do is change the color and increase the thickness a little bit. In order to do that, within the progress bar's Style property, expand the Marquee Image and change the Image Size from 20x12 to 20x16. Now, for the color, we change the Fill Color and Opacity property that is under the Appearance category. Notice the fact that we can bind a function or value to this property. This is interesting because we can change the color as the progress reaches its end. That said, create a new function binding, naming it GetProgressBarFillColor. In the graph we use one Make Color node to directly connect into the output of the function. We hard code the G = 0.013, B = 0.15 and A = 1.0. We will increase the red (R) as the progress reaches the end. For that, we get the current progress value and directly plug into the red component:

As an alternative to calculating the color like this, it's possible to create a color curve and retrieve an interpolated value from it based on the progress bar percent value.
Remember Game Mode
When we click the Play button from the main menu we are taken into the mode selection sub-menu. In this sub-menu the difficulty selection is remembered every time we relaunch the game. Why not do the same for the actual game mode? The logic behind this is very similar to what we have done with the theme selection. That said, open the BP_SaveData asset and add a new integer variable to it and name it GameModeIndex. Next, in the BP_GameInstance we create the custom event function meant to save to this index:

When the menu is constructed we will need to retrieve this value, so add a new function to the game instance blueprint, named GetSavedGameModeIndex. The graph is straightforward as all we have to do is use the save object and get the GameModeIndex from it, plugging it into the output. Remember to set this function to Pure as we are not changing anything and this will result in a node without execution pins:

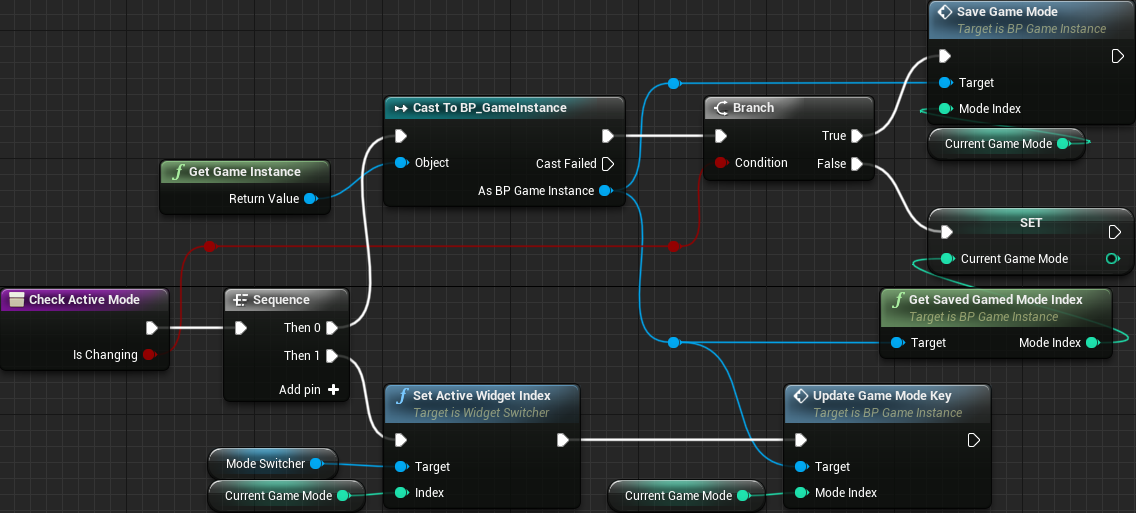
We can now edit the UI_ModeSelector widget so it uses our saving system. The first thing we will do is create a function that will check a boolean input flag, IsChanging, and if it's true we save the index into the file, otherwise we load from the file. After that we change the active widget in the ModeSwitcher:
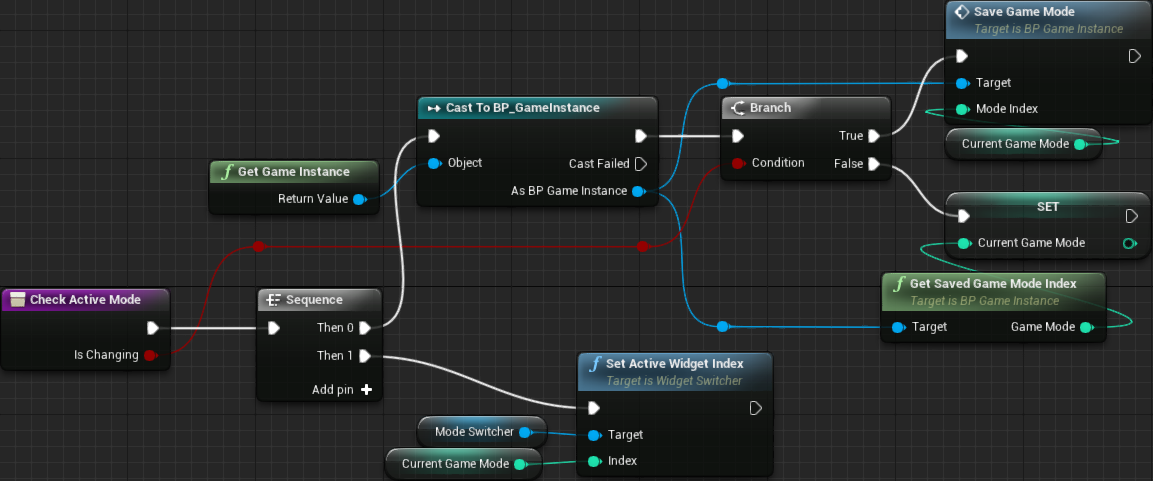
Now, from the event construct, right after the for loop is completed we have to call this function, with the IsChanging set to false. With this, we are loading the value from the save file and applying it to the active widget. In the image bellow I'm showing only the relevant part, not the entire graph:

The last thing is to replace the set active widget section of the On Clicked event handlers of the arrow buttons. In their place we call the Check Active Mode function, with the Is Changing set to true, which, in effect, will save the new mode index to the file:

High Score
If desired we could think about saving multiple high scores per game mode, storing a fixed amount and then sorting through those values whenever the game is over. For simplicity sake we will only work with a single high score per game mode. Again we will take advantage of the saving system we already have in order to store the high scores. Granted this is not the safest solution against hacking but then, this is not the point of this tutorial not to mention the question: what is really safe against hacking? The high score will be displayed as part of the HUD and we have already planned its place, even created an empty widget, UI_HighScore. We won't deal with the player name associated with score. If you want to, the easiest is to request the name before the start of the game. Still, if you want that to be entered after the game ends, then a new widget must be created and it should be displayed on top of all the others and, as mentioned, I won't go into details about this.
Now that all of the requirements and goals have been described, let's see how exactly we will store the high scores. The thing is, we have two game modes, meaning that we would need at least two variables. But, each game mode has multiple difficulty settings and it would not be fair to directly compare the high score obtained in the easy setting against the hard difficulty. And then, what if we add a new game mode? And what if this new game mode does not have any difficulty setting? Or we decide to tweak the difficulty settings and get a different number of options? Surely we could easily edit the save game asset and perform the necessary changes every time we add/remove something to/from the game. But, what if we can come up with a system do deal with that for us? Let's see the possibilities!
We can store an array of game modes that, in turn, will store collections of high scores. The problem here is how to properly identify each entry in the array, namely if it does indeed correspond to the correct game mode. If we strictly deal with indexing values, we have a very weak association and problems will arise if we accidentally change the order of the game modes in the mode collection asset. An stronger association can be achieved by using the map container, but then there is this information, quoted from the liked page:
Currently, Map values are immutable, which means that they cannot be modified after they have been created.
This is not very useful if we desired to use map containers to store the high scores, simply because we want to update them. So, what can we do? Luckily this information is relevant only for blueprints. From C++ we are able to change the values stored within the maps. This means we can create a function in the blueprint library meant to perform this change. We will do that shortly but before that we have to define the overall structure. We want to use the map container to map from some key, the game mode name as string, to a collection of high scores. Each game mode will have associated with it a different number of high scores which, in turn, each score will be associated with the different difficulty settings. This means we need a map of string to some container. Again, if we use an array we will have problems to associate them with the corresponding difficulty (or whatever forces the creation of multiple high scores) settings. So, we will have a map of a map of integer values. Hopefully the following image helps understand the overall structure:
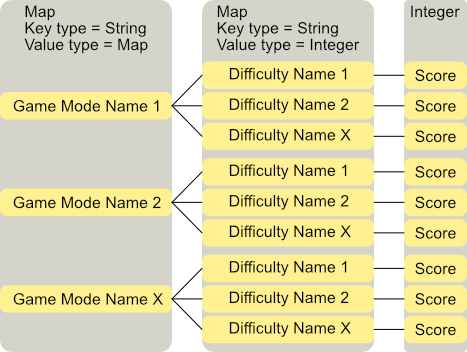
It should be clear by now that we can store any number of game modes and, within each one, any number of difficulty levels. Associated with each difficulty a single integer value representing the score.
The problem here is that we can't access maps of maps within blueprints. Because of that, we can't create a map of map variable inside the BP_SaveData. Still, through some hac... err... clever usage of technology we indirectly have this kind of mapping. Basically, we create an struct with a single property, a map from string to integers. The map held by this struct is the container of high scores. Then, the "outermost" container will be a map from string to this struct. That said, let's create the struct in C++:
USTRUCT(BlueprintType)
struct FHighScoreContainer
{
   GENERATED_USTRUCT_BODY()
public:
   UPROPERTY(BlueprintReadOnly)
   TMap<FString, int32> ScoreCollection;
};
We can now work on the code to modify the contents of the ScoreCollection map from blueprint. Because we are dealing with a map of FString to FHighScoreContainer, we have to include the helpers.h in the ColBPLibrary.h file otherwise we will get compile errors when we declare the function.
#include "Kismet/BlueprintFunctionLibrary.h"
#include "helpers.h"
#include "ColBPLibrary.generated.h"
The function will take the container itself as a reference, the game mode name, score name and the new score value. By default, non const reference values are turned into output values in the blueprint nodes. In this case we want the container to be an input so we have to use UPARAM(ref) meta modification so the building system interprets that reference as input rather than output. The declaration:
// Update the high score specified by MainContainer -> ModeName -> ScoreName with the value set in the NewScore
// If the entry ScoreName does not exist it will be created, however if ModeName does not the function will silently
// do nothing to any container.
UFUNCTION(BlueprintCallable, Category = "Score")
static void UpdateHighScore(UPARAM(ref) TMap<FString, FHighScoreContainer>& MainContainer, const FString& ModeName, const FString& ScoreName, int32 NewScore);
As mentioned through the comment in the code, we will create an entry within the ScoreCollection map if it does not exist. This will make things a lot easier to deal with when we come to initialize the containers within the save file. We use the Add() function for this task. Since we are dealing with TMap, the keys are unique and if it already exists the value will be overwritten.
void UColBPLibrary::UpdateHighScore(TMap<FString, FHighScoreContainer>& MainContainer, const FString& ModeName, const FString& ScoreName, int32 NewScore)
{
   FHighScoreContainer* inner = MainContainer.Find(ModeName);

   if (inner)
   {
      inner->ScoreCollection.Add(ScoreName, NewScore);
   }
}
After building the project we can now update the BP_SaveData. In there, we add a new variable, HighScores, that should be a map from String to HighScoreContainer.
Now we add the functionality to manipulate the data within the save data object. In other words, we will add logic to the BP_GameInstance. The first thing we want is fill the HighScores container with one entry per game mode. What this means is that we need access to the list of game modes, so add a new variable named ModeCollection and set its type to Game Mode Collection Data object reference. Compile the blueprint, select the ModeCollection variable and set its default value to be our GameModeList data asset.
Next we create a new function named CheckScoreContainers that will perform the necessary tasks of iterating through the game mode collection and ensuring the HighScores map is holding one entry per existing game mode. Add one boolean output named HasChanged to this function. Shortly the reason for this flag will be explained, nevertheless it will indicate if the container has indeed changed or not. In order to make things easier to set this output we use a local variable named AddedCount. The output of the function will be the result of the comparison of AddedCount > 0:
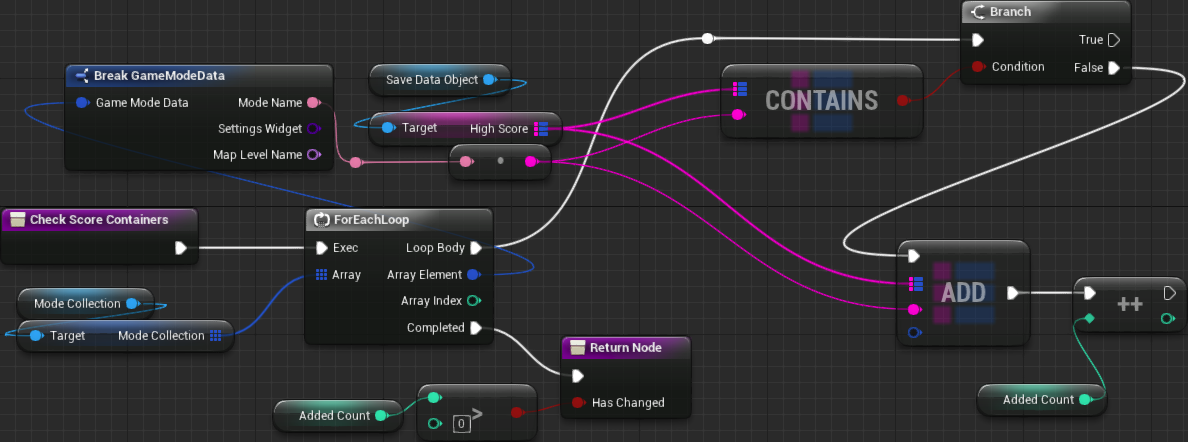
Before we call this function we have to keep in mind that it requires a valid save data object, more specifically the SaveDataObject variable. In our Init event we do get one either after we load the save file, through Load Game from Slot (and casting to BP_SaveData) or after creating the save data with the Create Save Game Object.
No matter which path we are on during the initialization we will want to check the containers. The reason is somewhat obvious when we are creating the save file but maybe not so when the save file is loaded. The thing is, suppose the game has already been shipped and people have some high scores already saved and then you decide to release an update containing a new game mode. If we don't check the containers after the save file is loaded then the new game mode will not correctly store the high scores unless the users delete the save file and loose the scores they have already obtained. Well, at least with the system we are implementing right now.
Another thing to keep in mind is that we will want to save to the file in case we have indeed added something into the container. And for that, the HasChanged flag we have added as output of the CheckScoreContainers function will really help us now. That said, the updated Init event function looks like this:

Next, we want to provide means to load and save the high scores from elsewhere in the code. In this case we will use an slightly different strategy to access the correct inner container, which is associated with the game mode, as well as the high score itself, which is associated with arbitrary mode specific settings. The usual way would be by creating a function requiring, as inputs, the keys to the containers. If we follow this logic, then we would have to deal with the correct associations, string -> string -> integer, from multiple parts of the project, namely UI_ModeSelector, the widgets spawned by it, UI_HighScore and the InGame game modes (each one of them).
If we create two string variables within the BP_GameInstance to store the keys to the containers then we can "limit" the key association handling only within the UI_ModeSelector and the widgets spawned by it. The thing is, once we launch the game, those widgets "know" about the correct keys and can directly set those cached strings. From anywhere else that we need to deal with the high scores we can simply request those from the game instance since the keys are cached. And well, from the mode selector (and the spawned widgets) we will update those strings within the instance when necessary, that is, when the user selects a different game mode and/or switches any of the specific settings that have scores associated with. That said, add two string variables to the BP_GameInstance named GameModeNameKey and HighScoreNameKey, respectively.
We can now create the functions to save and load the high scores. Let's begin with the function to retrieve the score, GetSavedScore. Since we won't modify anything from within this function, it can be set to pure. And of course, it needs one integer output, which is the requested high score. The first operation is check if the HighScore map contains any entry matching GameModeNameKey. If not, we return -1 to somewhat signal an error. Otherwise we proceed and check if there is any high score matching HighScoreNameKey. If not, we return 0 and here comes something a bit different. You probably have noticed that we didn't fill the inner container during initialization. That's because it would require us to add extra data somewhere to "tell" which high score names are associated with each game mode. With our current overall system it's easier to lazily add the entries within the inner container as necessary. Because of that, returning 0 when there is not entry for HighScoreNameKey will not necessarily mean an error. Keep in mind that this design has its flaws, namely, we won't know for sure if we are dealing with the correct keys just be looking at a 0 being returning. That said, the blueprint function looks like this:

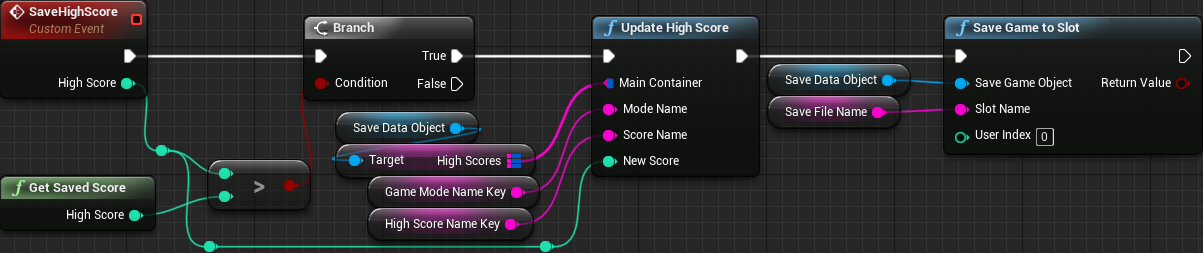
And then, the event function meant to save a new high score. This function will take the score as input and we will compare it to the saved value. If it's greater then call Update High Score with the proper input values. After that, we persist the update into the save object through Save Game to Slot:
Updating the Keys
Remember that we are dealing with two string keys that are cached within the BP_GameInstance class, which are used to access the proper score containers. Obviously we need to update those values. Let's first add a wrapper function that will be used to update the GameModeNameKey variable. Also remember that this variable is used to access the outer-most container, which is the one holding an object entry for each available game mode. From this function we will take an input integer, ModeIndex, and use it to access an entry in the ModeCollection object. With that, we get the name of the corresponding game mode and assign to the variable. Now please note that while we are indeed using the index of the game mode within the collection asset, the real association of the scores is done through the name of the game mode. This means that even if we change the order of game modes within the collection, we will still get the correct score values. That said, create a new custom event function in the BP_GameInstance named UpdateGameModeKey. The logic has been explained, so let's see the graph:

There are two major events that we will want to "track" in order to update this string key:
- Game Launches
- Game Mode Selection Changes.
In a way, we do handle those two events in the UI_ModeSelector widget. There is even more, if you take a look into the blueprint graph in there, we have previously created a function that is indeed called from both of those events, the Check Active Mode. We can use this function to call the game instance's UpdateGameModeKey event function! Now there is one detail that must be discussed before we update said function. By doing so we are yet again adding some "game behavior logic" inside the widget asset, which ideally should hold UI only logic. We will do so in this way because it will be a lot shorter but, again, this is not the ideal. Anyway, all we have to do is call the UpdateGameModeKey function providing the CurrentGameMode variable to its input:
Then, we have to update the other cached string key, HighScoreNameKey. Because we are not exactly holding any information regarding those names anywhere, we will directly deal with that from within the widgets that are spawned by UI_ModeSelector, that is, the game mode specific widgets. Currently UIGM_Traditional and UIGM_Timed. Following similar logic to the game mode key, we want to perform the update when the game launches and when the difficulty selection changes.
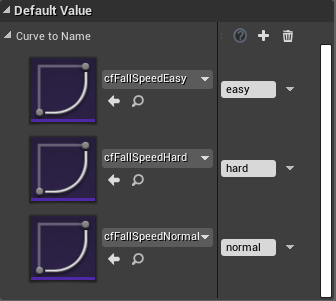
Let's begin by updating UIGM_Traditional. We have 3 difficulty levels for this game mode, Easy, Normal and Hard. We need some way to "map" from the selected difficulty to an string. Internally we are holding an speed curve, the Speed Curve variable, that corresponds to the difficulty but, with our current structure, we don't have easy means to obtain an string from the variable value. We can, however, create yet another map container holding curve float as key and string as value which, effectively, brings the desired association of speed curve → difficulty name. The great thing in this case is that we will be able to initialize the container using the default value when the variable is selected. That said, add a new map container named CurveToName, setting its type as described. Once the blueprint is compiled its default value can be set (you will not be able to add 3 empty entries and then setup all at once. You will have to add → setup before adding another entry):
Now let's create a "shortcut" function named CheckDifficultySelection that will be used to retrieve the desired name from this container, based on the value set in the SpeedCurve variable. Basically we use the Find node from the Curve To Name and use the speed curve variable as key. The result can be directly plugged into the output of the function. Yes, we are somewhat ignoring the case of the map not finding the speed curve:

Now, from the Event Construct we have to call this new function:

Finally, when the check boxes are changed we also call this function:
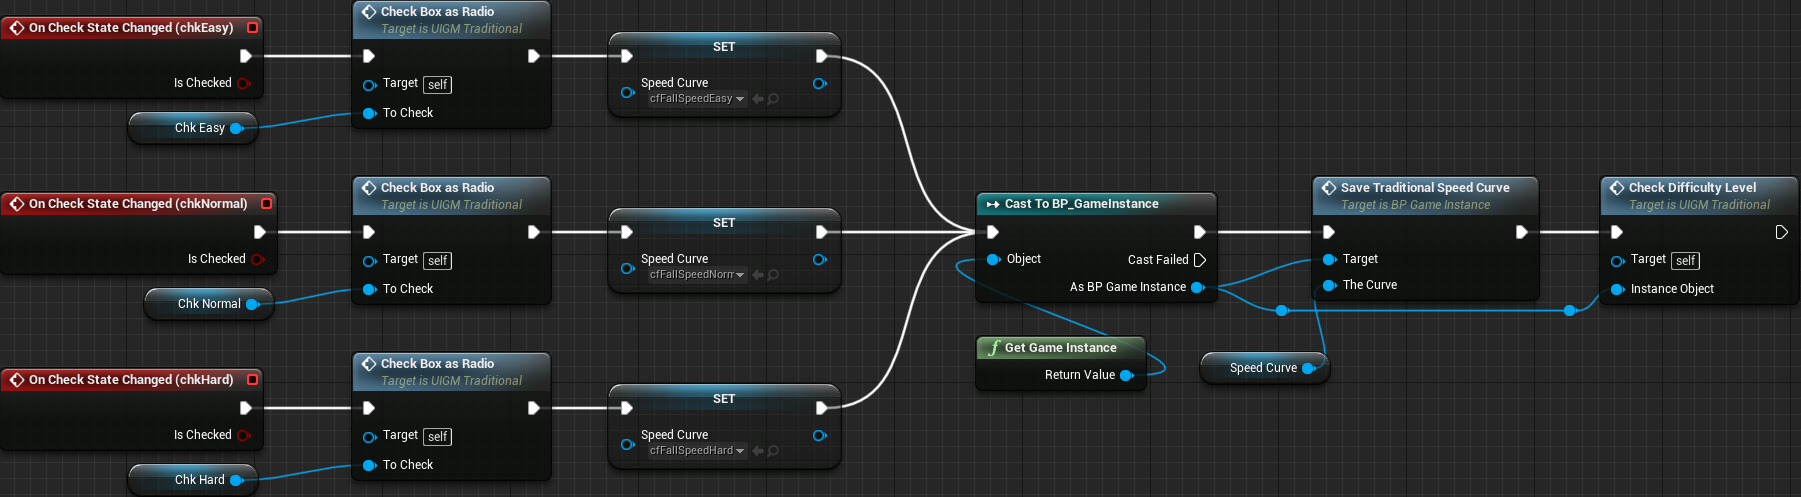
At this point, if we decide to add a new difficulty level to the traditional game mode, after creating the new speed curve we will have to perform a few changes, all of them confined to the UIGM_Traditional! Namely, we have to add the option to choose the new speed curve through a toggle button. Then, update the two internal map containers. And that's it!
Now we can move on to the UIGM_Timed, that is, the high score names specific for the timed game mode. In there we have added 4 difficulty levels that are identified by the duration. At this moment we have to take one decision related to hwo we will name the high scores within the inner container. There are two obvious options:
- Just convert the numbers into strings and directly use them as keys.
- Use names like
VeryShort,Short,LongandVeryLongas keys.
If we go with option 1 and then decide to tweak the durations, we sort of "loose" the high scores. On the other hand, if we do indeed tweak the durations and people has already set some high scores, then it will not be fair to compare those scores to the new ones since the durations have been changed. In order to avoid fairness problems we will go with option 1. There is another "consequence" that I have to mention, however. Tweaking the durations will create new high score entries in the score container map and the old ones will not be deleted. Since they can still be accessed, we have the possibility of showing some "legacy high scores" if so desired.
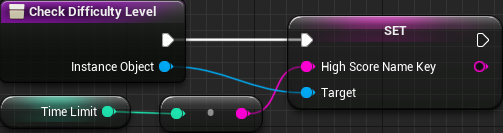
As with the UIGM_Traditional we will also use a helper function that will perform the high score name key within the game instance object. This time it will be easier because we can directly use the TimeLimit variable, since we decided to just convert its value to a string. That said, create a new function named CheckDifficultyLevel, having one input of BP_GameInstance object reference type. All we do here is use the given object to set its HighScoreNameKey, plugging the TimeLimit variable into it. A conversion node should be automatically created:
Again, we want this to be called when the game launches and when the difficulty level changes. That means, from the Event Construct and from the check box change events:


HUD High Score
We now have means to save and load high scores. But we are not saving nor displaying the loaded value. Let's first work on a somewhat forgotten widget, the UI_HighScore, which will display the high score within the game HUD. We begin by performing the usual steps of deleting the default canvas panel from ti and then adding a vertical box.
Add two text widgets and set the text of the first one to Text = High Score, Justification = Text Align Center and Font Size = 24.
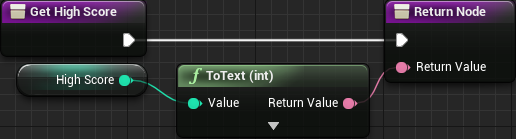
The second text widget will be used to display the high score itself. Set its Justification = Text Align Center. Create a binding to its text and name the created function GetHighScore and, for the moment, leave the graph empty. We will come back to it shortly. First, let's cache the high score once the widget is created. From the event construct we get the game instance, cast to BP_GameInstance and call GetSavedScore storing it into an internal integer variable named HighScore:

The reason we are caching the high score value is to avoid accessing the map containers at every single UI update, which can be a costly operation, specially because we are accessing two maps. Again, for a small and simple project like this one it should not be a problem but this is an easy thing to avoid so we will do so. Nevertheless, now that we have the high score cached in, we can "directly" plug this variable (HighScore) in the output of the GetHighScore binding function (the conversion node will be automatically created):
Saving the High Score
We finally have created the UI_HighScore widget and it already shows in the game. However, it's always displaying 0. The thing is, we are not saving the high score in any moment. Well, we are not calling it, rather. The great thing is that we have implemented the saving function in a way that will automatically check if the score should be saved or not, by comparing the incoming score value with the saved one. So, our (first) task is to call this saving function once the game is over, providing the current scored value. There is a second task that we will have to tackle and I'm mentioning it now because it changes how we will think about the way we will implement the first one: we need means to tell that the high score has been changed so we can update the value we have stored in the UI_HighScore.
The (first) task is relatively simple, but we have to define how we will do it. Or, more specifically, where to do it. We know when and we already have the means to do that. We also have easy access to the player score with the GetCurrentScore() function we have added to the blueprint library. One possibility is to perform this task from the UI_HighScore widget. Since we already obtain the game instance casted into the correct type, we can easily call the save high score function. Still, we need to obtain the game mode, cast it into AGameModeInGame and then add the event listener that will handle the game over event. There is still one "hidden" advantage here and that is the fact that we can directly update the internal integer value, thus completing both described tasks in one. Still, if we do this we are adding yet more non UI code inside of one widget. Since I have already done that in this tutorial, let's take a closer look into the other options and then decide upon what will be done.
The other obvious options are to use Game Instance, Game Mode or Player Controller in order to perform the high score saving task. In all three cases the route is very similar:
- Listen to the game over event.
- Call the
SaveHighScorefunction that is in theBP_GameInstanceclass. - Fire up an event through the event dispatcher from the
SaveHighScoretelling that the high score has been changed
If we do this from the game mode, we have to think about some details. In order to avoid duplication of code we have to go to a base game mode class common to all in game modes. In this case we have the AGameModeInGame which is a C++ class. The problem in this case is that we don't have easy/clean access to the BP_GameInstance from C++ in order to call the SaveHighScore. If we think about directly calling the UpdateHighScore C++ function which is in the blueprint library, remember that it requires a map container reference which, in this case, is being handled by the BP_SaveData that in turn is is being handled by BP_GameInstance.
You may have noticed the game over event → event listener → score updated event → another event listener path. This is OK if we are dealing only with simple tasks and not doing so at every single frame update, which is the case here. Well, we are doing so only when the game is over and extend a little more only if the player does get a high score. Still, we could avoid part of this path if we edit the StateGameLost() state function in the AGameModeInGame class and call a blueprint implementable event that we can use to call the SaveHighScore function. This will still lead to duplicated code because we will have to implement the function in the blueprint derived classes.
Another thing, maybe you are asking why fire up another event ("step" 3) instead of making UI_HighScore listen to the game over and only update the internal integer. This would certainly keep UI only logic within the widget. The reason is that we didn't take any precautions to ensure the right call order. In other words, without ensuring this we might end up with the case of the UI_HighScore "updating" its internal integer value before the new high score is saved.
The interesting thing here is that it would have been absolutely easier if we had implemented the saving system as a C++ class (derived from SaveGame) rather than doing so as a blueprint (the BP_SaveData). I say this is an interesting situation because it shows the kind of impact we can face because of a decision that has been previously taken. Since this is an small project we would not have too much of a problem to "fix" the code. However, if I did so it would over extend this tutorial because there are many places that need changes and well, I would have to show them all.
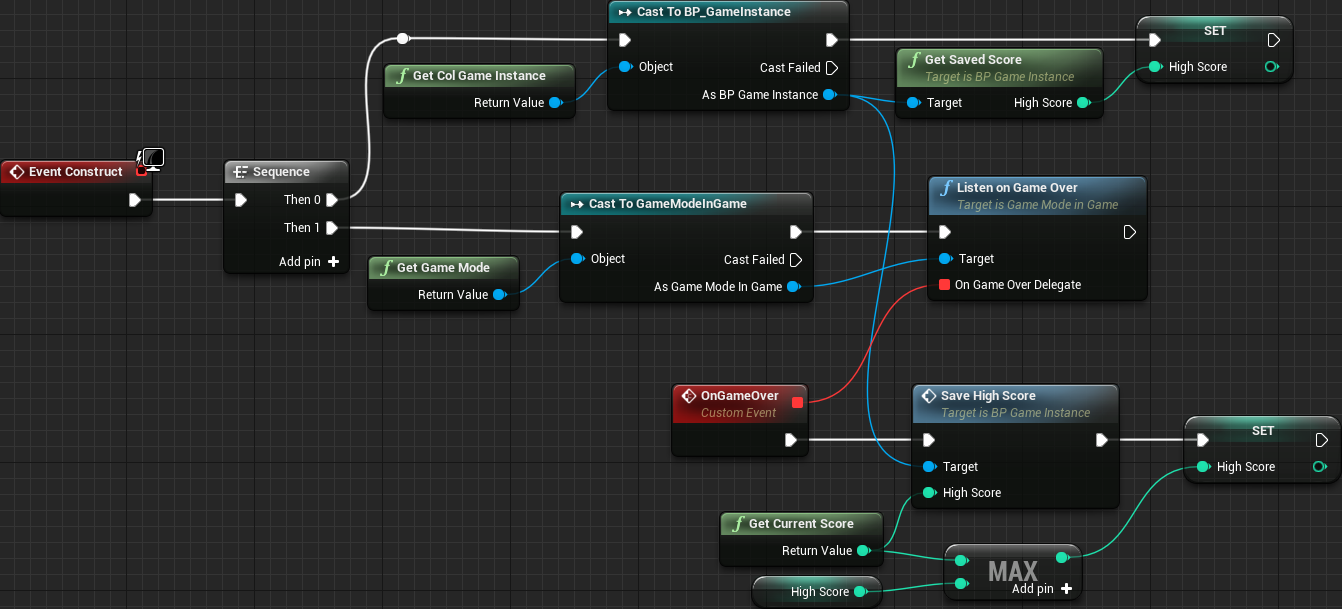
For simplicity sake, we will go the route of not so ideal, non UI logic code within UI widget. In other words, we will extend the graph from the Event Construct in the UI_HighScore widget. We have to get the game mode, cast it to GameModeInGame in order to call its Listen on Game Over function so we can handle this event. Within the listener itself we call the game instance's Save High Score after that we assign, to the internal integer variable, the biggest value between the current player score and the actual value of the variable itself. The resulting graph looks like this:
Access Settings from Pause Menu
We now have the high score system working. Yet, there is a button in the pause menu that is not working, the Settings. This is the only button in the UI_InGame that we haven't added an event handler yet. In order to fix that, we first need to create a "second page" in the MenuSwitcher widget. That said, add a new vertical box inside the switcher. This box will be used to hold one UI_Settings and a button to go back to the main page of the pause menu. That said, drag the UI Settings widget to the new vertical box. There is no need to change padding since the widget has already set that, however change the Size property to Fill. That will help keep the "back" button at the correct position, near the bottom part of the widget.
Now open the UI_MainMenu widget and select one of the sub-menu pages within the switcher, preferably one that only contains the back button (SubMenuSettings is the perfect candidate!). Now select the horizontal box containing the button and copy it. Back to the UI_InGame, paste the horizontal box inside the second page of the switcher (which is the vertical box). After that is done, rename the button to something like btBackToPause.
Now, to the blueprint graph. Select the btSettings and add an event handler to its On Clicked event. All we want here is change the visible page index in the switcher widget. In this case, we change to 1:

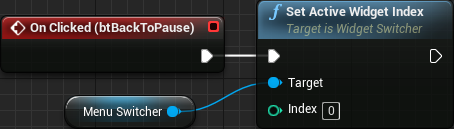
Then, we want the btBackToPause button to bring us back to the previous page of the pause menu when clicked. That means, we select it and add an event handler to its On Clicked event. All we want to do is set the active widget index back to 0:
We now have a fully functional settings widget from the pause menu. However, the widget does not fit. More specifically, the width is too wide for the available space. The Apply button is almost entirely outside of the desired space. Let's see some of the options we have:
- Redesign the pause menu so the buttons occupy the entire width of the window, not just the "grid space". This requires some changes in the calculation of the widget size and position, more specifically the
GridBoxwidget. This would entirely hide theExtraBoxwidget when the game is paused. - Change the
UI_Settingsso theApplybutton stays bellow the toggle buttons. Doing so would also require a little bit of fiddling with the spacing between the audio volume sliders because there isn't enough height to fit settings widget. Regarding this spacing, we will probably have to do so regardless because it seems a bit too big. - Reduce the font size of the button labels so the width can be reduced within the settings widget. The problem here is that the font size has to be reduced to an unreasonable small size in order to get sufficient width reduction, even if we also reduced the indentation of the toggle buttons.
While option 1 is not that complicated, I would rather try to find something that doesn't go into that solution because I really like having that extra widget space still being shown when the game is paused. So, first let's reduce the space between the sliders by changing the Top and Bottom padding values. For all sliders I have set to 16, while the very first horizontal box the Top remains at 0. And then, the last horizontal box can have the Bottom padding set to 0 since the vertical box holding it already has a padding.
The next step is to move the Apply button to stay bellow the toggle buttons, shifted to the right side. For that, the first thing is to drag the Size Box holding the btApply widget and drop directly into the vertical box holding the toggle buttons. After that, apply button's size box and change its horizontal alignment to Right. By doing so, we keep the same size within the button. Now take the Size Box holding all 4 buttons outside of the Horizontal Box (which is not necessary anymore), placing it bellow the Window Mode text widget. Delete the horizontal box. The buttons are probably stretched using the entire widget. Select the outer size box (the one holding all 4 buttons) and set its horizontal alignment to Left. Then we restore the indentation by setting the Left padding to 64. Remove the Right padding of the 3 toggle buttons, which will correctly align the right side of the 4 buttons. Remove the Top padding of the first toggle button and then set the Top padding of the Apply button to 16.
This is the new hierarchy of the UI_Settings widget. The selected border is the one holding the Window Mode section:

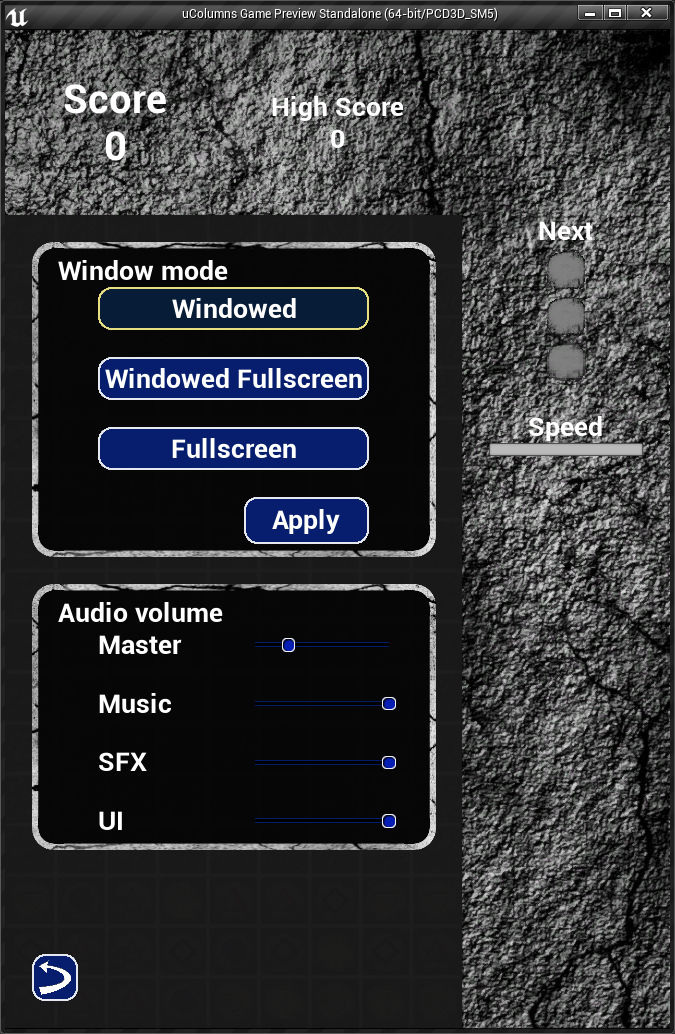
And this is how the settings menu looks like from the pause menu:
In this part we worked a bit more with the visuals of the user interface, greatly improving the readability of the text, not to mention making the controls within the widgets have a more consistent look by changing the styling in them. Later on we have added some minor changes like remembering the last played game mode as well as the selected difficulty.
Continuing, we have added the high score system that should be kind of easy to add more game modes and difficulty settings to existing game modes.
We finished this part by making the settings widget accessible from the pause menu.
There are still some things to be done, however, like adding the help menu and so on. In the next part we will continue with the polishing including those mentioned and a few more.