Part 17 - Game Mode SpecificsApril 11, 2019
We have spent the last part implementing a somewhat flexible system that allows us to create custom UI elements that are specific to some game modes, however we only have one game mode at the moment, which isn't even complete! In this part we will see how to use the system we have implemented. But, for that, we will first finish the traditional game mode and add a new mode.
Player Piece Fall Speed
Way back in at the beginning of the tutorial, when specifying the rules of the game, there was one that tells the player piece must fall at increasing speeds. We haven't done that yet and the main reason is because we will do that as a game mode specific feature. Another factor is that it's a little bit more involved than it seems. We first go through a quick recap of how our vertical movement is setup, which was explained in part 11, then how we could change the falling speed during the game and why it requires a little bit more than anticipated.
Ok, so, when the player piece is spawned, we calculate the total necessary time the piece needs to complete the movement until it reaches the bottom of the column, using this line:
const float vert_time = mPlayerPiece.GetVertDiff(vert_dest) / mPlayField->GetScaledCellSize() * UColBPLibrary::GetVerticalMoveTime(this);
The most important part for our discussion is the UColBPLibrary::GetVerticalMoveTime(this). This gives us the amount of time needed to move a single cell in the grid. Instead of this, we create a virtual function meant to give us this value and, by default, just use the function from the blueprint library. And so, a derived game mode would just override this if needed. Then, to increase the speed in which the piece falls we would just return smaller values as the game progress.
Fantastic, so, with such system we can then keep an internal value that will decrease according to some rule. The thing here is, what exact delta should we use to change the internal value? We could surely specify a value and directly use it to subtract from the internal value, of course performing teaks as necessary. The biggest problem with this is the fact that if we linearly change the time like this, the speed differences we will perceive will seem bigger near the final time values. This suggests that our notion of speed in the motion perception is not linear. In fact, if you take a look at the Tetris handbooks, there will be the so called speed curve used to drive the dropping speed of the tetramino. There is even a formula, , that gives the time spent per row and uses the level as variable. More information can be found here and if you are interested. Here is a graph plot of this formula:

In any case, if you want to go really deep in this aspect, you can search psychophysics, more specifically related to motion perception. There is one very interesting dissertation, written by Siddharth Jain, which will give plenty of reading material (specially if the references are considered).
Another problem (which is very easy to fix) is that if we return very small values from our new virtual function the motion code (interpolation) will break and the piece will wark beyond the play field. The fix in this case is to cap the return value at some point.
One last detail is when to actually change the internal value. While in this project we will change the speed every time the player piece lands, if desired we could do that only after blocks are destroyed as a result of matching runs. In this case, it would create some interesting strategy possibility to the player.
We begin by creating the virtual function system in the game mode. Since we want to allow blueprints to override this but also have a default native behavior we will need an slightly different strategy from the typical code we have been using (C++ virtual function calling a BlueprintImplementable function). The base of the system is a BlueprintNativeEvent which is basically a function with default native code but allows blueprints to override them. The problem is that we can't directly override them from C++ code because such function cannot be virtual. So, we create an extra function, that one being virtual and from the BlueprintNativeEvent we call this virtual function:
// Use to retrieve the time necessary to vertically move a block through a single grid cell
// This can be overridden in the blueprint class
UFUNCTION(BlueprintNativeEvent, BlueprintPure)
float OnGetVerticalMoveTime() const;

// The "internal" function used to retrieve the time necessary to vertically move a block through
// a single grid cell. This can be overridden in a C++ class
virtual float OnGetVerticalMoveTime_Internal() const;
We now have to implement those functions. Notice that BlueprintNativeEvent generates some extra code and we will have to implement a somewhat different function rather than OnGetVerticalMoveTime(). Even though, from this implementation we just call the internal virtual function that will, in turn, use the function form our blueprint library:
float AGameModeInGame::OnGetVerticalMoveTime_Implementation() const
{
   return OnGetVerticalMoveTime_Internal();
}

float AGameModeInGame::OnGetVerticalMoveTime_Internal() const
{
   return UColBPLibrary::GetVerticalMoveTime(this);
}
Next we have to update the code that uses this time value. More specifically, we have to do that from two different functions, right after spawning the player piece and then when handling the horizontal movement input. And to be even more specific, we have to substitute the UColBPLibrary usage. First, in the StateSpawning() function:
AGameModeInGame::StateFunctionProxy AGameModeInGame::StateSpawning(float Seconds)
{
   ...
   else
   {
      ...
      const float vert_time = mPlayerPiece.GetVertDiff(vert_dest) / mPlayField->GetScaledCellSize() * OnGetVerticalMoveTime();
      ...
   }
   ...
}
Then, the OnSideMove() state function:
void AGameModeInGame::OnSideMove(float AxisValue)
{
   ...
   else
   {
      ...
      const float vtime_fraction = mPlayerPiece.GetVertDiff(dest_coord.Z) / mPlayField->GetScaledCellSize() * OnGetVerticalMoveTime();
      ...
   }
}
Interestingly the system is complete! Yes, we are not using it from any derived class yet, but the important thing now is that we can customize the behavior from derived classes, both C++ and Blueprint! Testing the game now will show that nothing has changed from the point of view of the player.
Speed Curve
We have the necessary foundation code to implement the speed curve and pass in faster movement speeds for the player piece. But... how exactly will we implement the curve? And, what values should we actually hold in the curve? Unreal Engine provides us UCurveFloat which is derived from UCurveBase. Quoting from the description of the base class:
Defines a curve of interpolated points to evaluate over a given range
That seems promising! We also have an editor that allows setup of the curves. In other words, we can create curve assets, edit them and later interpolate any value in them. Unfortunately, at the time of this writing, the curve editor documentation at the provided link is a bit (ok, very) outdated and some information is no longer valid.
Ok, we have an idea of which tool to use. But, what to build? We can surely research and try to approximate the speed progression of a similar game (ahem Tetris)... or, we could define our own curve and tweak it as necessary. Please feel free to research about the speed curve in that game, but in this project we will work with our own curve, only trying to approximate the shape. The thing is, it's not that complicated!
Nevertheless, we have at least two types of curves we can create. Let's see both of them, remembering that the goal is to effectively reduce the delta of the value we return through OnGetVerticalMoveTime() function as the game progress.
- Hold Delta Values: The curve will hold values that will be used to directly subtract from a reference value, which we can use
GetVerticalMoveTime()from the blueprint function library. Since we want to cap the maximum falling speed we want the end of the curve range to be 0 and the rate in which the delta reaches it should be faster near the end of the curve. In other words, the shape of the curve will be reversed. - Hold Time Values: The curve directly holds the values we will return through
OnGetVerticalMoveTime(). We don't have an "initial reference value" since everything is directly obtained from this curve. This is also a decreasing curve, however it does so at faster rates near the beginning of the curve and much slower rates at the end.
At first glance, choice 1 seems very interesting since we can work with a reference value from the game settings system we have implemented. The problem here is that if we come up with a game mode requiring this value to be tweaked, we will most likely have to also tweak the curve, since the end value will become different as the reference value changes.
Then, we think about choosing 2. Ok, some may think, "but it will render the GetVerticalMoveTime() completely useless. Well, maybe. If all of our game modes require change in the falling speed, then yes, it will. What if a tell you that the game mode we will create later in this part will use a fixed fall speed value? Our settings system might still be useless but not as much, right? Even though, in this case it's not really very difficult to clean up and remove this "useless setting value".
Based on all that, the curve used in this project will follow approach 2. One really interesting feature of using those curves is that we can create multiple ones and use them to be part of a "difficulty setting" allowing the player to select when starting the game. That already gives us something to be added into the game mode specific settings to be added into the game mode selector screen! That said, it's time to create our initial curve, which will be the "normal" difficulty. When you request to create a new Curve asset (Miscellaneous → Curve), a dialog will be displayed allowing the selection of the curve type, Float, LinearColor or Vector. Hopefully it should be obvious that, for our case, it should be CurveFloat. Now, before you create it, know about two options:
- You can create a new
CurveFloatasset and manually enter the data into it. I will give a fast explanation on how to do that and then you can refer to a table I will show shortly. - Enter the values in a .csv (Comma Separated Values) file and then import into Unreal Engine. At this moment, the editor will provide a dialog asking which kind of asset to create, one of them being
FloatCurve. Once that is done theCurveFloatasset is automatically created with the correct data points. An small tweak will still be necessary, which will be explained shortly.
Granted, you can follow whichever option you want. Option 2 is particularly interesting if you have means to edit data curves and can export that into CSV files (that's not exactly my case but). Nevertheless, I will give some fast explanation on how to work with the curve editor, as if you have chosen option 1. In any case, I will show tables that you can use as reference, either to manually enter the data or to create the CSV file.
Yet, we have to define what data we want in there. Let's start thinking about the actual speed and see if that helps us better visualize what we will use in there. The value we are going to deal with (let's call it ) is the time, in seconds, needed to move the piece through a single cell. We can easily calculate the speed ( - cells per second) by . In other words, if we take the default vertical movement time, 0.5, the speed will be 2 cells per second. Based on that we can try to define the initial and final speed, convert into the time needed and then try to make an smooth graphic reaching a non linear progression.
Honestly, for the initial speed 2 cells per second seems a bit fast to me! Perhaps we can experiment with 1 cell per second. It probably will be very slow, but again, we can tweak it later. Moreover, at this point we can perform a very quick test, by changing the Vertical Move Time property in the game instance blueprint. Set it to 1 and test it! If you like it, great! Honestly, I feel it's indeed too slow. In the end, I decided to keep at 1.25 cells per second, which means the initial value is 0.8.
Now how about the cap speed? Let's experiment 20 cells per second. This means vertical movement time is 0.05. It's way too fast, to the point that we can't even move the pieces to the borders before they land! With a bit of experimentation, I have ended up with 14 cells per second for the end speed, which means roughly 0.0714 as the movement time. This is a somewhat really fast speed that is meant to force the game to end!
Now, if you have create the curve float asset, name it cfFallSpeedNormal so we can easily reference it throughout the text. Now it's time to add the first two data points into the graphic. Shift click it will add a new data point where you clicked. While you don't have to be precise with the mouse position, try to keep slightly close to the location in the graphic. Once the point is added, you can select it and two text boxes will appear near the top-left corner of the graphic, where you can manually input the (Time) and (Value) axes.
We know the initial values that we will use for the first and last data points, but we don't know the range. The idea is to use the concept of percentage progression, meaning that we will hold one floating point value that will directly point to the progression of the speed curve. To make things easier then, we will place the end point at the in the graphic. And this is how the graphic looks like after the two points are added and set:
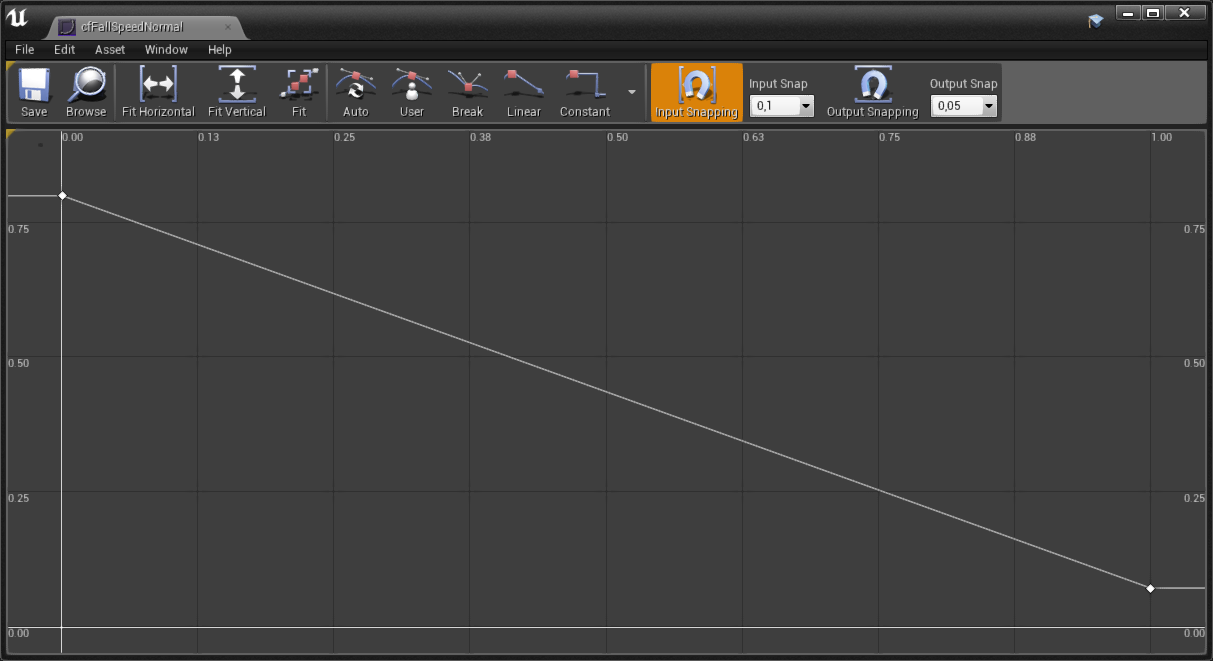
As mentioned, near the end of the graphic we want an slower progression towards the final value while at the beginning we want a faster decrease rate. But still, how about the rest of the data points? What coordinates and how many? Because we are restricting the graphic to be in the range [0..1], we can look into the increments in order to find how we will subdivide. If we choose to increment by 0.2 we will end up with 6 (0, 0.2, 0.4, 0.6, 0.8 and 1) data points. We can definitely add more data points but keep in mind that we are not restricted to only those key points when requesting a value from the curve. That said, add 4 more points, in the specified X coordinates. After a bit of fiddling a bit I got this graphic:

The following table shows the data points and the corresponding values:
| X (Time) | Y (Value) |
|---|---|
| 0 | 0.8 |
| 0.2 | 0.58 |
| 0.4 | 0.4 |
| 0.6 | 0.25 |
| 0.8 | 0.13 |
| 1 | 0.0714 |
If you decide to take the CSV approach, create a new plain text file named cfFallSpeedNormal.csv and dump in this (click to expand/collapse):
0, 0.8
0.2, 0.58
0.4, 0.4
0.6, 0.25
0.8, 0.13
1, 0.0715
As you can see, the value difference between each point is reducing as we approach the end of the curve. Now, however, the graphic can be smoothed out. "Box select" all data points but the first one and them click the Auto button at the toolbar of the editor window. By default all points are set to linear interpolation and the result of that is that we see an straight line between each data point. Setting them to "auto" will create curved lines. Notice that from the first to the second point we still see the straight line. If we also set the first point to Auto we will have an additional set of points with very slow speed progression at the very beginning of the graphic. That can, of course, be a desired feature. After converting the interpolation method of the points, the graphics looks like this:

Speeding Up
Now that we have the system allowing us to directly change the falling speed of the player piece, as well as a curve containing the values we need, we have to apply them! We have the AGMInGameTraditional C++ class, which is our first specific game mode. In there we want the (private) property to hold a pointer to the curve asset as well as the internal value (also private) we will use as progression control, which is the alpha used to request a value from the curve, as will be shown shortly:
UPROPERTY(EditAnywhere, Category = "Gameplay Settings", meta = (DisplayName = "Speed Curve"))
class UCurveFloat* mSpeedCurve;

UPROPERTY()
float mSpeedProgress;
Next we override, in the public section, the OnGetVerticalMoveTime() function so we can return a value from the curve:
virtual float OnGetVerticalMoveTime_Internal() const override;
To the implementation file, we have to update the include list. Since we are dealing with the curve, we have to add its header file:
#include "GMInGameTraditional.h"
#include "Curves/CurveFloat.h"
#include "ColBPLibrary.h"
Next we do some initialization, for good practices, really:
AGMInGameTraditional::AGMInGameTraditional()
   : mInitialFloor(3)
   , mSpeedCurve(nullptr)
   , mSpeedProgress(0.0f)
{}
Every time the game begins we have to reset the speed progress to 0 and we already have a function that is called at each new game, CustomGameInit(). So, we append to its implementation:
void AGMInGameTraditional::CustomGameInit(float Seconds)
{
   ...
   CheckGridFloorLevels();

   mSpeedProgress = 0.0f;
   ...
}
Now we implement the OnGetVerticalMoveTime() override. In there we first have to check if the speed curve pointer is valid and, if so, request an interpolated value, using the mSpeedProgress as the InTime parameter. In case the curve is not valid we return a default value, the one obtained from the blueprint library's function:
float AGMInGameTraditional::OnGetVerticalMoveTime_Internal() const
{
   if (mSpeedCurve)
   {
      return mSpeedCurve->GetFloatValue(mSpeedProgress);
   }

   return UColBPLibrary::GetVerticalMoveTime(this);
}
After building the project, editing the BP_GMTraditional blueprint asset we can assign the curve asset into the Speed Curve property. After doing that our game mode will correctly pick a value from the curve, but we are not changing the mSpeedProgress in any moment. Of course, the result of that is that we don't get any increase in the speed of the falling piece.
We have to increment the mSpeedProgress value, but when, how and by how much? I have mentioned at the beginning of this part that we will progress the speed every time the player piece lands. What this means is that we will have to intercept the OnPlayerPieceLanded() event. This is relatively easy, since all we have to do in this case is override this function, perform the necessary operation and then use the super class so it still calls the blueprint's implementation.
That covers the when and how, however how about the by how much? The very first thing to mention is that we will work with a delta variable that we can tweak, meaning that we will create an additional property. How about its default value? If we set this to 0.1, then we will end up with "10 turns" before we reach the end speed. Perhaps this number of "turns" is a bit too small. Let's double it (the amount of "turns") by setting the default progress delta value to 0.05.
All that said, we declare the additional property (remember, in the private section):
UPROPERTY(EditAnywhere, Category = "Gameplay Settings", meta = (DisplayName = "Progress Delta"))
float mProgressDelta;
And then the function override:
virtual void OnPlayerPieceLanded(const TArray<int32>& BlockIndices) override;
In the constructor of the class we initialize mProgressDelta with the default value we have defined, 0.05. Remember, this will give the player "20 turns" before reaching the end speed.
AGMInGameTraditional::AGMInGameTraditional()
   : mInitialFloor(3)
   , mSpeedCurve(nullptr)
   , mSpeedProgress(0.0f)
   , mProgressDelta(0.05f)
{}
Lastly, we implement the OnPlayerPieceLanded() event. In there we just apply the delta into the progress variable, clamping the result so it does not go beyond 1.0 and then we call the super class version of the same function:
void AGMInGameTraditional::OnPlayerPieceLanded(const TArray<int32>& BlockIndices)
{
   mSpeedProgress = FMath::Clamp(mSpeedProgress + mProgressDelta, 0.0f, 1.0f);
   Super::OnPlayerPieceLanded(BlockIndices);
}
That's it, we can now test if our curve progress is working. Remember to assign the curve into the property inside the blueprint editor as after compiling the project there is some probability that it will be reset to null! Well, it is working, but the progression seems a bit too fast! And here comes two things. We can try to tweak the Progress Delta property or manipulate the curve we have created. Let's try the easiest change, which is increasing the number of "turns" before reaching the end speed. By that, we decrease Progress Delta, maybe to 0.025. We are effectively doubling again the amount of "turns" before the end speed.
While it's a lot "better", the curve does no seem to be performing very well. The speed difference seems to be a bit bigger near the end when compared to the beginning of the curve. Let's try to tweak the curve a bit. Just keep in mind that changing the data points will not change the tangent points and the result of that is a somewhat weird graphic. To obtain again the smooth graphic, we have to select all the points, change back into Linear interpolation and then back to Auto. The main problem is the lack of data points, really. If we try to take the "0.8" point a little closer to the final speed we indeed get an smoother transition from it to the last point, but the overall steps before will get very large "jumps" in throughout the progression. The first tweak was to go from 6 to 11 data points, then the values were adjusted according to the table bellow:
| X (Time) | Y (Value) |
|---|---|
| 0 | 0.8 |
| 0.1 | 0.58 |
| 0.2 | 0.43 |
| 0.3 | 0.32 |
| 0.4 | 0.23 |
| 0.5 | 0.165 |
| 0.6 | 0.125 |
| 0.7 | 0.1 |
| 0.8 | 0.085 |
| 0.9 | 0.075 |
| 1 | 0.0714 |
If you are going the CSV file route, click the bar bellow to expand the updated contents of the file. Once the file is updated you can right click the asset in the editor and then Reimport. Remember to set the points to Auto in order to smooth them.
0, 0.8
0.1, 0.58
0.2, 0.43
0.3, 0.32
0.4, 0.23
0.5, 0.165
0.6, 0.125
0.7, 0.1
0.8, 0.085
0.9, 0.075
1, 0.0714
The resulting graphic looks like this:

The speed progression seems a lot more natural now, however we reach maximum speed somewhat very fast. Let's once more double the amount of "turns" before we are at the maximum speed, by changing the Progress Delta property to 0.0125. I particularly like this setting!
Speed - Custom Widget
In the previous part we implemented a system to allow us to create custom HUD elements, that could be game mode specific. So, let's create one exactly to display the speed progress. Since internally we have the progress as a percent value, it will be extremely easy to hook it up in a progress bar! For that, the first thing we have to do is create some way to access the current progress variable from blueprints. This means, a new C++ function (in the AInGameTraditional class):
UFUNCTION(BlueprintPure)
float GetSpeedProgress() const { return mSpeedProgress; }
We can now create our first custom HUD element, in the UI/CustomHUD directory. I have named the new widget UICH_ExtraTraditional. We don't need the default canvas panel, so delete it.
The idea is to have a text displaying "Speed" and right bellow it the progress bar. So, add a vertical box and, inside of it, the text and the progress bar widgets. Set text accordingly (that is, Speed) and then rename the progress bar to SpeedProgress. Also set the text for center horizontal alignment.
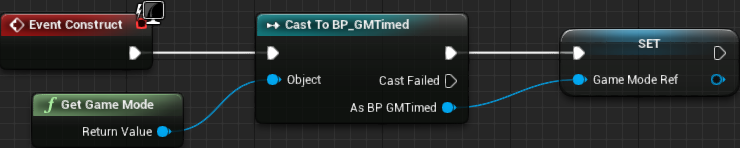
The value we want to bind into the progress bar will be obtained from the game mode. In a way, we are restricting this widget to be used only with the specific game mode. The ideal would be to retrieve the widget object from the game mode and actively update the progress bar, however with our system we don't have easy access to it. Having a widget tied to an specific game mode like we are doing is not really too problematic (granted, we will create some more like this), so we will not try to change our system. Anyway, from the Event Construct node of the widget (UICH_ExtraTraditional) we obtain the game mode, cast it to GMInGameTraditional and promote the return value to a variable, naming it GameModeRef:

Lastly for this widget we create a new function binding to the progress bar's Percent property. All we have to to in there is use the game mode reference created at the construct event and call in the Get Speed Progress function:
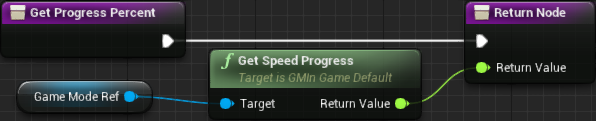
Now, in order to test this, we edit the BP_GMTraditional blueprint class. All we have to do is setup some properties. First, because we have added C++ code, chances are big some of the properties have been reset. So we make sure the curve property is properly pointing to our curve asset as well as the progress delta is set to our previously defined value of 0.0125. And, of course, we set the CustomHUDExtra property to our new helper widget UICH_ExtraTraditional. After compiling (and saving) the blueprint class, the changes can be tested. And this is the result:

It surely can be visually improved with some padding and texture style on the progress bar, however the most important thing is that it's working!
New Game Mode
As promised at the beginning of this part, we will implement a new game mode! And we will do so entirely from blueprints, mostly to showcase that we can do that with our system! The idea of this game mode is to not change the speed of the falling piece. Instead we add a timer that, once at 0, the game ends. There is only one caveat here. The way we have designed the internal state machine make it very hard to just abruptly interrupt the game. Instead of redesigning the state machine, we can work with the rule that once the timer ends, the game will be over when the falling piece lands. In other words, once the timer ends no new player pieces will be spawned.
First, we have to create the game level for that. It will be a lot easier if we just duplicate the existing InGameTraditional level and perform the necessary changes. That said, right click it and choose Duplicate (there is also a keyboard shortcut, Ctrl+W if you prefer that) then set the name of the new map to InGameTimed. The main change we have to do here is change the associated game mode, which we haven't created yet. So, let's do that, add a new blueprint class (in the Blueprints directory) derived from GameModeInGame and named BP_GMTimed. As soon as the blueprint is created we can associate it with our new map. Remember, to do that it's necessary to access the World Settings tab.
With the association done we can now start working with the game mode blueprint class. If you try to play right now, you will get and empty play field grid and new player pieces being spawned as the normal rules. However, we don't have the game lost condition function, meaning that there will be errors if the spawn column has no room for new pieces, so keep that in mind. We will work on that shortly
First, we work on the time counting. We need two float variables, TimeCount and InitialTime, that will be used to track the time and set the initial time, respectively, in seconds. We then set the default initial time to 1 minute and 30 seconds (90 seconds). In other words, set InitialTime default value to 90. Next we make InitialTime to Instance Editable, that is, enable its check mark property. By doing so we will be able to edit this variable from elsewhere
Anyway, first, we add into the class two new float variables, TimeCount and InitialTime, that will be sued to track the time and to set the initial time, respectively, in seconds. In order to set the default value we have to first compile the blueprint. Speaking of that, I have decided to set the default initial time to 1 minute and 30 seconds, or 90 seconds. In other words, set InitialTime default value to 90. Next, we make InitialTime to Instance Editable (that is, enable its check mark property). By doing so we will be able to edit this variable from elsewhere.
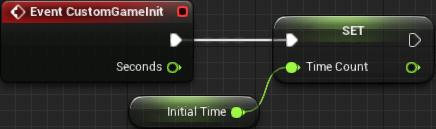
Now we implement the loosing condition. In order to do that, in the My Blueprint panel, if you hover the mouse over the Functions category, two buttons will be revealed, one of them being Override. If you click it, a drop down menu will be shown, with a list of all functions that can be overridden, including IsGameLost, which is the one we want to override. So, click it and the editor should automatically transition into this function graph. There are two conditions we want to use in here. The first one we already know, no extra room for new player pieces. Unfortunately we will have to duplicate the code for that (at least it's easy). The other condition is TimeCount variable being equal to 0. The graph:

We of course want to make sure the TimeCount variable is at the correct value when the game begins. For that we have to override the CustomGameInit() function. It should be in the same Override list, as it happened to IsGameLost. This function, however, will be added into the event graph tab, rather than creating a "new function". That said, override it and in the graph all we do is set the TimeCount to whatever InitialTime is holding:
And then, we have to update the TimeCount variable. There should be an Event Tick node in the Event Graph tab. If not, you can easily add one as a normal event node. Anyway, it does give, as argument, the delta seconds (since the last frame). Since we are holding TimeCount as seconds, we can directly subtract from it, clamping the result. Because we have to use an upper and lower limits in the clamp, we use InitialTime as the upper limit:

And that's it! The game mode is finished! Of course, we could add another float variable and return it into an override of the OnGetVerticalTime() function so we could further tweak the constant speed of the falling piece just for this game mode without affecting anything else. I leave this as an exercise for the reader.
Timing Widget
And so we have a new game mode, but we don't have any visual clue as to how much time left we have to play. This can be a bit frustrating for the player, so, let's take advantage of the custom HUD element system and create a timer widget, meant to be placed at the top section of the HUD widget. In other words, create a new widget asset, UICH_Timed.
Again, we don't need the default canvas panel, so delete it. In this widget all we want is a text, time left, and the actual time text bellow it. Add a vertical box and the two text widgets into it. Set both to center horizontal alignment and change the first text to Time Left.
We will bind a new function into the Text property of the second widget in the box, however in there we will need access to the game mode, BP_GMTimed. To make things simpler, we obtain this (performing the cast to BP_GMTimed) from the construct event and promoting the return value into a variable, GameModeRef, so we can easily access it later:
Finally, in the bound function, all we do is use the GameModeRef, get TimeCount variable and then directly hook it up into the output of the function. The editor should automatically create a conversion node, from float to text:
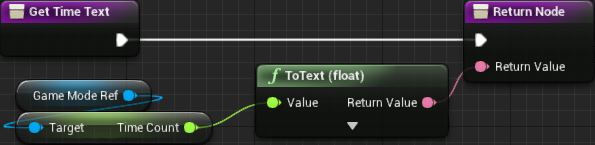
And the widget is complete. Now, let's change the CustomHUDTop property of the BP_GMTimed game mode to UICH_Timed. Compile the widget and test. Well, it works but, the text is displaying a lot of decimal digits. We don't exactly want that. Go back into the function we have bound to the Text property of the timer. In there, the conversion node contains an arrow that allows expanding the node, providing a bunch of extra options. Set the maximum fractional digits to 0, compile, saved the widget and test again.

Much, much better, right?
Selecting Modes
We now have two game modes, including a system that allows us to select the desired mode from within the main menu. The problem is that we didn't finish the main menu functionality, our game mode list system is not holding the correct data and we don't have the necessary game mode specific widgets meant to be displayed at the mode selector. That seems like a lot, right? Then, we better begin working on the helper widgets.
First, let's work on the widget for the "traditional" game mode, the UIGM_Traditional. In this widget we provide a brief description of the game mode itself and then we allow the player to select between 3 speed progression curves. Of course we will not display "speed curves", but Easy, Normal and Hard. Yes, I know, we didn't create the additional curves yet, it will come at a later moment in the tutorial.
As usual, we begin with a vertical box as the top widget in the hierarchy. In other words, remove the canvas panel if you didn't do so in the last part. Now here comes a little bit of a problem. We want to display the description of the game mode and it will most likely need multiple lines of text. For that we could use the Auto-Wrap Text property of the text widget however the text wrapping needs prior information regarding the actual available width, which is not known on the first rendering pass. The result is that the first time the widget is displayed on screen it is possible to see the text in a single line and then quickly adjusting to the available width. More information about this limitation can be found here. The suggestion is to use fixed width for the wrapping, but while it works, the visual appearance of the text becomes somewhat inconsistent on different game window sizes. We have a few options:
- Go with the auto-wrapping behavior and (try to) ignore the distracting text adjustment.
- Use the fixed width for the wrapping. Unfortunately we can't dynamically update it.
- Use one of the multi-line editable text boxes and setup it in a way to look as close as possible to the text widget. Curiously the auto-wrapping in this case does not produce any distracting text adjustments.
- Implement a new text widget where it hides the text when the internal cached area width is not known.
Obviously 1 is not really an option. Using option 2 would lead to some trial and error regarding the value we should set in the fixed width, albeit that is not too problematic. The visual inconsistency becomes noticeable only when changing the game window size and it's an uncommon event. 3 is a short term "solution" that will give us a result very close to the desired one, however it may be a bit too much just to display text. 4 is the ideal solution, however it's a bit more complicated than the desired to be added in this tutorial. From all of this, 3 and 4 are the "best" solutions and, to keep things focused on the tutorial's objective, we will follow option 3.
All that said, we have 4 (!) editable text widget options available. Two of them are restricted to a single line, thus not what we want. The other two, Editable Text (Multi-Line) and Text Box (Multi-Line) (both under Input category in the pallette panel), give us the desired capabilities. The Text Box (Multi-Line) widget offers a bunch of extra styling options, although we won't need most of them. Lastly, the Editable Text (Multi-Line), by default, does not render a box around the text, making it a lot easier to setup in a way that it will behave like an ordinary text widget. Because of that I have opted to use Editable Text (Multi-Line) widget and setup it like this:
- Font → Size (Appearance): from default 12 to 18. The default value seemed a bit too small for the purposes.
- Color, disabled
Inherit(Appearance): Set to full white. Of course, you can personalize the color. - Visibility (Behavior): Set to
Hit Test Invisible. This effectively makes the widget behave exactly like a text widget in regards to the mouse interaction. Basically, no events are fired up. - Text (Content): "In this game mode each time a piece lands the speed of the next one will be slightly faster. The difficulty affects how fast this speed will progress as well as the final speed.". Of course you can change this description to whatever you prefer.
Next we add a text label, horizontally centered, that will display Difficulty. Just to give some spacing after the description, the top padding is set to 32.
And now we want the "difficulty selector", which will be done by 3 toggle buttons (UIC_ToggleButton), one besides the other. This means we need one horizontal box, so add one. Add the 3 custom buttons into this new box. For now let's just forget about the functionality of the difficulty selection and finish the mode selection. In the next part we deal with this.
Next, let's create the timed game mode's widget, UIGM_Timed. Again, we provide a brief description of the game mode and allow the player to select between 4 different time limits. The overall layout of this widget should follow the same idea of UIGM_Traditional, so I won't detail everything about it.
The description I have used is this one: "The speed of the falling piece does not increase, but there is a time limit. Once it reaches 0, no new pieces will come into play, but you still can place the one that was falling as a last scoring chance!". The text bellow it, instead of "difficulty" is set to Time Limit. And then, the 4 toggle button widgets inside one horizontal box right bellow the Time Limit label. Again, for now we forget about those buttons.
Now we want the mode selector to create these new widgets and use them according to our previous code. In order to do that we have to edit the GameModeList data asset. We have created 4 temporary, dummy modes in this asset. Delete (click the little down arrow next to the entry's header then delete) the last two and we will edit the remaining two:

Just by doing this the game mode selector widget will correctly use our game mode specific widgets. If you test it right now, depending on the background color it will be somewhat hard to read (like in my case, with grey background and white text everywhere). We will fix that on the next part. Yet, if you click the Go button with a game mode selected nothing will happen. The thing is, we didn't add any blueprint graph into the event handler of this button! In this case, we obtain from the mode selector the name of the map that must be loaded and then do that (remember, this button is in the UI_MainMenu):

We now have two different, fully playable game modes. The main menu also allows us to select one of them and correctly transition into the corresponding map. Granted, the UI still need some work, not to mention the fact that we have to disable the auto exposure setting (eye adaptation) so the brightness don't get higher than we want/need. This eye adaptation behavior becomes more apparent when dealing with the UI. In the next part we will do some polishing, which includes fixing that issue.