Part 15 - HUD WidgetsApril 11, 2019
In the previous part we have created the main widgets, those meant to control the overall layout of the displayed graphical user interface. We have created code to make sure the size and position of the widgets are correct, never exceeding the background image yet fully occupying the available space. However those widgets are not showing any useful information, not to mention the fact that we have almost no interactivity with the buttons added in the main menu widget. In this part we will work with the in game widgets which we will use to display information to the user as well as provide the pause/game over menu.
Most of the functionality will be done through helper widgets that we will then instance in the main widgets. By doing this we will be able to keep things somewhat very simple, specially related to the entire widgets hierarchy, not to mention the possibility of reusing some of those widgets.
In the UI_InGame widget asset you can delete the temporary colored borders, if you haven't done that yet. Remember to not delete TopBox, GridBox and ExtraBox since those are the ones being positioned and sized.
Before proceeding, I have to mention that in this tutorial I'm a lot more concerned with the actual functionality of the widgets than anything else, although I do my best to have something minimally acceptable in terms of visual appearance. With that said, I do encourage you to experiment and tweak the settings to achieve a much better result than mine!
Player Score
This should be a somewhat simple widget, holding two simple static text widgets, while one of them will have its text bound to a function that will be used to retrieve the player score. If you are using the same directory organization that I have shown, in the UI/Helpers directory create a new widget blueprint asset, named UI_PlayerScore. Delete the Canvas Panel and, in the Designer Window, click the (dropdown) button Fill Screen and select Desired on Screen instead. That option only tells how we will preview the widget while designing, not how it will be in the end.
We want two static text widgets, one bellow the other. This means we will need a Vertical Box widget to hold them. So, add it and then the two static texts as children of the box. Change the Text property, under the Content category, to Score:. The second text widget can have whatever text you desire. In there we will create a function binding that will provide the actual value. So, click the Bind button (which is on the right side of the text box that allow you to enter the displayed text) and then, on the drop down, Create Binding. At this moment the editor will be changed to the Graph window, with the new function already created. Rename it to something more useful, like GetPlayerScore. In its graph just add on GetCurrentScore node and then directly plug into the Return Value of the function. One Int ToText conversion node is automatically created and it will look something like this:
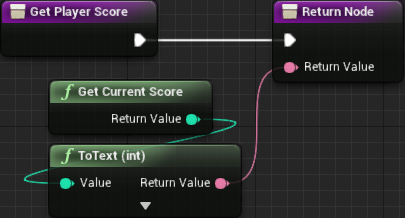
Another change that must be performed in this function is to check the properties are correct. If you click the main entry node of the function you should be able to edit the function's details. Expand the Graph category in order to show advanced settings and make sure the Const property is checked. If that is not done any widget using this helper will fail to compile because we are making use of a const/pure node, GetCurrentScore, in a non const function. And the error message is a bit unhelpful and looks exactly the same the one I have mentioned in the previous part:
Fast CreateWidget Warning! This class can not be created using the fast path, because the property SourceObject on PropertyBinding references UI_PlayerScore. Please add the 'Instanced' flag to this property.

On the second text widget, which will be used to display the actual score, I have changed the Justification property to Center so it gets centered bellow the Score: text.
Now we can open the Designer window of the UI_InGame widget and add in our UI_PlayerScore helper widget as a child of the TopBox. Compile and save the widget asset. Testing now should show something similar to this:
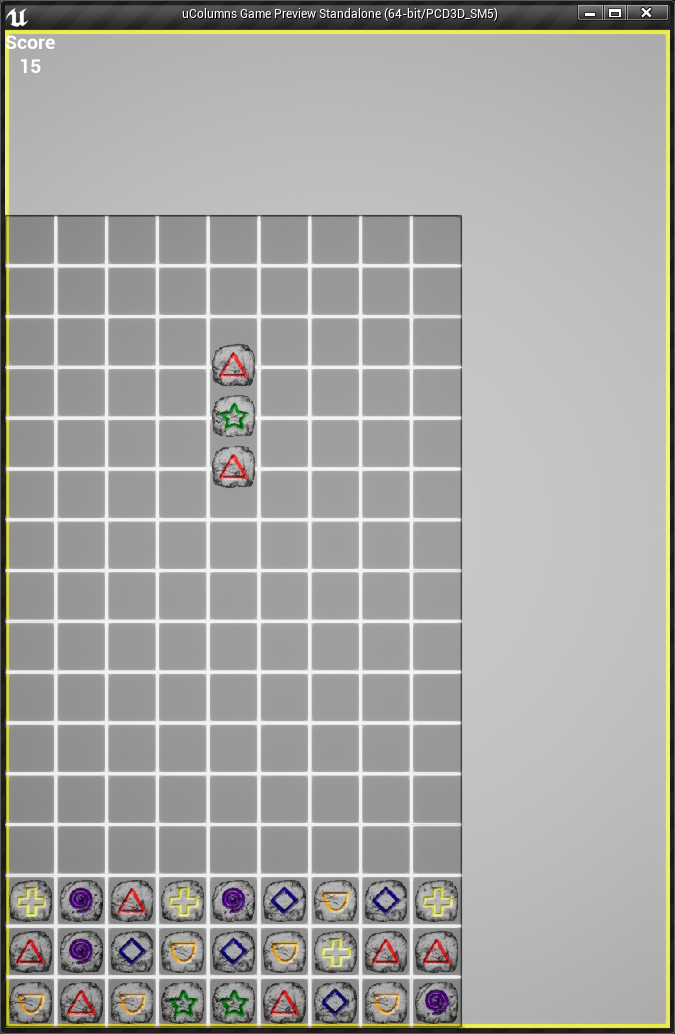
As you can see, the score is being displayed and correctly updated! However, the gap between the score and the grid is a bit too big, specially when compared to the space above the "Score" text. Changing a few properties related to the Horizontal Box Slot of the UI_PlayerScore widget instance in the UI_InGame widget we can fix that. Specifically, set its Size to Fill, Horizontal Alignment to Left and Vertical Alignment to Center. With this, the helper widget will "look" into the entire box area when computing the alignment. We still want it to be on the left size but vertically centered.
You may have noticed that UI_PlayerScore is way too close to the left border. In fact, it's at the exact coordinate of the left border. In the next part we will come back to this and fix it.
Block Image
Back in part 13 we updated the code so we could have information related to the player piece that will be spawned after the current in play, however we didn't have any means to visually display that (well, Ok, we still don't). In the case of this helper widget we will have to dynamically change it. Namely, it should be able to correctly display all of the blocks regardless of how many you set, within reason of course! The main thing to remember here is that our player pieces are always "columns", that is, blocks are always one above the other. Because of that, we can already consider the usage of a Vertical Box to layout the images representing the blocks. Iterating through the values in the NextPiece array means that we begin from the bottom most block, however each new addition into the Vertical Box goes bellow the previous widget, meaning that we will have to reverse the indexing somewhere.
Because we will need to dynamically spawn widgets, one for each block forming the player piece, we will need yet another helper widget. In this case its sole purpose is to allow us to setup the image (texture and dimensions). That said, create a new widget asset, in the helper directory. Name it UI_BlockImage. Delete the canvas panel and add one Image widget from the pallette window, which is under the Common category. By default it should already be set to be a variable (IsVariable is checked). Rename it to something more useful, like imgBlock. The actual image displayed by this widget will be changed throughout the game so we need means to easily update the brush used to draw this widget (imgBlock). Albeit with a somewhat increased computational cost, the easiest and most practical way of performing this updating is by binding a function to the brush property of image widget. That said, click the Bind button that is next to the Brush property, under the Appearance category and, in the drop down menu, choose Create Binding. Rename the created function to something like GetImageBrush. This function outputs an object of the type Slate Brush and we have to construct one.
There are a few options to build slate brush objects, but we will create a new function in our blueprint library. This function will return an slate brush after taking a theme data, draw size and block type ID as inputs. The theme data is necessary since it holds the block collection which, in turn, have the necessary information we need to construct the brush, namely the material. The block type ID points directly into an entry in this collection. When the slate brush is built, it requires the draw size of the image, so we will use that as argument in the function. That said, let's jump back to C++ and create a new function in the blueprint function library:
// Given a theme data, block type ID and the draw size, return a brush that can be directly used with
// an image widget. This assumes the block is "square"
UFUNCTION(BlueprintPure)
static FSlateBrush GetBlockBrush(class UThemeData* Theme, int32 TypeID, int32 DrawSize);
To implement this function we will require two extra includes, one that actually gives us the slate brush and the other that gives a default brush in case we can't return anything:
#include "slate/SlateBrushAsset.h"
#include "Brushes/SlateNoResource.h"
What we will do in this function is this, assuming the provided theme data is valid:
- Check if the
TypeIDis valid, that is, it actually points to an entry in the block collection inside the theme. In this case, we take the material associated with the block and build the slate brush using that. - Considering the
TypeIDis not valid, we build the slate brush using theBlockSprite, that is part of the theme data, to obtain the texture.
By doing this we have an "extra" chance to display something in case we don't have a valid block type ID. But then, we can also use this and forcefully send an invalid type ID in order to obtain a more "generic" image for some different usages. We will do so later in the tutorial. In any case, the slate brush is an struct that provides us a function, SetResourceObject() that we can use in order to setup the image we want. It will be able to extract the image from a common 2D texture or from a material. The code to implement this:
FSlateBrush UColBPLibrary::GetBlockBrush(class UThemeData* Theme, int32 TypeID, int32 DrawSize)
{
   if (!Theme)
      return FSlateNoResource();

   if (!Theme->BlockCollection.IsValidIndex(TypeID))
   {
      // Invalid TypeID, obtain the theme's block sprite
      UTexture2D* tex = Theme->BlockSprite ? Theme->BlockSprite->GetBakedTexture() : nullptr;
      if (tex)
      {
         FSlateBrush ret;
         ret.SetResourceObject(tex);
         ret.ImageSize = FVector2D(DrawSize, DrawSize);
         return ret;
      }
   }
   else
   {
      if (class UMaterialInterface* mat = Theme->BlockCollection[TypeID].Material)
      {
         FSlateBrush ret;
         ret.SetResourceObject(mat);
         ret.ImageSize = FVector2D(DrawSize, DrawSize);
         return ret;
      }
   }

   return FSlateNoResource();
}
There is one last thing. If you try to build the project at this moment, you will most likely get link errors related to the slate brush! The problem is that we are now making direct usage of the Slate module but we didn't specify to the build system that we need it. To fix that it's necessary to edit the uColumnsTutorial.Build.cs file. Commonly this file contains those two lines:
// Uncomment if you are using Slate UI
// PrivateDependencyModuleNames.AddRange(new string[] { "Slate", "SlateCore" });
As it turns out, we are using Slate, sort of. So, uncomment that line and then the build should work.
// Uncomment if you are using Slate UI
PrivateDependencyModuleNames.AddRange(new string[] { "Slate", "SlateCore" });
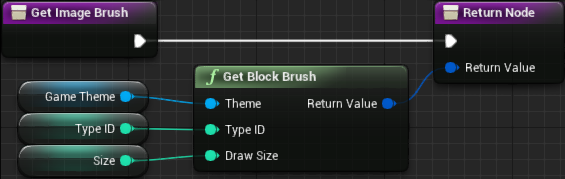
Now the project can be built and once done we can go back into the blueprint function we have bound to the Brush property of the image widget in our helper UI_BlockImage. In this function you should be able to add the node GetBlockBrush and directly connect its output into the function's output. However, we do need the inputs to this new function.
For the Theme Data input we could just add the Get Game Theme node based on the blueprint function we created early and directly plug in there. However, it would just further increase the cost of this widget, specially because GetGameTheme isn't exactly the cheapest of the functions. Since it's very easy to save a bit in this case, we will do so. For that, we create a variable that will hold the theme data and it will be initialized when the widget is constructed.
That said, create a new variable (make sure it's not local), name it GameTheme and set its type to Theme Data (object reference). Soon we will initialize it, but for now, just drag a get into the function and directly plug into the GetBlockBrush node. Now, hit the Compile button so we can set a default value in the Game Theme variable. After compilation is done, selecting the variable should allow editing its default value in the Details panel. Set a default theme in there that will be used mostly during design preview.
The TypeID input is what will actually "drive" the widget. Whenever we need to change the image displayed by the widget we will just change this input. The easiest way in this case it to perform this through a variable. So, create a new variable (again, make sure it's not local), name it TypeID and set its type to Integer. Now, there is an interesting thing we can do. When we dynamically spawn this widget we can "expose" some variables so we can set them in the same "create node". To do that, we have to further set the variable's properties, checking the Instance Editable and also checking the Expose on Spawn checkbox, which effectively allows us to edit during creation. Drag this new variable directly connecting it into the TypeID input of the GetBlockBrush.
Finally, we have the DrawSize. We won't know the exact value for this since it's dependent on the available space after the overall widget layout is setup. We can create a variable that will also be exposed during its creation, making things a lot easier to setup at a later moment. That said, create an integer variable named Size and connect it into the DrawSize input of the GetBlockBrush. Remember to set this new variable to be Instance Editable and Expose on Spawn. The blueprint function should look like this:
Next we "properly" initialize the Theme Data. Early we did set a default value to it, but we want to use the actual theme. In the Event Graph tab, if there isn't one Event Construct node, add it. Add a Get Game Theme node and, from it, add one IsValid node. When you search from this node you will see two options, one function (marked by a green "f") and a macro (marked by a white "?"). Choose the macro, since it already performs the Branch test and offers two execution pins. From the Is Valid execution pin we set the Game Theme variable:

Next Player Piece
We now have means to dynamically spawn new widgets meant to display the individual blocks of the player piece. We can now work on the helper widget that will manage those block widgets. Create a new widget blueprint asset (in the helper directory if you are using the same organization than me) and name it UI_NextPiece. This widget is meant to spawn, and keep track of, multiple UI_BlockImage widgets, one for each block of the player piece. As already mentioned, the player piece is always like a "column", one block above the other. So, remove from the Canvas Panel from the widget and add a Vertical Box, naming it BlockBox and checking the IsVariable property.
In order to make things a little bit simpler, let's create a blueprint function inside this widget so we can call it to perform the internal setup. This means, create a new function named SetInternalData. We will need 3 inputs, all of them Integers. The first one is meant to specify how many image block widgets must be spawned, so name it BlockCount. The second argument, the draw size of the block image, so name it BlockSize. Finally, give a default block type ID that will be set in all spawned block image widgets. That said, name the last input BlockTypeID.
During the game we will want to change the TypeID of the block image widgets, meaning that we need to have access to them. We could use the BlockBox and iterate through its children, but that also would force us to cast each of them to UI_BlockImage. Instead, we can create an internal array already of the correct type and fill it when spawning the widgets. That said, create a new variable (not local), name it BlockImageWidget and set its type to UI Block Image (Object Reference). Right after the drop down button that allows you to set the variable type, there is an square that, when clicked, presents a drop down allowing us to choose which kind of container this variable is, Single, Array, Set or Map. For our case, Array should be choice.
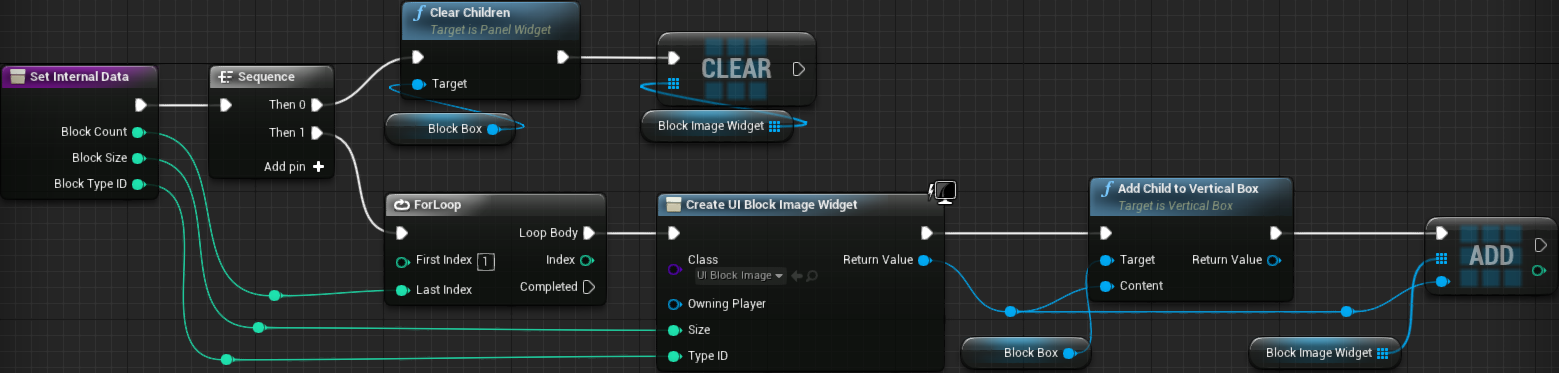
Back to SetInternalData function. Let's break it into "two sections" by adding a Sequence node. The first part will be meant to perform some cleanup. Well, actually to make sure we will deal with empty containers, really. In there, we want to clear the BlockBox vertical box, which is done through the Clear Children node. We also want to clear the BlockImageWidget array, which is done through the Clear node.
The next step is to create Block Count widgets of the type UI_BlockImage and then add the return value into both the BlockBox and BlockImageWidget. To do that we use the For Loop node, entering 1 in the First Index and Block Count into the Last Index. The reason we begin from 1 and not 0 is because the ForLoop macro, when iterating, includes the Last Index into the body, internally using <= comparison. In the body of the loop we have to spawn the widget, through the use of Create Widget node. Once the Class input is set to UI Block Image, Size and Type ID input pins should appear in the node. The return value of the Create Widget should be directly added into the BlockBox, by using Add Child to Vertical Box, and also into the Block Image Widget array, with Add node:
Just so we can preview something in in the designer window we will call Set Internal Data from the Event Pre Construct node. We want to use this mostly for previewing and perform the actual setup at a different moment, after we calculate the draw size. Luckily, this event provides one boolean, Is Design Time that allows us to know if we are in the design window or in the game. We directly connect this boolean into the Condition of a Branch node and, in the true execution pin we call Set Internal Data. Again, because it's mostly for previewing, we hard code the input values of the setup, Block Count = 3, Block Size = 32 and Block Type ID = -1.
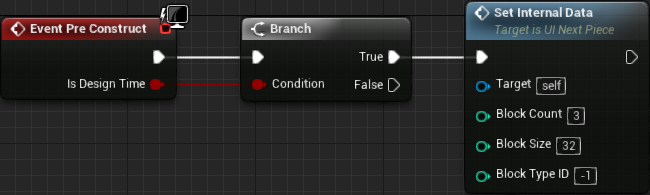
In the designer preview the widget should be displaying 3 "empty blocks", the texture used to setup the BlockSprite property inside the default theme data setup in the UI_BlockImage.
The intention is to add the entire "next piece display" inside the ExtraBox, which should have plenty of available space for that. However, in order to provide some flexibility as well as avoid some display errors we should calculate the draw size to ensure the widget is correctly shown. In this case we have to check both the width and the height of the available area. We can even further restrict the used space, perhaps define a maximum of 40% of the available vertical space and 90% of the horizontal size. To perform the calculation we have to establish a default draw size. We could hard code to, say, 64 or create a function meant to retrieve the actual size being used to draw the block actors inside the grid.
If the textures used to draw the blocks are the exact same size of each tile in the grid tile set, then we can obtain this value by calling GetScaledCellSize() from the APlayField class. As it turns out, the AGameModeInGame class holds a pointer to the play field objects in the scene, however this class does not provide public access to this object. Instead of relying on the game mode we could use one strategy we have used before in order to obtain the play field pointer and that is through the use of actor iterator. That said, let's declare the function in our blueprint library:
UFUNCTION(BlueprintPure, meta = (WorldContext = "WorldContextObject"))
static float GetBlockDrawSize(const UObject* WorldContextObject);
In its implementation we first obtain the world object, which is needed as argument to construct the iterator. Then, we check if the first object of the actor iterator is valid and, if so, directly return the GetScaledCellSize(). Then, at the end of the function we return a default value of 64, which is the size of the texture.
float UColBPLibrary::GetBlockDrawSize(const UObject* WorldContextObject)
{
   if (UWorld* world = GEngine->GetWorldFromContextObjectChecked(WorldContextObject))
   {
      TActorIterator<APlayField> it(world);
      if (APlayField* pf = *it)
      {
         return pf->GetScaledCellSize();
      }
   }

   return 64.0f;
}
When comparing DrawSize to the available width we don't have to do much since we have a "single column" meaning, in this case, we can simply use DrawSize = min(DrawSize, AvailableWidth * 0.9). This is simply telling that if 90% of the width is smaller than the DrawSize then we have to use this value since it specifies the maximum width we can use.
When dealing with the height, however, we have to take into account the amount of blocks forming the player piece. Yet, the computation here is relatively simple. We established that we don't want to use more than 40% of the available height. We can then use AvailableHeight * 0.4 / BlockCount in order to calculate the "individual height" of each block in a way that the entire "piece" would use that 40% space. However, we don't want to exceed the width, so we also use the min() function.
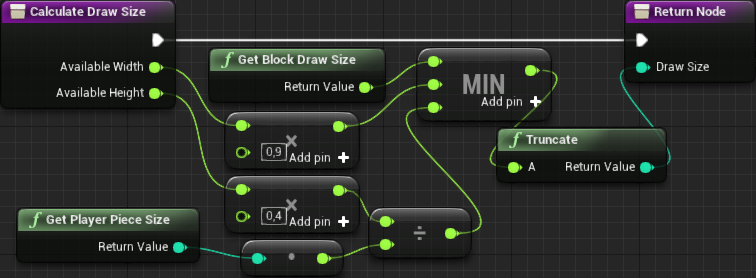
So, create the new blueprint function (remember, we are working with the UI_NextPiece helper widget), named CalculateDrawSize. In its properties check the Pure check box which will allow us to call this function without an execution. With all that has been said here, it should be clear that we need two input values, AvailableWidth and AvailableHeight. Set both types to Float. This function is meant to return the draw size, so add an output. Because the DrawSize is an integer, set the output type to that instead of Float. The graph becomes relatively simple since we need a single Min (float) node with 3 input pins receiving GetBlockDrawSize, AvailableWidth*0.9 and AvailableHeight*0.4/PieceBlockCount:
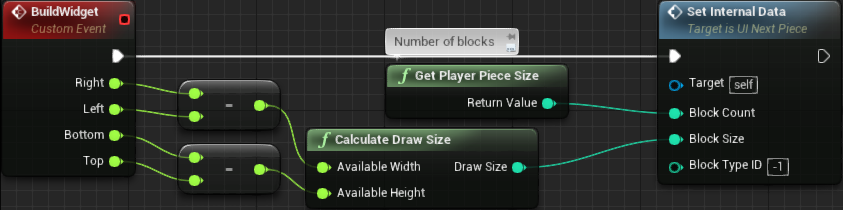
From the UI_InGame main widget we will want to build the UI_NextPiece widget. More specifically, before making the widgets visible. But, considering how we have implemented the helper widget, we would have to call two of its functions in order to perform the setup. Although it's not really a problem, we can slightly reduce the node clutter if we create another "function" in the UI_NextPiece that will perform the necessary calculations. Instead of creating a function, let's add a Custom Event, named Build Widget (in the UI_NextPiece widget). We add 4 float inputs to it, Right, Left, Bottom and Top, respectively (this order will avoid crossing connections). From it we directly call SetInternalData. Block Count should be connected to Ge Player Piece Size node, which is a function we have added through the blueprint function library. Then we add a calculate Draw Size and connect it into the Block Size input pint of the Set Internal Data. The available width is calculated by Right - Left and available height Bottom - Top. The Block Type ID we hard code -1 which will effectively use the "empty block":
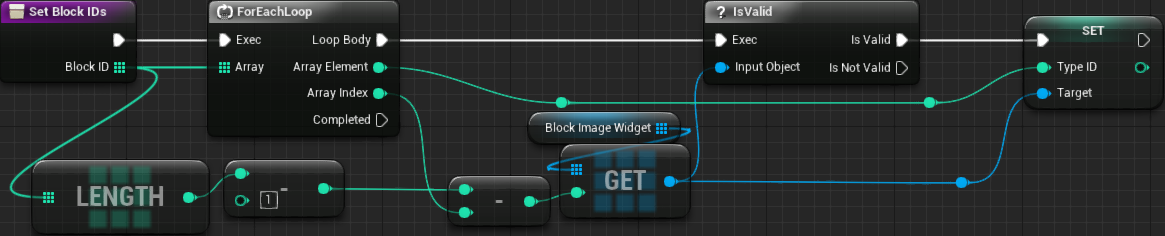
Lastly, we need one function, SetBlockIDs, to change the TypeID on each block of the UI_NextPiece. This function will receive, as argument, the array containing the ID types of each block that will be spawned next, which is an array of integer values. We then use ForEachLoop to iterate through each element of this array and take the value to directly set the TypeID on the corresponding element of the BlockImageWidget array. Now remember that we have to reverse the indexing here, which is somewhat simple to be done. For that, we need the last index, which is BlockCount - 1, and the index of the element currently being iterated, which is given by the ForEachLoop with the Array Index output pin. Subtracting Array Index from BlockCount - 1 should give the reverse indexing. Since Array Index begins from 0, we effectively get a "backwards iteration index" that begins from the last index! The BlockCount we can easily obtain by using Length node on any of the arrays that we will use. Yes, we do have a function in the blueprint library meant to give us this exact same value. I have opted to use the Length just because it's cheaper than our blueprint function.
We can now update the UI_InGame widget so it contains UI_NextPiece. Remember that I mentioned about the intention of adding the next piece display inside the ExtraBox container. That said, drag in a Text widget, setting its text to Next and center horizontal alignment. Then, drag in one UI_NextPiece right after the Next text. Set its horizontal alignment to Center as well. By default is should already be marked to be a variable and if it's not, enable it because we will need to access this widget from the Blueprint.
We now want to call in the UI_NextPiece's BuildWidget function. Because this function requires data that is changed whenever the game window is resized, we will call it from the OnResize event handling function, inside the UI_InGame widget. The input values can be retrieved from the GetAreaLimits and GetGridLimits, which we are already using to plug into SetLayout function. Specifically, we want to tell the coordinates of the ExtraBox. The bottom right of this box corresponds to the bottom-right of the area limits, while the left corresponds to the right of the grid limits. Finally, the top is the same of the grid limits' top. With that in mind, we can update the graph:

At this moment, the result should look like this:

While the widget is there, not only it's showing the "empty block" but also it's not getting updated when the player piece lands. Indeed, we didn't actually call the function we have added meant to update the images! Early in the tutorial we did add an event system, directly tied to the "next piece changed", inside the game mode class. We now have create a new function and bind to this event. For that we need to obtain the correct game mode object, that is, casted to the ColGameModeInGame type. We do this binding from the Event Construct node of the UI_NextPiece. The most important thing to note is that we have to check if the size of the Next Piece array matches the BlockImageWidget array. This is only possible when the level is loaded, since our Build Widget will not have been called before that. The graph should be pretty straightforward:

There is still one problem here. When first loading the level, the next piece display will still be incorrect since the event will be called before the widget is fully built. A somewhat easy approach here is to create a new function meant to force the game mode to broadcast the event. That way, once the widget is built with the Build Widget function we can call that function and our widget should get updated. That said, let's create the public function in our game mode class:
// Force the OnNextPieceChanged event to be broadcast
UFUNCTION(BlueprintCallable, Category = "Events")
void RequestNextPieceData() { mOnNextPieceChanged.Broadcast(mNextBlock); }
Then we update the Build Widget graph to call this new function. In there we have to obtain the game mode object and cast to the Game Mode In Game type:

Pause/GameOver Menu
Right now when the game is over everything will seem frozen. There is no way to play again or go back to the main menu. Besides that, if you want to pause the game there is no way to do that either. Let's fix that by editing the UI_InGame and adding the menu that will be displayed on both cases, game over and game paused. In this menu we will display a text that will reflect the situation "Game Over"/"Paused". We will want several buttons that will allow un-pausing/restarting the game, access some settings, go back to the main menu and completely exit the game.
Accessing some settings means that we will probably want to change the menu to a different set of UI elements. Again, the easiest way of doing that is by using the Widget Switcher widget. That said, let's drop one onto the GridBox, renaming it to MenuSwitcher and changing the Size property from Auto to Fill. In order to avoid creating yet another helper widget to hold the pause/game over menu, we add one vertical box inside the MenuSwitcher, which will allow us to directly design said menu. Then, inside this box we add a text and four text buttons (UIC_TextButton).
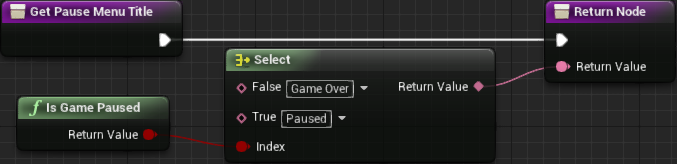
The text should be changed to center justification and the actual displayed text, the Text property should be bound to a new function. In my case I have named this new function as GetPauseMenuTitle. Its graph is pretty straightforward. Through the Select node, we check if the game is paused, with the Is Game Paused (which is already provided by the engine), and set the output to either Game Over or Paused:
The first button is meant to resume the game (if it's paused) or restart the game (if the game is over). That said, rename it to btUnpause. Its label requires a bit more logic. Just to make things easier to identify when designing the menu, set the label to something like Resume/Restart. Because the label is a blueprint property we can't create a binding to it, so we will have to rely on a different strategy to change the value of the property. We will come to that soon as we will take advantage of another binding that will be added shortly.
The next button will be used to access the game settings so rename it to btSettings. For now just set its label to Settings and later in the tutorial we will work on its functionality.
Then we have the button that will take the game back into the main menu, so name it btMainMenu. Set the label to Main Menu.
The last button will be used to quit the game. Rename it to btQuitGame and the label to Quit Game.
If you click the "Play" button you will see that this menu is being shown on top of the grid but we don't exactly want that when the game is actually running! This menu is meant to be shown only when the game is over or when it's paused. We have means to detect if the game is paused or not (remember that Is Game Paused node provided by the engine) however we don't have means to (easily and quickly) tell if the game is over or not. The easiest way here is to create a new boolean variable, IsGameOver, that we can manipulate throughout the game flow (in other words, in the UI_InGame create a new boolean variable). By default we want this value to be false, which should already be set in this way.
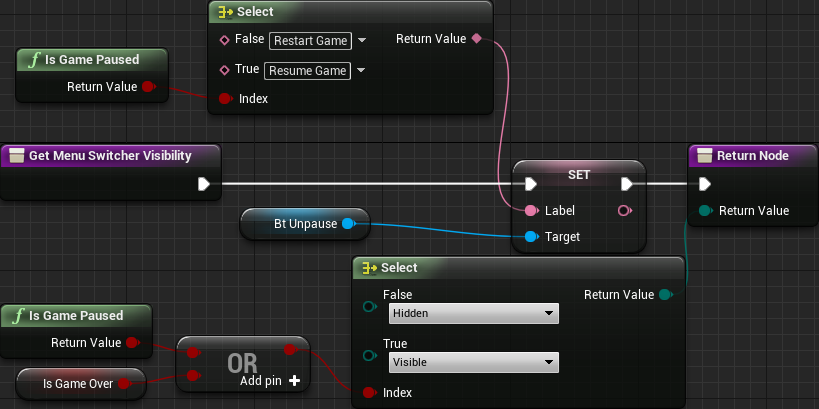
With that we can select the MenuSwitcher widget and bind a new function to the Visibility property. Within that function we output the result of a Select node that will test if the game is over or the game is paused. In that case we set the visibility to Visible, otherwise Hidden. We will take advantage of this function and change the label of the btUnpause basically by directly setting the Label variable of the button:
Pausing/Un-Pausing
Playing now should correctly keep the menu hidden, however we don't have means to bring the menu yet, either from the game over or pause! We will begin by implementing the pause system. Because we are very used to pause the game through the Escape key, we will use that for this task. However, keep in mind that testing the game in the editor will not allow us to use this key for this exact purpose since it's used to actually close the game test. Because of that we will add an extra key, P, that will also pause/un-pause the game.
To make things easier, we add a new action binding to our input settings. For that, open the Project Settings and then go to the Engine - Input category (we have already been there). Add a new Action Mapping and name it Pause. Add the two mentioned keys into the mapping and, if desired, the Gamepad Special Right which, on the XBox Controller, should correspond to the Start button. In order to get this event we have to use the game controller class. Since we only want this functionality when in game, we edit the player controller associated with the in game mode. We already have a blueprint game controller, BP_PCInGameDefault, so open it. In the event graph tab, search for the Pause node. You will probably find multiple ones, but the one we want is under the Input -> Action Events category. From there we want to invert the current pause state, which can easily be done by negating it, with the NOR boolean operation. For that, we have the Not node:

Later we will update this graph since we will not want to "pause" the game when it's over! Nevertheless, if we test it right now, we will be able to pause the game, bringing the pause menu. However, pressing the P key will not unpause it! The problem is that our event node is not getting called when the game is paused. Luckily it's very easy to tell the engine that we actually want this event to be called! Click the node InputActionPause and, in the properties section, there should be available the Execute when Paused property. By default it's unchecked so enable it. Compile and save the blueprint and let's test again! Yes, now the Pause input action should correctly work to pause and un-pause the game!
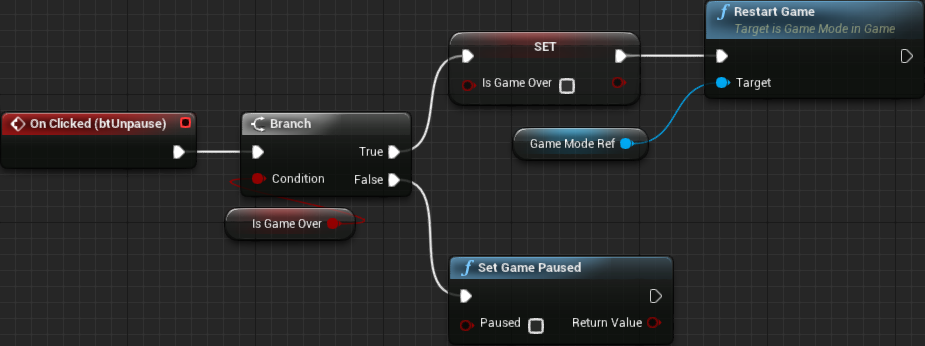
But, how about the Resume Game button? Let's go back to the UI_InGame widget and add some graph into the OnClicked event of the btUnpause. Now, remember that we will reuse this button to restart the game in the case we are actually in the game over state. So, we either branch over the IsGameOver boolean variable or the IsGamePaused return value. Notice that it's valid to assume that if the IsGamePaused is false we are in the game over state since this menu is meant to be shown only in either state and we can't use this button to actually "pause" the game. Just to avoid confusion when looking into the nodes (specially some time after we have worked on the graph), we will branch over the IsGameOver variable. For the moment we won't add anything from the True execution pin, since we are not dealing with the game over system yet. From the false, however, all we have to do is set the game paused state to false:

Now we can un-pause the game by either pressing the Resume Game button or by pressing again the input binding keys. You may have noticed, however, that our menu title is barely readable because of the background. Let's first focus on making the things work then we make it prettier, shall we?
The Over State
Although we do have a menu to be displayed when the game is over, we are not doing so yet. The thing is, we don't have easy means to detect when this is happening. Granted, we did create a system where game modes are meant to override a virtual function and tell if the game is over or not, however this stays somewhat "confined" within the game mode. We can use the event system we have been using throughout the tutorial, where any object that actually needs to be notified binds a listener function. That said, let's declare the delegates:
DECLARE_DYNAMIC_DELEGATE(FOnGameOverDelegate);
DECLARE_DYNAMIC_MULTICAST_DELEGATE(FOnGameOverMultiDelegate);
Now, in the private section, we add the multi cast delegate object:
UPROPERTY()
FOnGameOverMultiDelegate mOnGameOver;
Next, we have to add the public function that allows binding to this delegate:
// Binds a new event function that will be called whenever the game is over
UFUNCTION(BlueprintCallable, Category = "Event Binding")
void ListenOnGameOver(FOnGameOverDelegate OnGameOverDelegate) { mOnGameOver.Add(OnGameOverDelegate); }
Now we have to broadcast this event when the game is over. Remember when we designed our internal state machine, creating StateGameLost and StateEndGame? In this design, we perform some tasks from the StateGameLost and then transition into the "empty" End Game state. Yes, I know, we are not performing anything yet. With this design, right before transitioning into the StateEndGame we can broadcast the game over event. However, if we did condense into a single state we would need some extra internal upkeep necessary in order to not fire up the event multiple times. That said, let's update the StateGameLost code so it broadcasts the game over event just before transitioning into the StateEndGame:
AGameModeInGame::StateFunctionProxy AGameModeInGame::StateGameLost(float Seconds)
{
   mOnGameOver.Broadcast();
   return &AGameModeInGame::StateEndGame;
}
With this code (remember to build the project!) we can now get event notifications whenever the game is over. We will use this to directly set the IsGameOver variable inside the UI_InGame widget. From the Event Construct we add the graph that will obtain the game mode object, cast it into GameModeInGame, promote the casted return to a variable (named GameModeRef) and then call ListenOnGameOver() function. The event function we will give as argument simply sets the variable (IsGameOver) to true:

Testing it now will indeed bring the menu when the game is over and with the title having the correct Game Over text, as well as the button's label showing Restart Game rather than Resume Game. That shows our logic has been correct up to this point, however clicking the Restart Game button doesn't do anything. In order to restart the game, besides resetting the IsGameOver variable to false we also have to make sure the play field is empty, zero out the player's score and so on. Now, remember back in part 13 when we implemented the scoring system in the player controller? We also added a Reset() function that is called from the StateGameInit state function. This means that if we request the game mode to go back into the Game Init state, then we will also reset the score. However, we still must cleanup the play field. Let's add a public function in the game mode so we can request a game restart:
UFUNCTION(BlueprintCallable)
void RestartGame();
In this function we will make sure the grid is empty and, if necessary, perform some other cleanup. In the end then we reset the internal current state:
void AGameModeInGame::RestartGame()
{
   // Make sure there are no blocks in the grid
   for (FGridCellData& cell_data : mGridData)
   {
      if (cell_data.BlockActor)
      {
         cell_data.BlockActor->Destroy();
         cell_data.BlockActor = nullptr;
      }
   }

   // Reset all the floor levels
   for (int32 i = 0; i < mColumnFloor.Num(); i++)
   {
      mColumnFloor[i] = 0;
   }

   // Make sure the helper arrays are empty
   mLandedBlock.Empty();
   mMatchedBlock.Empty();
   mRepositioningBlock.Empty();

   // And the next piece is "null"
   for (int32 i = 0; i < mNextBlock.Num(); i++)
   {
      mNextBlock[i] = -1;
   }

   // Finally, reset the state machine
   mCurrentState = &AGameModeInGame::StateGameInit;
}
As you can see, we are performing quite a bit of cleanup, some of them probably not necessary but it should help avoid some unpleasant bugs. I didn't explain everything from this function mostly because they are pretty much self explanatory, not to mention the comments are further (hopefully) ironing that out. Anyway, now we have means to logically restart the game, meaning that we can update the graph for the Restart Game button. In there we set the IsGameOver variable to false and then use the variable GameModeRef (which we promoted from the game mode casting) to call RestartGame():
Pausing Again
With everything that we have up until now, we can pause the game by pressing the bound keys, which will bring a menu. Then, we can un-pause the game by either pressing again one of those keys or clicking the button Resume Game. This very same menu can be brought up by the game over conditions, updating the text widgets accordingly. However, if we get the Game Over menu, pressing the pause button will effectively pause the game and change the menu labels accordingly. To make matters worse, if we click the Resume Game it will perform the cleanup logic, but the menu will stay in there, in the paused state. Only by clicking a second time will actually bring us back into the game.
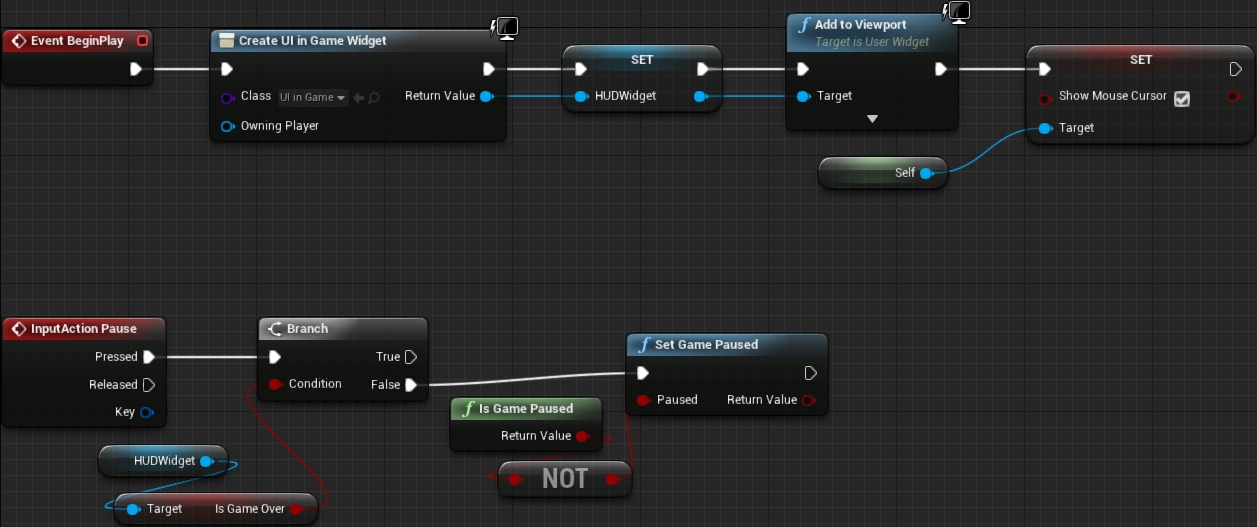
The thing is, we are allowing the game to be paused when we don't want to. If wanted, we could create a function meant to tell us if the game is over or not (and, of course, update the previous graph we have created). But, all we have to do is check the UI_InGame's IsGameOver variable before calling the SetGamePaused function, in the game controller blueprint. Since we are creating that widget from this very same blueprint, we can just promote the return value of the create widget into a variable and then use it to branch over the boolean variable. More specifically, we only want to pause the game if it's not over:
Resize While Paused
If you try to resize the game window while the pause menu is displayed, probably things will not go exactly as desired. The game play field and HUD will not be repositioned and resized according to the new game window. And even after un-pausing the camera will not be fully updated. The problem is that when the game is paused there are some sections of the game loop that are not called, one of them is necessary for updating the camera settings. After digging into the engine's source code it's possible to find the UpdateCameraManager() function in the APlayerController class. Indeed, this function is called as part of the ticking logic, which doesn't occur when the game is paused. Fortunately we can manually call this function within our own camera update code, so we force the camera to take into account the new ortho width setting.
All that said, we have to update the UpdateCamera() function and append code to obtain the player controller and call UpdateCameraManager(). We have already added code to retrieve the player controller but we are casting it to AColPlayerController. Because we don't need this casting, we will repeat a little of the get world → get first player controller logic. One last thing to mention before dumping the code is the argument required by the UpdateCameraManager() function, which is the elapsed time. We can just pass in 0.0 and things will still work.
void AColCamera::UpdateCamera()
{
   ...
   if (UWorld* world = GEngine->GetWorldFromContextObjectChecked(this))
   {
      if (APlayerController* pc = world->GetFirstPlayerController())
      {
         pc->UpdateCameraManager(0.0f);
      }
   }
}
Quitting
We still have 3 more buttons to add functionality. The first of those, is the Settings button, but we will only work with it later in the tutorial. For now, we will just add the back to the main menu and exit the game button functionalities. We will only do so because they are very simple. In the case of the Main Menu we have to transition back into the MainMenu level map. For the last button, we use one node provided by the engine, Quit Game and that's it:

Ok, that will work, but we will certainly want to add a confirmation dialog for both buttons. Near the end of the tutorial we will work with that.
Our project is now fully playable, albeit lacking a few game play features. Still, we are tracking (and displaying) the player score, showing which blocks will be used in the next player piece, allowing the game to be paused/un-paused, with a menu that allows us to go back to the main menu or even quit the game and a "restart game" functionality, which is accessed from the "game over" menu. Yes, the UI is not pretty at the moment, but we will make it less ugly later.