Part 9 - The Player PieceApril 11, 2019
Up to this point we have the play field/grid, where the blocks are confined at, a somewhat easy and "generic" block spawning code and a simple state machine implementation meant to govern our game rules. Not to forget the initial game rule, which spawns a bunch of blocks at the beginning of a new game. However, there is absolutely no interactivity yet. As we have already seen, what the player will control is the Player Piece, as named throughout this project. In this part we will start working on the code meant to handle the player piece.
Requirements
As usual, before jumping into the code we first see a little bit of theory (I promise this one will be short). The first thing is to analyze the common way to deal with user input in Unreal Engine. Typically, an actor is possessed by a player controller. This controller gets the configured input events and then relay the relevant information to the actor. It's also possible to see some projects where the actor directly deal with the input events. No matter what, this kind of pattern kind of forces the player to control a single actor. The player piece is meant to be formed by multiple ABlock actors. Because of that, we have to completely ignore this "actor possessing" feature of Unreal Engine. Soon we will see how.
We will need means to manage the block actors forming the player piece. This is relatively simple, as we will take advantage of the TArray class. Based on this information, we can somewhat think about the other actions necessary to be part of the player piece. One of them, of course, is dealing with player input. In this case, player input will cause one of the following:
- Move the player piece sideways, that is, from one column to another. This should be done smoothly rather than just "teleporting" the block actors into the new column.
- Change the order in which the blocks are forming the player piece. In this case we will just "teleport" the player pieces.
- "Accelerate" the falling speed of the player piece, so at the beginning of the game, when pieces are slow and the player has enough time to position the piece, there won't be any need to actually wait for the piece to land.
Based on these 3 items we know that we will need a function meant to setup sideways movement, at least one to swap the block order and another one to "accelerate" the falling speed. More than that, we also know that we will need to configure two buttons for sideways movement, two buttons for block swapping and another button for increased falling speed.
Both sideways and falling movements should be smooth rather than "teleporting". In other words, animation. This means we will need to constantly update the player piece, via some kind of tick. In this case we will manually call a "tick" function rather than work with an object that does receive ticking from the engine.
FPlayerPiece
After this brief overview of the player piece, we can somewhat decide upon how to actually implement it. Ideally this should be lightweight but it also requires some functionality. A class would be the perfect candidate here. We could then create one UCLASS() however it adds quite a few extra stuff. We can use an struct just like a class, which gives use the necessary tools to implement the functionality and still keeping it relatively lightweight. With this in mind, we create FPlayerPiece, in a new file, PlayerPiece.h:
#pragma once

#include "CoreMinimal.h"
#include "PlayerPiece.generated.h"

USTRUCT()
struct UCOLUMNSTUTORIAL_API FPlayerPiece
{
   GENERATED_USTRUCT_BODY()
public:
   FPlayerPiece() {}

private:
   TArray<class ABlock*> mBlock;
};
Throughout the rest of this part we will add in to this struct, but for now let's just add the initial content in the definition file:
#include "PlayerPiece.h"
#include "Block.h"
Piece Initialization
Throughout the tutorial every time I mentioned the player piece, I didn't say the exact number of blocks forming it, only occasionally said at least 3 blocks. Again, we will want to setup this through a variable that can be tweaked and maybe even give the player the opportunity to change this as a difficulty setting. With that said, we need to add a game play setting meant to "tell" how many blocks must be spawned to compose the player piece. Following the exact same logic of the mMatchRunSize property added in the previous part, we add mPlayerPieceSize into the public section of the UColGameInstance class:
UPROPERTY(EditAnywhere, meta = (DisplayName = "Player Piece Size"))
int32 mPlayerPieceSize;
The usual public functions meant to set and get this property:
int32 GetPlayerPieceSize() const { return mPlayerPieceSize; }

void SetPlayerPieceSize(int32 Size) { mPlayerPieceSize = Size; }
And of course we have to initialize this property with a default value, in the game instance constructor:
UColGameInstance::UColGameInstance()
{
   ...
   mPlayerPieceSize = 3;
}
To make things easier to access this property, we follow the usual way of adding two functions into the blueprint function library:
// Set the player piece size
UFUNCTION(BlueprintCallable, meta = (WorldContext = "WorldContextObject"))
static void SetPlayerPieceSize(const UObject* WorldContextObject, int32 NewSize);

// Obtain the player piece size
UFUNCTION(BlueprintPure, meta = (WorldContext = "WorldContextObject"))
static int32 GetPlayerPieceSize(const UObject* WorldContextObject);
And the implementations:
void UColBPLibrary::SetPlayerPieceSize(const UObject* WorldContextObject, int32 NewSize)
{
   if (UColGameInstance* gi = GetColGameInstance(WorldContextObject))
   {
      gi->SetPlayerPieceSize(NewSize);
   }
}

int32 UColBPLibrary::GetPlayerPieceSize(const UObject* WorldContextObject)
{
   if (UColGameInstance* gi = GetColGameInstance(WorldContextObject))
   {
      return gi->GetPlayerPieceSize();
   }
   return 3;
}
Since all "in game" game modes will require a player piece, we add one FPlayerPiece property in the AGameModeInGame class. In the .h file we first include the PlayerPiece.h:
#include "uColumnsTutorialGameModeBase.h"
#include "helpers.h"
#include "PlayerPiece.h"
#include "GameModeInGame.generated.h"
Then, in the private section we add the property. Notice that it's not meant to be a pointer, that's why we had to include PlayerPiece.h in this file:
FPlayerPiece mPlayerPiece;
In order to easily deal with the array inside the FPlayerPiece, we have to initialize it. By doing this initialization we will be able to, later, directly access elements of the array, by index without having to worry if the "element" is there or not. In this case, by element, I mean the memory chunk that can be directly accessed by using array[index].cpp syntax. For that, we add a public function in the FPlayerPiece struct:
void InitArray(int32 Size);
In the implementation, we use a loop to add a nullptr until we fill the array with Size elements. Note that TArray does have code meant to do this kind of initialization but, for some reason, this resulted in quite a few crashes of the game, specially in the packaged version. Nevertheless, the InitArray() implementation:
void FPlayerPiece::InitArray(int32 Size)
{
   mBlock.Empty(Size);

   for (int32 i = 0; i < Size; i++)
   {
      mBlock.Add(nullptr);
   }
}
We could then initialize the player piece from the BeginPlay() function, as that will work. However, if we add this initialization in the StateGameInit() we get one "hidden flexibility", which is the fact that we will be able to provide , if desired, means to change the piece size from a "game over menu" for example. If the initialization is done from the BeginPlay() the initialization is called only once when the map loads. This somewhat would "force" the player to go back to the main menu, change relevant settings and then go back into the game. With that said, let's update the StateGameInit() state function:
AGameModeInGame::StateFunctionProxy AGameModeInGame::StateGameInit(float Seconds)
{
   // Initialize the player piece
   mPlayerPiece.InitArray(UColBPLibrary::GetPlayerPieceSize(this));
   // Perform custom game initialization
   CustomGameInit(Seconds);
   // And transition into the Spawning state
   return &AGameModeInGame::StateSpawning;
}
The Spawning
We finally have the necessary tools to start working on the code to spawn the player piece, that is, multiple block actors. The FPlayerPiece struct contains a private array property meant to hold the pointers to the spawned block actors. We could create some functions to provide direct access to this array or members of the array but we can do better, although requiring usage of the lambda feature of C++11 which may look a bit confusing for some people. The basic idea here is to create a SpawnPiece() function, in the FPlayerPiece struct receiving a single argument, a function like object meant to provide the block actor pointer. By doing this we keep the responsibility of block management confined to the player piece "class" while the game mode does the actual creation of the actor object.
We have two possibilities to implement the SpawnPiece() function:
- Using template parameter: Has the advantage of not requiring any extra
#includein thePlayerPiece.hfile, however the entire implementation of the function has to be placed in the.h. - Using std::function: Allows us to move the implementation into the
.cppfile as well specifying the desired signature of the expected function object. In turn, we have to add an extra#include.
Personally my preference would be to use option 2, however the recommendation is that we only use STD library for communication with external libraries (unfortunately I didn't save the URL where this is mentioned so I can't provide a reference link for this fact). This is not exactly the case, so let's follow the recommendation, shall we? All this function has to do is to iterate through each element of the internal array, assigning to it the return value of the function object. In order to know the exact place to spawn the block, we send the iteration index as an argument to the function object, like this:
template <typename GetBlockFunc>
void SpawnPiece(GetBlockFunc Func)
{
   const int32 bcount = mBlock.Num();
   for (int32 i = 0; i < bcount; i++)
   {
      mBlock[i] = Func(i);
   }
}
Shortly we will see exactly how to use this function. We will make use of the SpawnBlock() function that we implemented in part 6. This function requires the Column and Row in order to position the block. Because we want the player piece to be spawned at the center column, all we have to do is GetColumnCount() / 2 to obtain the column index. We also want the top most block of the player piece to be in the "last" (top most) row of the grid. If we think about building the player piece bottom-up, the first row index can be obtained by GetRowCount() - GetPlayerPieceSize(). Because we are giving the "block index" within the internal array as argument to the function object, we can use that to compute the actual row where the spawned block should be positioned, just by adding this index to the value we have computed for the first row index.
The last detail of the implementation that must be commented relates to the last argument of the SpawnBlock() function. It's a flag that, if true, automatically adds the created pointer into the internal grid data of the game mode class. As mentioned early, this is not the case for blocks meant to compose the player piece. So, we have to set this flag to false.
Now, remember in part 7 when we implemented the core of the state machine system? At that moment we added some initial code into the StateSpawning() state function. Now we will add the code to actually spawn the player piece. We will insert the code right bellow the // Game not lost. Spawn a new player piece comment. In there we compute the spawn column and the initial row and then call SpawnPiece() with a lambda function that, in turn, calls the SpawnBlock() function:
AGameModeInGame::StateFunctionProxy AGameModeInGame::StateSpawning(float Seconds)
{
   ...
   else
   {
      // Game not lost. Spawn a new player piece
      // Spawn piece at:
      const int32 spawn_row = GetRowCount() - UColBPLibrary::GetPlayerPieceSize(this);
      const int32 spawn_col = GetColumnCount() / 2;

      mPlayerPiece.SpawnPiece([this, &spawn_row, &spawn_col](int32 Index)
      {
         return SpawnBlock(spawn_col, spawn_row+Index, PickRandomBlock(), false);
      });
   }
   ...
}
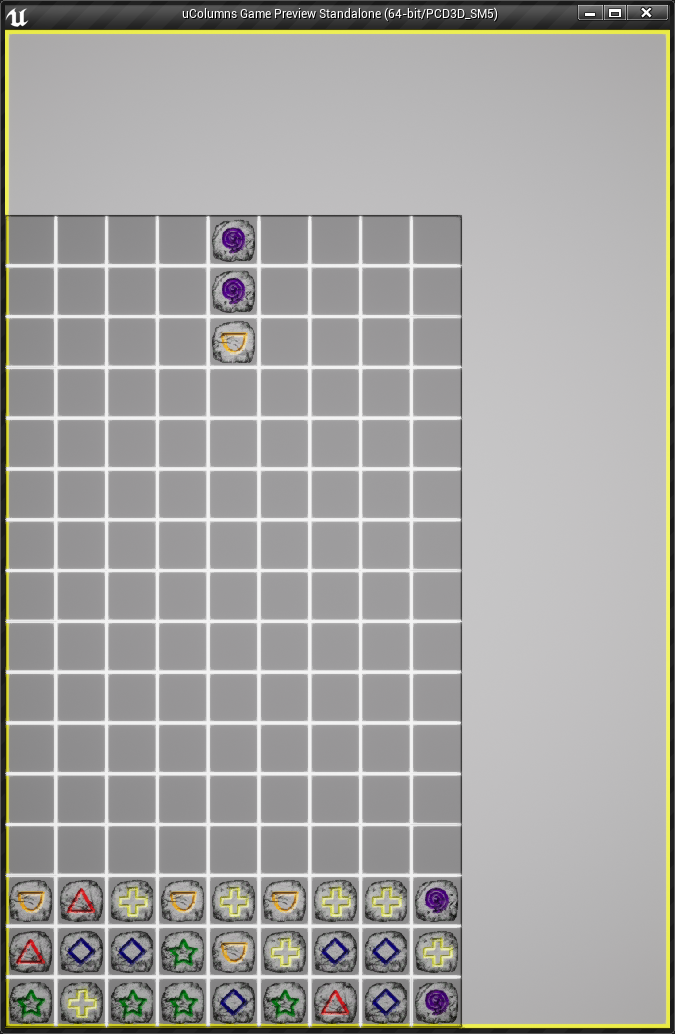
That's it! Build the project and now when clicking the "play" button you should have something similar to this:
Player Input
We finally have the player piece code, and tested! Before we can start to add interaction, we have to setup the player input system. We begin by setting up the button mappings, so click Edit → Project Settings... → Engine/Input. More detailed information on this can be found here. In there we can setup the button bindings for the various interactions that we desire. We require a single Action Binding and two Axis Bindings, so click the "+" button once for the Action Mappings and twice for the Axis Mappings. Rename the action map entry to Accelerate and the two axis entries to SideMove and Rotate, respectively.
In the Accelerate action entry we need two buttons, Space Bar and Gamepad Face Button Bottom. This last one corresponds to the button A in the XBox controller.
For the SideMove and Rotate axis mappings, we will need 6 "buttons" for each one of them. Essentially an axis mapping allows us to set buttons for two opposing directions in that axis. For instance, the SideMove axis can map buttons for both left and right, just by changing the scale value. The following tables are meant to give the scale values associated with the buttons that must be set within each axis mapping:
SideMove
| Button | Scale |
|---|---|
| Left | -1.0 |
| A | -1.0 |
| Gamepad Left Thumbstick Left | -1.0 |
| Right | 1.0 |
| D | 1.0 |
| Gamepad Left Thumbstick Right | 1.0 |
Rotate
| Button | Scale |
|---|---|
| Up | 1.0 |
| W | 1.0 |
| Gamepad Right Thumbstick Up | 1.0 |
| Down | -1.0 |
| S | -1.0 |
| Gamepad Right Thumbstick Down | -1.0 |
In the editor it should look like this:
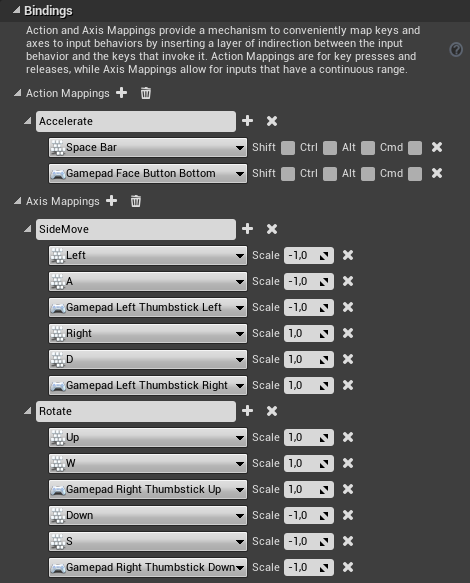
Taking those values as example, left arrow, A and the gamepad left thumbstick move to the left should move into one direction (specifically, left), while right arrow, D and gamepad left thumbstick move to the right should move into the opposing direction (right).
We now need to get this input from code. The way this will be done is by enabling input in the game mode class and then use the input component that is added into all actor classes (remember, the game mode is indirectly derived from the actor class) to bind those actions/axis mappings into some event functions. We will need one function for each of the axis mappings, meaning OnSideMove() and OnRotatePiece(). Then for the action mapping we will need one function called when the buttons is pressed and another when the button is released, OnAccelerate() and OnDecelerate().
Now, why a function to "key press" and another for "key release" when dealing with the action mapping and not axis mappings? The reason is relatively simple. Events bound to the axis mappings will be called in every loop iteration with an scale value indicating the "direction" of input, 0 being "neutral" (or, in this case, "not pressed"). Action mappings on the other hand are only called when the state of the button changes. With all that said, let's declare our new event functions, in the private section of the AGameModeInGame class:
// Input event handlers
void OnSideMove(float AxisValue);
void OnRotatePiece(float AxisValue);
void OnAccelerate();
void OnDecelerate();
For the moment we will leave their implementations empty (if we don't do this, we won't be able to build the code):
void AGameModeInGame::OnSideMove(float AxisValue)
{
}

void AGameModeInGame::OnRotatePiece(float AxisValue)
{
}

void AGameModeInGame::OnAccelerate()
{
}

void AGameModeInGame::OnDecelerate()
{
}
The next step is bind those functions into the input mappings. In order to do that we need a valid InputComponent, which is created when we call the actor's function EnableInput(). This function requires a player controller pointer, which we will obtain by using GetFirstPlayerController() function from the UWorld object, which we will obtain by calling GetWorld() that's also part of all actor classes. Once we get a valid InputComponent, we use it to call BindAxis() and BindAction() functions to perform the associations of our functions and the mappings created early. The first argument of both functions is meant to be the name of the mapping entries which, in our case, are Accelerate, SideMove and Rotate.
Because we only need to perform this setup once when the game level map is loaded, we use the BeginPlay() of the AGameModeInGame class to bind our functions to the button mappings:
void AGameModeInGame::BeginPlay()
{
   ...

   // Setup input handling
   if (UWorld* const world = GetWorld())
   {
      if (APlayerController* pc = world->GetFirstPlayerController())
      {
         EnableInput(pc);

         if (InputComponent)
         {
            InputComponent->BindAxis("SideMove", this, &AGameModeInGame::OnSideMove);
            InputComponent->BindAxis("Rotate", this, &AGameModeInGame::OnRotatePiece);

            InputComponent->BindAction("Accelerate", IE_Pressed, this, &AGameModeInGame::OnAccelerate);
            InputComponent->BindAction("Accelerate", IE_Released, this, &AGameModeInGame::OnDecelerate);
         }
      }
   }
}
When in game, with this code (and input setup), pressing "A"/"Left" or "D"/"Right" will result in the OnSideMove() to be called with "-1" or "1", respectively, in the AxisValue argument. Conversely, pressing "W"/"Up" or "S"/"Down" results in the OnRotatePiece() function being called with "1" or "-1", respectively, in the AxisValue argument. With this information we can perform the proper actions based on two simple tests: AxisValue < 0 and AxisValue > 0.
Block Order Change
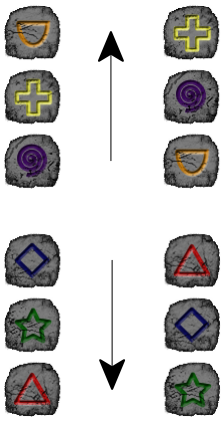
The first interaction that we will incorporate into the player piece will be the block order swapping, mostly because it requires less code than the other two input handlers. The block order change can be thought of as shifting operation. That is, a "shift up" would cause the top most block to be moved into the bottom most "row" while the rest of the blocks move one "row" up. The image bellow depicts both the "shift up" and "shift down" operations:
In order to properly perform this swapping, we have to both change the order of the block pointers in the array inside FPlayPiece and also some internal data, most importantly the position. To make things simpler, we will add a helper function in the ABlock class, meant to perform the internal data swapping. So, let's create a public function:
void SwapWith(ABlock* OtherBlock);
In its implementation, for the moment we will just swap the actor locations. At a later moment wee will add extra data in which we will have to swap too. Nevertheless, as shown in the code, this is merely the same idea of "variable value swap".
void ABlock::SwapWith(ABlock* OtherBlock)
{
   if (!OtherBlock)
      return;

   // Swap actor locations
   const FVector tmp_location = GetActorLocation();
   SetActorLocation(OtherBlock->GetActorLocation());
   OtherBlock->SetActorLocation(tmp_location);
}
We can now go back into the FPlayerPiece. The first thing will be a private helper function meant to perform the swapping of both the internal data of the blocks as well as the pointers in the array. Notice the fact that in this function we deal with the indices of the blocks in the internal array:
void SwapBlocks(int32 A, int32 B);
Its implementation is pretty straightforward, as all we do is first call the block's SwapWith() function and then swap the pointers in the array, which is performed by a function provided by TArray:
void FPlayerPiece::SwapBlocks(int32 A, int32 B)
{
   mBlock[A]->SwapWith(mBlock[B]);
   mBlock.Swap(A, B);
}
Now let's add the two public functions that will perform the shifting, one to "shift up" and the other to "shift down" the blocks:
void ShiftUp();

void ShiftDown();
The "shift up" operation must move each element from their current array position into the next, while the last one must move into the first. In order to accomplish this, the easiest is to iterate the array backwards while calling the SwapBlocks() helper function. The "last element" will always be swapped with the previous element. The "shift down" is the exact reverse. Note that this is not exactly the most efficient way of doing this kind operation because we are performing quite a few extra data swapping that could be avoided by a different approach but we would have to expose the internal block data. As part of this data at the moment we only have the actor location, but later we will have additional data. Because we are dealing with very few array elements it's not really a problem to leave the algorithm like this. With that said, the implementation of the two functions:
void FPlayerPiece::ShiftUp()
{
   const int32 read = mBlock.Num() - 1;

   for (int32 i = read; i > 0; i--)
   {
      SwapBlocks(i, i-1);
   }
}

void FPlayerPiece::ShiftDown()
{
   const int32 read = mBlock.Num() - 1;

   for (int32 i = 0; i < read; i++)
   {
      SwapBlocks(i, i+1);
   }
}
The last thing we need is to actually call those functions from the input event. Although the function is empty we already have it, OnRotatePiece(), which is in the AGameModeInGame class. In this function the first thing we have to do is to check if we are meant to actually interact with a player piece. This check is relatively simple since the only state in which we should gather this kind of input is in the StatePlaytime. Based on that, all we have to do to make sure we are meant to call the player piece's shift functions is check if the state function pointer is equal to StatePlaytime. After that, we check the AxisValue argument value and, if negative we shift down and if positive we shift up the blocks, like this:
void AGameModeInGame::OnRotatePiece(float AxisValue)
{
   // Bail if not in the PlayTime state
   if (mCurrentState != &AGameModeInGame::StatePlaytime)
      return;

   if (AxisValue < 0.0f)
   {
      // Shift down
      mPlayerPiece.ShiftDown();
   }
   else if (AxisValue > 0.0f)
   {
      // Shift up
      mPlayerPiece.ShiftUp();
   }
}
Input Limiting
After building the project, we can test if the input is working. Well, it is... sort of (if nothing happens, click the playfield and input should work)! The shifting is way too fast to be of any use for us! Namely, it's nearly impossible to keep the blocks in the desired order. We have to create some system to count time and only call the shifting functions if the "timer allows". Although Unreal Engine provides timers, we will manually count the time, mostly because it's extremely simple and easy, not to mention the fact that we will not create unnecessary extra overhead just to count time. Basically, we will have a float variable, mShiftTimer that will begin with value 0. When pressing the "rotate" button, the first thing will be to verify if this value is <= 0.0f and, if so, call the relevant shift operation, otherwise, ignore the input event. If the shift operation is called, set the mShiftTimer to a positive value (which we will be able to tweak) and then, at each loop iteration, we subtract delta seconds from this variable.
According to this, we will need a property that will allows us to tweak its value. Although we will only need it during the actual game, adding it into the AGameModeInGame class will bring an small problem: tweaking the value requires a blueprint class and, although we do have the BP_GMTraditional, a different game mode will end up having a different property value. This means, if we tweak in one place, we will have to perform the same tweaking on all of the game modes derived from AGameModeInGame, otherwise we will get inconsistent input response. Of course this is not ideal! Because of that, we will add this property into the UColGameInstance class and retrieve its value much like we have done with the other properties that were added in the game instance. Although this is also not ideal, it's better than having to tweak the value on multiple places.
With that said, in the private section of the UColGameInstance class we add the property used to control the "timer":
UPROPERTY(EditAnywhere, meta = (DisplayName = "Block Shift Delay"))
float mShiftDelay;
We don't want to change this value during the game, so there is no need to provide a "set" function. All we will need is the "get" function in the public section:
UFUNCTION(BlueprintPure)
float GetShiftDelay() const { return mShiftDelay; }
Don't forget to initialize this property in the constructor. At this moment we really don't know exactly what this value should be and we will probably have to change it in the editor. For now, let's just set it to 0.2f:
UColGameInstance::UColGameInstance()
{
   ...
   mShiftDelay = 0.2f;
}
And then we add easy access through the blueprint function library:
// Obtain the block shift input delay
UFUNCTION(BlueprintPure, meta = (WorldContext = "WorldContextObject"))
static float GetInputShiftDelay(const UObject* WorldContextObject);
And the implementation:
float UColBPLibrary::GetInputShiftDelay(const UObject* WorldContextObject)
{
   if (UColGameInstance* gi = GetColGameInstance(WorldContextObject))
   {
      return gi->GetShiftDelay();
   }
   return 0.2f;
}
Now, in the AGameModeInGame, where we are handling input, we add the private property meant to count the time:
float mShiftTimer;
Let's initialize this value with 0 at the constructor:
AGameModeInGame::AGameModeInGame()
{
   ... // Previous code
   mShiftTimer = 0.0f;
}
Every time we spawn a new player piece, ideally we should be able to immediately interact with it. With that said, let's set this variable to 0 right after spawning a new player piece:
AGameModeInGame::StateFunctionProxy AGameModeInGame::StateSpawning(float Seconds)
{
   ...
   else
   {
      // Game not lost. Spawn an new player piece
      // Spawn piece at:
      const int32 spawn_row = GetRowCount() - UColBPLibrary::GetPlayerPieceSize(this);
      const int32 spawn_col = GetColumnCount() / 2;

      mPlayerPiece.SpawnPiece([this, &spawn_row, &spawn_col](int32 Index)
      {
         return SpawnBlock(spawn_col, spawn_row+Index, PickRandomBlock(), false);
      });

      // Reset input timers
      mShiftTimer = 0.0f;
   }
   ...
}
If you have noticed the comment mentioning "timers" rather than "timer", rest assured that it's correct, although not at this moment! The thing is, the exact same problem we are facing here with the piece rotation occurs with the sideways movement. This means that at a later moment we will also have reset an input timer for the horizontal movement of the player piece. Nevertheless, we have to update the "timer" variable at every loop iteration, not only inside the StatePlayTime state function. We can do this in the tick function right before calling the state function:
void AGameModeInGame::Tick(float DeltaTime)
{
   Super::Tick(DeltaTime);

   if (mCurrentState)
   {
      // Update input timers
      if (mShiftTimer > 0.0f)
      {
         mShiftTimer -= DeltaTime;
      }

      mCurrentState = (this->*mCurrentState)(DeltaTime);
   }
}
Finally, we can update the input event function, OnRotatePiece(). In there, we want to reset the mShiftTimer variable if the mapped button is not pressed (AxisValue = 0). Although floating point comparison can be really finicky because of rounding errors (you can read more about this here), as far as I'm concerned Unreal Engine does ensure the AxisValue is zeroed whenever the mapped axis is neutral/not pressed (or at least inside the "dead zone" when dealing with analog input). With that said, let's see the code:
void AGameModeInGame::OnRotatePiece(float AxisValue)
{
   // Bail if not in the PlayTime state
   if (mCurrentState != &AGameModeInGame::StatePlaytime)
      return;

   if (AxisValue == 0.0f)
   {
      // Reset the timer if the button is not pressed
      mShiftTimer = 0.0f;
   }
   else
   {
      if (mShiftTimer <= 0.0f)
      {
         mShiftTimer = UColBPLibrary::GetInputShiftDelay(this);

         if (AxisValue < 0.0f)
         {
            // Shift down
            mPlayerPiece.ShiftDown();
         }
         else if (AxisValue > 0.0f)
         {
            // Shift up
            mPlayerPiece.ShiftUp();
         }
      }
   }
}
Testing this new code (of course, it must be built) shows that we can now change the block order in the player piece in a lot more controllable way. Thanks to the "reset the time if the button is not pressed", we can also perform a faster rotation by multiple presses of the mapped key. There is, however, the fact that although the "rotation while pressed" is a lot slower than in our first test (before implementing the timing), it's still a bit too fast for some people. We can decrease the speed by increasing the value of the Block Shift Delay property in the game instance blueprint inside in the editor. In my case I have increased it to 0.35 and it seems reasonable.
We finally have the visual representation of the player piece in which we can even specify how many blocks will compose it. There is also some interaction implemented. In the next part we will more to the the interaction, namely sideways (horizontal) movement.