Part 7 - Improvements and State SystemApril 11, 2019
In the last part we finally got to see something that changes between game execution, albeit still not that exciting. We still have to add some more foundation code to control the game rules, which is the internal state machine system.
Before doing that, we will work on some minor code improvements.
Code Improvements
Back in part 4 we added the PlayField/Grid code into our project in a way that required us to manually enter some important property values, like sprite size and background image dimensions. At that moment I did mention this as a sure source for bugs if we ever decide to change the dimensions of the background image or the tile set. While performing this kind of change during the game development is not really a good idea and somewhat not that common, a flexible system is always welcome and may help avoid bugs. Nevertheless, in this case, those values can and should be retrieved from the used assets.
We will extract the background image dimensions from the image used, however our PlayField class does not hold the image/sprite. In fact we don't have this stored anywhere yet! Since the idea is to change the background image with the selected theme, we add a pointer to the sprite into the theme data struct.
Although no really necessary, we will also add the grid tile set to be part of the theme which opens the possibility of creating different tile sets associated with the themes.
With all that in mind, the first thing that must be done is add two new properties into our theme class, UThemeData, one meant to hold the background image sprite and the other for the grid tile set sprite sheet:
// Defines the background image
UPROPERTY(EditAnywhere, BlueprintReadWrite)
class UPaperSprite* BackgroundSprite;

// Tileset sprite sheet used to draw the grid
UPROPERTY(EditAnywhere, BlueprintReadWrite)
class UPaperTileSet* GridTileSet;
Of course we have to update the constructor initialization list! We set those new pointers to nullptr:
UThemeData()
      : BlockSprite(nullptr)
      , BackgroundSprite(nullptr)
      , GridTileSet(nullptr)
   {}
If we select the PlayField in the level editor, we can edit the properties Tile Sprite Size, Background Size and Grid Tile Set because of how they were declared. As mentioned, the idea is to remove them from the property editor disallowing manual editing of them. We have to change their declaration so they still exist within the class but not accessible from the property editor. Locate these lines in the APlayField class:
UPROPERTY(EditAnywhere, meta = (DisplayName = "Tile Sprite Size"))
int32 mTileSpriteSize;

UPROPERTY(EditAnywhere, meta = (DisplayName = "Background Size"))
FVector2D mBackgroundSize;

UPROPERTY(EditAnywhere, meta = (DisplayName = "Grid Tile Set"))
class UPaperTileSet* mGridTileSet;
And change them into:
UPROPERTY()
int32 mTileSpriteSize;

UPROPERTY()
FVector2D mBackgroundSize;

UPROPERTY()
class UPaperTileSet* mGridTileSet;
The class now needs functions meant to allow us to setup these properties from elsewhere. So, in the public section we add them:
void SetBackgroundImageSize(float Width, float Height);

void SetGridTileset(class UPaperTileSet* Tileset);
Yes, there is no function to directly set the mTileSpriteSize property. This is because we will extract the value from the Tileset provided through the SetGridTileset() function. The definition will require a new include that properly declares the tile set. In the .cpp file:
#include "PlayField.h"
#include "PaperTileMap.h"
#include "PaperTileMapComponent.h"
#include "PaperSpriteComponent.h"
#include "PaperSprite.h"
#include "PaperTileSet.h"
#include "ConstructorHelpers.h"
Our new functions them can be defined:
void APlayField::SetBackgroundImageSize(float Width, float Height)
{
   mBackgroundSize = FVector2D(Width, Height);
}

void APlayField::SetGridTileset(class UPaperTileSet* Tileset)
{
   mGridTileSet = Tileset;
   mTileSpriteSize = mGridTileSet ? mGridTileSet->GetTileSize().X : 64;
}
Now notice something. When we implemented the SetGridSize function, it rebuilds the grid tile map. We are not doing that with these new functions, even though grid size (column adn row count), background image size and grid tile set size are required data to build the map. The reason for that is because we have to call all 3 functions during the setup process, thus we avoid calling the same function multiple times. By doing so we also somewhat force the order in which those functions must be called, leaving the SetGridSize to be the last one. Rather than remembering the correct order all the time, specially if we come to add any new setup function, we can remove the map building from the SetGridSize function and create a separate function meant to perform the map building, which we will know to always be the last one to be called. While this is still not the best solution, we at least have separate functions performing very specific tasks, tied to their names. With that said, first declare the new public function that will build the tile map:
void RebuildGridMap();
Its definition is very simple:
void APlayField::RebuildGridMap()
{
   BuildGrid();
   SetGridSprites();
}
Finally, we have to remove those two lines from the SetGridSize() function. It should look like this now:
void APlayField::SetGridSize(int32 ColumnCount, int32 RowCount)
{
   mColumnCount = ColumnCount;
   mRowCount = RowCount;
}
We have completed the changes to the PlayField class, for the moment. The next step is to actually call in those setup functions, with the correct arguments. The grid size setup is already being done from the AGameModeInGame class, more specifically in the OnConstruction() function. We will add the rest of the setup in there too.
We want to extract information that is stored in properties that are part of the theme, however the selected theme pointer is held in the GameInstance, which is only valid when the game is running, not in the level editor. We need some way to have valid data in the editor so, when developing, we can preview whatever the property changes will do.
We can add editable properties meant to provide default values for the background sprite as well as grid tile set. Then, in the OnConstruction() we test if we have a valid theme data pointer. In that case, we overwrite those editable properties with the data gathered from the theme. This is not the ideal solution, however I'm not aware of an easier way of providing this kind of project wide gameplay settings. Remember, we want property changes to be previewed in the level editor.
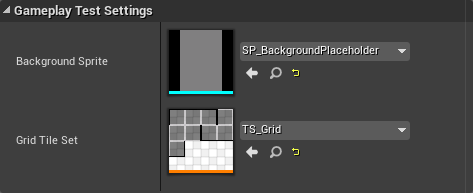
Our first change comes to the AGameModeInGame class. In there, we add two new properties in the private section:
UPROPERTY(EditAnywhere, BlueprintReadOnly, Category = "Gameplay Test Settings", meta = (DisplayName = "Background Sprite", AllowPrivateAccess = true))
class UPaperSprite* mBackgroundSprite;

UPROPERTY(EditAnywhere, BlueprintReadOnly, Category = "Gameplay Test Settings", meta = (DisplayName = "Grid Tile Set", AllowPrivateAccess = true))
class UPaperTileSet* mGridTileSet;
There is still ont more improvement related to those two properties that is possible, which is enclose them in #if WITH_EDITORONLY_DATA ... #endif. Doing this will exclude those two properties from the final packaged game, however it would also require adding this kind of enclosing inside the code definition where those properties are used. For simplicity sake I'm not going to add this kind of compile time check.
Next we have to update the include list in the .cpp file, adding PaperSprite.h to it:
#include "GameModeInGame.h"
#include "ConstructorHelpers.h"
#include "ColPlayerController.h"
#include "ColGameInstance.h"
#include "ThemeData.h"
#include "ColBPLibrary.h"
#include "Engine.h"
#include "PlayField.h"
#include "Block.h"
#include "PaperSprite.h"
#include "PaperSpriteComponent.h"
In the OnConstruction() function we are already calling the PlayField's SetGridSize() function. Now, it's necessary to also call SetBackgroundImageSize(), SetGridTileSet() and RebuildGridMap(). The arguments for the first two new functions are obtained from the theme data. To obtain the image (texture) dimensions, first we have to obtain a pointer to a UTexture2D object from the background sprite and, with this pointer, get the relevant values. Although there is a direct way of obtaining width and height from the sprite, that function is only available in builds with the editor present, meaning that we can't use that for packaging. So, let's update the OnConstruction() code:
void AGameModeInGame::OnConstruction(const FTransform& Transform)
{
   ...
   CalculateWeightSum();

   // First see which property values to use. From theme data or the testing ones?
   UPaperSprite* background_sprite = mBackgroundSprite;
   UPaperTileSet* grid_tileset = mGridTileSet;

   if (UThemeData* theme = UColBPLibrary::GetGameTheme(this))
   {
      if (theme->BackgroundSprite)
         background_sprite = theme->BackgroundSprite;

      if (theme->GridTileSet)
         grid_tileset = theme->GridTileSet;
   }

   // Extract background image dimensions
   FVector2D back_size = FVector2D(720, 1080);        // Default background image size
   if (background_sprite)
   {
      UTexture2D* back_tex = background_sprite->GetBakedTexture();
      if (back_tex)
      {
         back_size.X = back_tex->GetSizeX();
         back_size.Y = back_tex->GetSizeY();
      }
   }

   // Build the grid
   for (TObjectIterator<APlayField> it; it; ++it)
   {
      APlayField* pf = *it;
      pf->SetGridSize(mGridColumnCount, mGridRowCount);
      pf->SetBackgroundImageSize(back_size.X, back_size.Y);
      pf->SetGridTileset(grid_tileset);
      pf->RebuildGridMap();
   }

   // Initialize block management array
   ...
}
Build the project and now we can perform some tests to see if we didn't break anything! If you just hit play, without changing anything like updating the theme and setting the testing values, the grid will not have any visual representation, but will still be there. We can even spawn blocks, which will also be in the correct position! Let's update the default theme data, ThemeGeometric asset and setup the new properties Background Sprite and Tile Set sprite:

As already mentioned in this part, performing those updates won't immediately change anything in the level editor, which is why we have added extra properties into the GameModeInGame class. Hitting play at this moment will give the expected results in game. Once stopped, the settings will still be present, however if we change any property directly from the PlayField or the GameMode class, then the result in the level editor will use the new game mode properties, mBackgroundSprite and mGridTileSet. Speaking of that, let's update those properties:
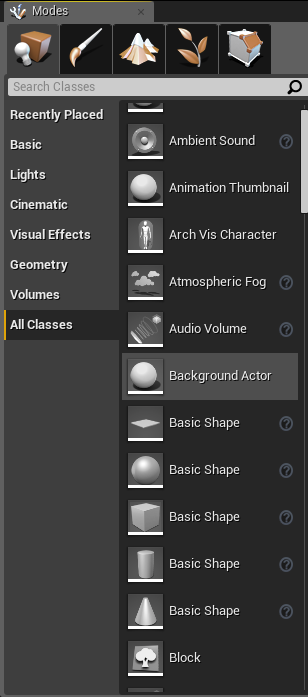
Background Actor
At this moment we have means to directly test new grid tile set assets and, if we have new background images, we have means to test if the sizing will work, however we can't see the actual background changing. Indeed, we didn't implement anything to dynamically change the background image! In order to remedy this we will need an extra actor class. Fortunately it's a very simple one. All we need is an actor class holding a paper sprite component property and a function allowing us to setup the actual sprite:
#pragma once

#include "CoreMinimal.h"
#include "GameFramework/Actor.h"
#include "BackgroundActor.generated.h"

UCLASS()
class UCOLUMNSTUTORIAL_API ABackgroundActor : public AActor
{
   GENERATED_BODY()
public:
   ABackgroundActor();

   UFUNCTION(BlueprintCallable)
   void SetSprite(class UPaperSprite* Sprite);

private:
   UPROPERTY(VisibleAnywhere, BlueprintReadOnly, Category = "Sprite", meta = (AllowPrivateAccess = "true"))
   class UPaperSpriteComponent* mBackSprite;
};
In the constructor we disable ticking, since we don't need it for this class. Later, create the paper sprite component, setting it as the RootComponent of the actor. In the SetSprite() function, all we have to do is make sure the mBackSprite pointer is valid and, if so, relay the provided argument to the function of same name that is part of the Paper Sprite Component class.
#include "BackgroundActor.h"
#include "PaperSpriteComponent.h"

ABackgroundActor::ABackgroundActor()
{
   PrimaryActorTick.bCanEverTick = false;

   mBackSprite = CreateDefaultSubobject<UPaperSpriteComponent>(TEXT("BackgroundSpriteComponent"));
   RootComponent = mBackSprite;
}

void ABackgroundActor::SetSprite(class UPaperSprite* Sprite)
{
   if (mBackSprite)
   {
      mBackSprite->SetSprite(Sprite);
   }
}
And that's it for this class! In a similar way to what we have done to update the PlayField, we will do with the background actor class, that is, use the object iterator and call the SetSprite() function providing the background sprite pointer. With that said, we just have to append the following into the OnConstruction() function of the AGameModeInGame class:
void AGameModeInGame::OnConstruction(const FTransform& Transform)
{
   ...

   // Setup the background actor object - that is, provide the correct sprite pointer
   for (TObjectIterator<ABackgroundActor> it; it; ++it)
   {
      (*it)->SetSprite(background_sprite);
   }
}
Of course, for this code to work we need to update the include list:
#include "GameModeInGame.h"
#include "ConstructorHelpers.h"
#include "ColPlayerController.h"
#include "ColGameInstance.h"
#include "ThemeData.h"
#include "ColBPLibrary.h"
#include "Engine.h"
#include "PlayField.h"
#include "Block.h"
#include "PaperSprite.h"
#include "PaperSpriteComponent.h"
#include "BackgroundActor.h"
We now have the necessary code to dynamically update the background image. Build the project so we can make use of this new actor class and test if it's correctly working. In the level editor we have to replace the sprite that has been placed in the beginning of this tutorial with our new class. The easiest is to first delete the old object and then drag in the new one from the pallette:
When the object is in the scene, there is a big chance it will not be displaying anything. There are a few ways to update the preview:
- Select the actor within the editor and change the
Source Spriteproperty. - Change any property within the associated game mode class.
- Hit the play button and then close the test game.
Keep in mind that if you go the 1 route, then change anything in the game mode class or play the game, the property will be overwritten. That's correct behavior! Nevertheless, change the actor's location to (0, 0, 0).
State Machine System
A common way of handling the overall game play flow is through the use of finite state machine simply because it gives a powerful tool to break down the project into "smaller parts", designed around what should be done based on the state. With that in mind, we will design (and implement) a machine meant to run all of our game rules.
Often state machines are implemented using switch ... case statements. Something very similar to this (please note that this is only the usual "pattern"):
int32 state_code = 0;
...
switch (state_code)
{
   case 0: state_code = state_function0(); break;
   case 1: state_code = state_function1(); break;
   ...
}
That means, each state function has to return the code number associated with the state that must be run in the next loop iteration. And so, in order to make things easier, the actual state codes are then defined in an enumeration (enum). Adding a new state requires updating the enum, updating the switch, implement the actual state function and then update the other states to make use of the new one, when necessary. While it's OK to implement the state machine like this (indeed, it's very easy), some people (including myself) don't really like this approach, mostly because there are quite a few places to be updated if the machine design does change, which is not a rare thing to happen.
In this project we will implement each state as a function and make use of a function pointer to hold the "current state". Then, at each loop iteration, this pointer will be used to call the relevant state function. With this approach, adding a new state to the machine requires us to implement the state function and then update the other states to make use of the new state, if necessary. No need to upkeep the enum and no risk of forgetting an entry in the switch statement. Of course, we may forget to transition into the correct state, but that is also a problem with the switch ... case approach.
Yes, I know that using function pointers may not be the best approach (and some people even consider it to be very confusing - syntax wise) but really, it's relatively simple and easy to design, implement and maintain such code. If you prefer the switch ... case way (or any other approach, really), feel free to use that.
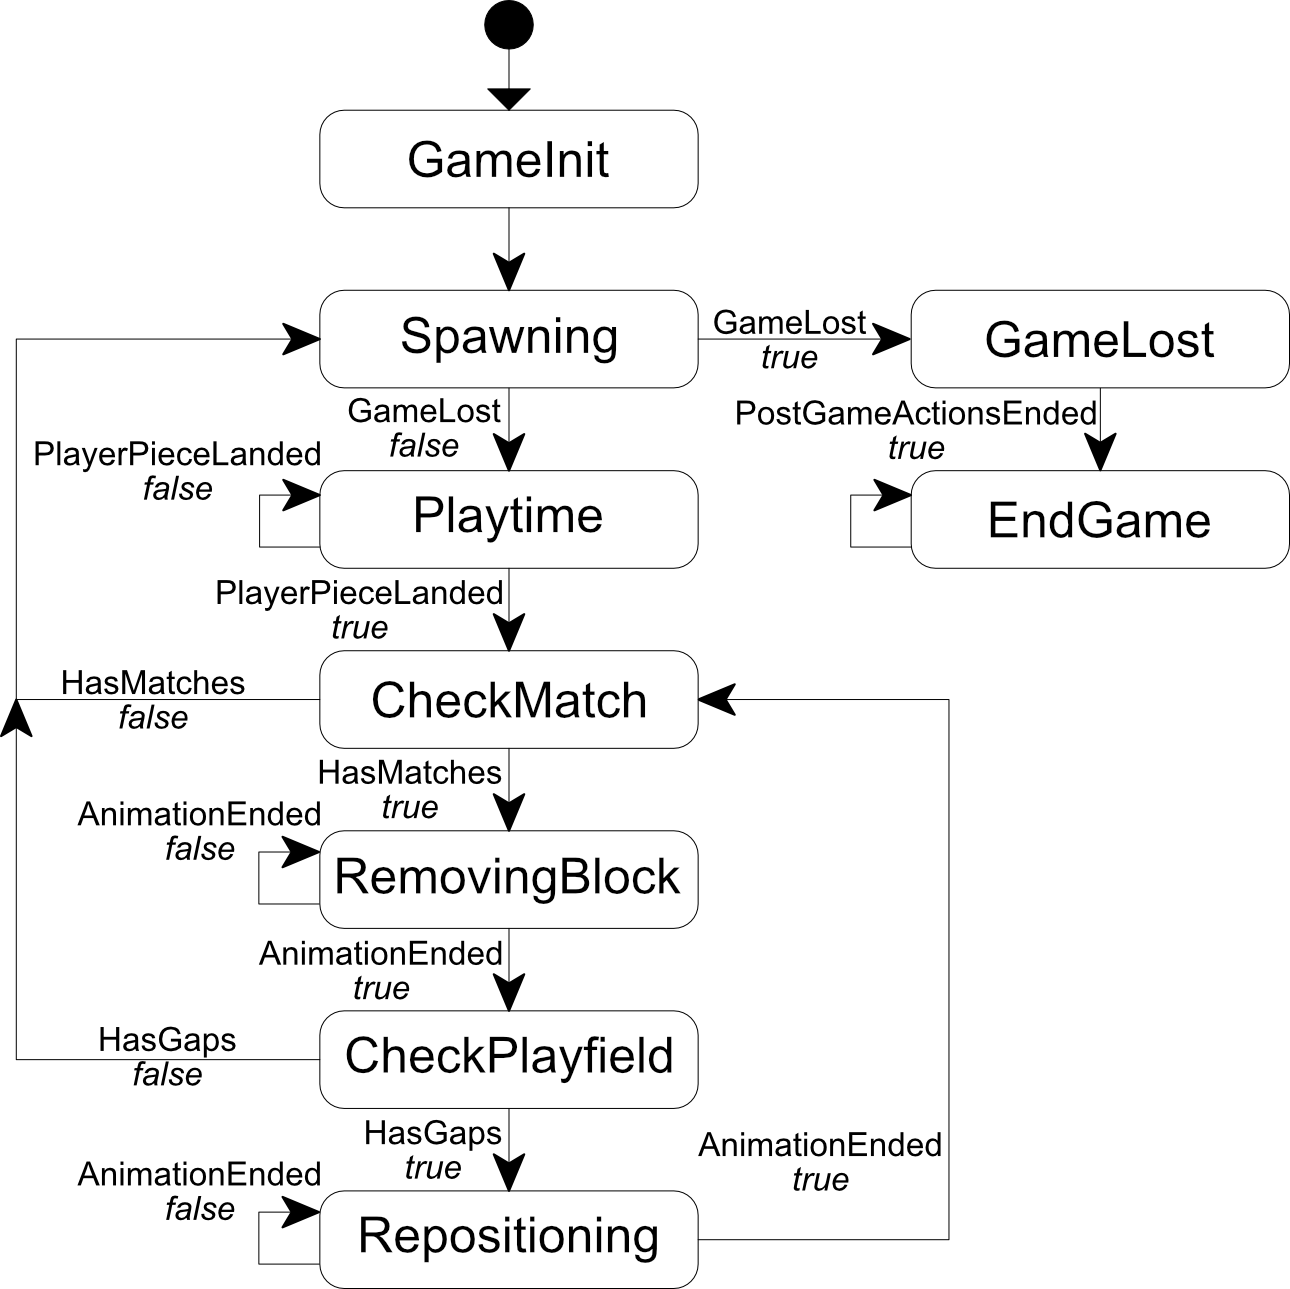
With all that said, the very first thing that we have to do is design the machine itself. So, bellow is a list of all the states, with a brief description of what it should do and the conditions that will "trigger" transitions to other states:
GameInit: Each time a new game is started, this is the first state to be run. This is where we make sure everything set to the initial game conditions, like player score set to zero, the starting blocks in the playfield (if in the relevant game mode) and so on. Unless there is an error during this setup, it should always transition to theSpawningstate.Spawning: In this state we have to check the loosing condition and if lost, we have to transition into the GameLost state. Otherwise, we spawn the player's piece and transition into thePlaytimestate.Playtime: Player piece movement/animation, as result of both the "natural" falling and player's input, happens here. Right after updating the position, check if it has reached the column's "floor". In this case, transition into theCheckMatchstate, otherwise, no state change.CheckMatch: Blocks have landed and we have to check if those have caused the minimum matching runs. If so, we transition into theRemovingBlockstate, otherwise go back into theSpawningstate.RemovingBlock: Instead of directly destroying the relevant block actors, we first give some kind of visual feedback (blinking) to indicate the blocks involved in the matching. Once this animation is finished, we transition into theCheckPlayfieldstate. While the "animation" has not been finished, stay at this state.CheckPlayfield: Blocks have been removed from the grid and we must check if they have left any gap. In this case we transition into theRepositioningstate, otherwise into theSpawningstate.Repositioning: After checking the play field, the removed blocks have left some gaps. We have to reposition the remaining blocks so there is no gap left. In this state we "animate" this repositioning and we stay in this state until every block is repositioned, when we transition into theCheckMatchstate.GameLost: This is where we perform some post game actions, like displaying a menu, cleaning the play field and so on. We then directly transition into theEndGamestate.EndGame: An empty state meant to just keep whatever was done in theGameLoststate on the screen. A menu should be displayed and from there we can either start a new game or go back into the main menu map.
Bellow, a diagram that represents the described state machine:
We will need 9 state functions and for some of those states we will want the possibility of running custom code. We will implement this "extra code" feature in a way that allows us to implement custom functionality in a derived C++ class or a Blueprint Class.
The simplest/easiest way of allowing custom code to be run would be to mark each state function as virtual, however doing so brings the risk of us forgetting to call the base class' function in a derived class. If the base code contains necessary functionality we sure will get undesired results! Instead, we will implement the states in the base GameModeInGame class and whenever necessary, call an extra function from inside the state at the relevant moment. So, for instance, in the GameInit state we may call a virtual function called CustomStateInit() and then perform the correct transitioning into the Spawning state. With this we can reduce the chances of creating undesired state transitions within custom code in derived classes.
The question that remains is the signature of the state functions. What should it be? First, let's tackle the return type. If we look into the switch ... case code provided early it gives a fairly interesting pattern of returning the next state. So, we make each state function return the pointer to the state that must be run in the next loop iteration. How about the arguments? Since we are implementing this machine in the GameModeInGame class, we have access to quite a few important game data objects. So, no need to add any of them as arguments. Since we will run animation (as part of the game rules) from some states, we will need time information, meaning a float argument. It doesn't seem that we will need any more argument and if we end up needing more arguments, then we will be forced to perform a little code refactoring.
It's determined that our state functions have to return a pointer to the state that must be run in the next game loop iteration. If you have some experience with C++ you already know that we can't directly make a typedef to a (member) function pointer that return a pointer of the same type (which could allow the function to return a pointer to itself, for example). One easy alternative would be to just ignore this return and directly assign the pointers inside the state functions, which is a valid solution. In order to make the pattern of returning a pointer to the desired state function work, we need to use a proxy object. Because its implementation is so simple, we will stick to this kind of pattern.
To make this proxy thing work, we first forward declare this struct, which then is used as the return type of the member function pointer, in a typedef (StateFunctionPtr). Lastly the actual struct is defined, which should hold one StateFunctionPtr. In its constructor we directly assign this object and, finally, we override an operator that will give direct access to the pointer. My explanation is probably a bit confusing but once you see the code you notice that it's actually easy, specially its usage! So, let's begin coding it by declaring right after the GENERATED_BODY() macro, in the GameModeInGame class:
struct StateFunctionProxy;
typedef StateFunctionProxy (AGameModeInGame::*StateFunctionPtr)(float);

struct StateFunctionProxy
{
   StateFunctionProxy(StateFunctionPtr p) : func(p) {}
   operator StateFunctionPtr() { return func; }
   StateFunctionPtr func;
};
Our state functions then have to be declared as StateFunctionProxy FunctionName(float) and the great thing is that we can directly return the pointer to the desired function, like return &AGameModeInGame::SomeStateFunction;! Shortly this will be show. The next step is to declare our 9 state functions. In the private section of the class, add:
// State functions
StateFunctionProxy StateGameInit(float Seconds);
StateFunctionProxy StateSpawning(float Seconds);
StateFunctionProxy StatePlaytime(float Seconds);
StateFunctionProxy StateCheckMatch(float Seconds);
StateFunctionProxy StateRemovingBlock(float Seconds);
StateFunctionProxy StateCheckPlayfield(float Seconds);
StateFunctionProxy StateRepositioning(float Seconds);
StateFunctionProxy StateGameLost(float Seconds);
StateFunctionProxy StateEndGame(float Seconds);
Of course, we need the pointer to the current state. So, also in the private section of the class, we declare it:
StateFunctionPtr mCurrentState;
In the constructor of the state class we initialize this pointer:
AGameModeInGame::AGameModeInGame()
{
   ...

   mCurrentState = nullptr;
}
Finally, we have to define the actual state functions. For the moment all of them should return a pointer to themselves (this allows us to do some incremental code builds). Bellow is an example of the first two state functions. All of the rest should be very similar to this:
AGameModeInGame::StateFunctionProxy AGameModeInGame::StateGameInit(float Seconds)
{
   return &AGameModeInGame::StateGameInit;
}

AGameModeInGame::StateFunctionProxy AGameModeInGame::StateSpawning(float Seconds)
{
   return &AGameModeInGame::StateSpawning;
}
At the constructor we initialized the pointer with nullptr but we actually need to set this pointer to StateGameInit() otherwise we will never get the game to actually be set into the initial state. The perfect place to do this is in the BeginPlay() function. For that, we have to declare its override in the public section of the AGameModeInGame class:
virtual void BeginPlay() override;
All we have to do here is call the parent's BeginPlay() and setup the function pointer, like this:
void AGameModeInGame::BeginPlay()
{
   Super::BeginPlay();

   mCurrentState = &AGameModeInGame::StateGameInit;
}
We are almost done with the core of our state machine system! All that is left to be done is actually "run" the machine/state. It was mentioned before that we would call the state function at each game loop iteration. This means we have to override the Tick() function and, from there, call the state function. In order to do that, in the public section of the GameModeInGame class, declare:
virtual void Tick(float DeltaTime) override;
Its definition is also pretty straightforward! We first call the parent's Tick() and then check if the state function pointer is valid. In that case, we actually call the function. That's it!
void AGameModeInGame::Tick(float DeltaTime)
{
   Super::Tick(DeltaTime);

   if (mCurrentState)
   {
      mCurrentState = (this->*mCurrentState)(DeltaTime);
   }
}
Note that with this implementation we could simply eliminate the EndGame state from our machine and just return nullptr instead of returning StateEndGame() function. The thing is, doing that will leave the actual machine in a "void state", that is, no function will be called unless we forcefully set the state again, from anywhere that we know will be called. Moreover, suppose you end up designing something that requires some code into the EndGame state. While there are no plans to do that (add something in the EndGame state) in this project/tutorial, the state function will remain there.
The Machine States
Now that we have the core of the state machine system coded, we can implement the states themselves. Indeed, we already know what should trigger the transitions.
GameInit State
Different game modes may require different initialization, meaning that we need a virtual function for custom game init code. And, of course, we add a function meant to be implemented by Blueprint classes. Inside the native virtual function we directly call this blueprint version. In a derived C++ class we can bypass the blueprint class if desired. With that said, we declare the two functions in the public section of the GameModeInGame class.
// Native C++ code for custom GameInit state code
virtual void CustomGameInit(float Seconds) { BP_CustomGameInit(Seconds); }

// Custom State GameInit code, meant for blueprint implementation
UFUNCTION(BlueprintImplementableEvent, meta = (DisplayName = "CustomGameInit"))
void BP_CustomGameInit(float Seconds);
For the moment all we will do here is call the CustomGameInit() function and then transition into the Spawning state, by returning the pointer to its state function:
AGameModeInGame::StateFunctionProxy AGameModeInGame::StateGameInit(float Seconds)
{
   // Perform custom game initialization
   CustomGameInit(Seconds);
   // And transition into the Spawning state
   return &AGameModeInGame::StateSpawning;
}
Yes, it's that simple, and yes, it will take an extra game loop to actually process the player's piece spawning. I do not think this should be a concern, specially because things are so fast that we won't even notice this "delay". Nevertheless, the GameInit state is completed.
Spawning State
From this state, we can either transition into the PlayTime or the GameLost state. And the condition is simple. All we have to do is check if the game has been lost and if so, transition into the GameLost state. Otherwise into the PlayTime state. However, the actual loosing condition is game mode specific, meaning that we will need a custom function. Again, we will add this function allowing us to implement either from native C++ code or blueprints. So, we add two new functions into the public section of the GameModeInGame class:
// Native C++ code to tell if the game has been lost or not.
virtual bool IsGameLost() { return BP_IsGameLost(); }

// Blueprint code to tell if the game has been lost or not
UFUNCTION(BlueprintImplementableEvent, meta = (DisplayName = "IsGameLost"))
bool BP_IsGameLost();
If BP_IsGameLost() is not implemented, then the function IsGameLost() will return false. This means that in your game mode, if you require to have a "lost" condition to be true by default, then you will have to implement this function, either by overriding IsGameLost() in native code or by overriding BP_IsGameLost in the blueprint editor. I will show how to do both in this tutorial. Nevertheless, now we have means to "tell" the machine if the game has been lost or not. But, how about the player piece spawning? We don't have any code to manage that so actual piece spawning will have to come at a later moment. Let's add some initial code into it. In there, we just check the state transition conditions and perform the relevant actions.
AGameModeInGame::StateFunctionProxy AGameModeInGame::StateSpawning(float Seconds)
{
   if (IsGameLost())
   {
      // Game has been lost. We have to transition into the game lost state
      return &AGameModeInGame::StateGameLost;
   }
   else
   {
      // Game not lost. Spawn a new player piece
   }

   // And then move into the Playtime state
   return &AGameModeInGame::StatePlaytime;
}
For now that's it for this state.
Remaining States
For the remaining states we will require some other code that is still not implemented. For instance, in the Playtime we have to update the player piece position (we don't even have the player piece code, much less the spawning), then check if the piece has actually landed. In that case, transition into the check match state. For this state we also need some code that we don't have, specially the match checking algorithm. In this match checking algorithm we have to mark some blocks (if they do form the matching sequences) to be removed in the Removing state. In this state we have to update a "blinking animation" and once completed, remove the involved blocks. As you can see, we do require more foundation code in order to actually start implementing the state functions. We sure will come back into those functions once we have the necessary implementations.
We have added the system that will manage our game rules, a simple finite state machine. We don't have anything new to be seen in the game, though. In the next part we will begin implementing the game rules, so we get to see something new.