Part 5 - Blocks and ThemesApril 11, 2019
Up to this point we have a camera that fully displays the background image, not matter the window size. We also have the grid being built and positioned in a way to give us some space for UMG widgets. Now we want means to represent the blocks meant to be matched by the player. So, in this part we will work our way into implementing means to represent the blocks within the game. Later on in this part we start to implement the theme system, as that will be necessary to spawn the blocks with the correct data.
Sprite Actor
In 2D games, the visual representation of objects are commonly called Sprites. With Paper2D this is true and here you can read a little about how it works. Yes, I know we have already create an sprite asset, but this time we will code on top of its functionality.
As we already know, everything in a scene in Unreal Engine is an Actor, containing or not a visual representation. In the case of sprites, Paper2D offers the class APaperSpriteActor. Our block class will be derived from it.
One important aspect that we have to know about the Block class is that it should manage all aspects of the visual representation, which includes animation. Animation? In the introduction I didn't talk about the blocks being animated. Indeed, by animation I mean moving sideways and falling down. But then, why not some blinking right before removing matched blocks? We could certainly go crazy and add any kind of animation if wanted.
When dealing with the movement animation I will go into details of how it works. Right now I have to talk about how we will deal with the blinking animation since it will determine part of the visual representation code. When we spawn a block into the scene, we also specify a material used to draw that specific block. If we add a material parameter meant to control the blinking intensity, we then create a dynamic instance of said material when assigning to the block. Later on, the parameter can be manipulated in such a way that we create the blinking effect. When the time comes to code it I will detail it a little more.
Assets
Before starting to code the class, let's create the visual assets that we will need. We begin by the textures. So, I have created 7 different images, each 64x64 pixels. Remember that this size must match that of the grid cell, so if you have chosen a different value for the cells, use the same for the block textures. The images I have created are meant to be part of a theme called "Geometric Shapes" and there is one "empty" for generic use as well as 6 that will actually appear in game. Bellow, the 6 game blocks, packed into a single image and then the empty one:


Again, I'm no artist so don't bash me for those things! Still, if you want to know how those were done, those are somewhat the steps I have taken:
- In GIMP, I created a new 64x64 image and then renamed the default layer to "BaseStone".
- Painted "BaseStone" with a basic stone (just selected a grey color and with a brush, dragged with my mouse until I got a shape I liked).
- Added a Mask layer to "remove" the surroundings of the "stone".
- Drew the geometric shapes using Inkscape and then exported each one of them into .png files (all of them 64x64).
- Dragged each .png shape into the image created in step 1. This process created multiple layers which were set to hidden (showing only the relevant that I wanted to actually work with).
- Run the "filter" (through the Script-Fu plugin - link in the introduction) "Bevel and Emboss" so it created the "carved" effect.
- With some "crack" brushes, painted the resulting "carved" layer so I could create the effect of "cracked stones".
- Exported each of the "shape layer" into .tga files.
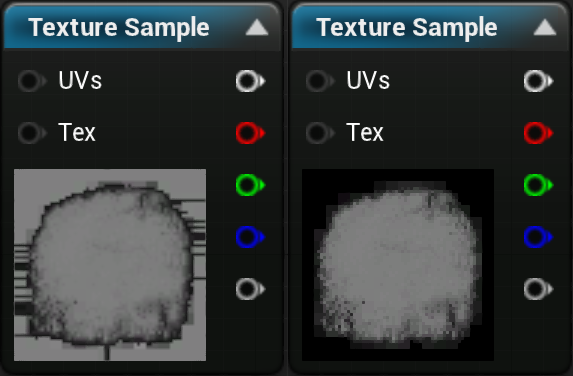
Why targa? Well, .png is a fine option if you don't need any kind of information on fully transparent sections of the image. In the case of those textures we don't actually need any information in the transparent sections so there wouldn't be any problem with .png files. Now, why one would want information in fully transparent sections? With the physically based rendering technique it's typical to store multiple maps in a single image, each map using one color chanel. And then, the reason .png becomes a poor choice for this kind of use is the fact that it's allowed, by the specification, that fully transparent sections could completely remove any color data from the file. While this indeed helps reduce the amount of uses bytes, it's not very useful for textures. In the following image I have placed the exact same texture, one exported to .png (left) and the other to .tga (right):
Anyway, import all 7 images into your project. In there, select all of the new assets then: Right Click → Asset Actions → Bulk Edit via Property Matrix, like this:

This will allow you to edit properties for all of the selected assets. Now, we select the Texture Group, under LevelOfDetail, to 2D Pixels (unfiltered). If we don't do this, the textures will look blurry. Although this window does not have a "save" button, you can use the common "ctrl+s" to save the changes. So, do that and if you want to, close the window.
Interestingly we only need one sprite. So, create one Sprite Asset and set its Source Texture property to the "empty block", that one meant for generic uses. In my case I named this sprite SP_BlockGeometric. This sprite is needed by the SpriteActor class, otherwise nothing will be drawn. The actual texture selection will be defined by a material that we have to specify when spawning the block actor. In this material we set, through a texture parameter, the relevant block image art. That said, we have at least two options:
- Create a single master material for this theme and then when spawning the block, specify all of the necessary variations for the specific block type through function parameters, create a dynamic material instance and then setup all of the necessary values.
- Create a master material and then an instance for each type of block, doing the necessary changes within the editor. When spawning, we specify the relevant material instance and then create a new dynamic material instance based on that.
You might have noticed the fact that a dynamic material instance is created no matter the choice. This is because of how we will deal with the blinking animation, which was already mentioned at the beginning of this part. Suppose for a moment that the master material has quite a few parameters that are meant to be adjusted for each block. Now, what if a new visual theme has simpler needs regarding those adjustments? This means choice 1 is less than ideal because we can't predict every single parameter needs when initializing the blocks during spawn. Instead, by keeping most of the adjustments to be done through the editor, we can greatly simplify the block initialization code. That's why in this project we will go with choice 2.
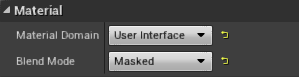
With that in mind, create a new Material Asset named M_BlockGeometric. The first thing to to is edit its properties and change Material Domain to User Interface. While we loose a bit of flexibility regarding what we can actually do in the material itself, we at least get the possibility of directly using this material within UMG, which we will do later. Then, change the Blend Mode to Masked so we can eliminate the "transparent" sections of the textures from the rendering.
Now, the needs here are really simple. The intensity of the Final Color must be a parameter so we can manipulate it later in the code. The color itself is the image, which should be specified through a texture parameter. The material blueprint is shown here:

By default, the texture parameter is set to use that empty block image. If you are a material expert, you will probably want to add some more into it. Please feel free to do so. As I have mentioned, I'm no artist and this is the bare minimum to give some results on screen. Anyway, for each of the block images, create a material instance based on M_BlockGeometric, by right clicking the base material and selecting Create Material Instance. Just in case you are curios, I have named my instances as MI_BlockGeomTriangle, MI_BlockGeomSquare, MI_BlockGeomStar, MI_BlockGeomSpiral, MI_BlockGeomCross and MI_BlockGeomArc, in the same order of the image I have shown before. In any case, edit each one of those instances and set the texture parameter to the relevant texture image. Just as an example, the triangle instance looks like this:

The Block Class
Although I didn't mention early, the way we will identify each block type will be through an integer, which will be named mTypeID. This will make things a lot simpler when running the match checking algorithm, since it will become a matter of integer comparisons. We add a few functions that will be used as "shortcuts" to compare this property.
We will need a few Init[something]() functions that are meant to initialize the actor, prior to spawning. Unfortunately there is no way to add extra data in the class' constructor and then spawn the actor using that modified signature. When we come to the spawning code I will explain how things are done, for now the important thing is to know why we are adding those Init() functions. None of those functions will be visible for blueprints, mostly because the intention is to provide a higher level function for block spawning and that one will be made available to Blueprints.
The last detail is that we hold a pointer to the material instance that we will be created when the block is spawned. We need this piece of information so we can manipulate the material's parameters.
All that said, the class declaration:
#pragma once

#include "CoreMinimal.h"
#include "GameFramework/Actor.h"
#include "PaperSpriteActor.h"
#include "Block.generated.h"

UCLASS()
class UCOLUMNSTUTORIAL_API ABlock : public APaperSpriteActor
{
   GENERATED_BODY()
public:
   ABlock();

   // Spawn initialization
   void InitTypeID(int32 ID);
   void InitMaterial(UMaterialInterface* Material);

   // Type query
   UFUNCTION(BlueprintPure, Category = "Block")
   bool IsSameType(ABlock* OtherBlock) const;

   // Type id query
   UFUNCTION(BlueprintPure, Category = "Block")
   bool IsSameTypeID(int32 TypeID) const { return mTypeID == TypeID; }

   UFUNCTION(BlueprintPure, Category = "Block")
   int32 GetTypeID() const;

private:

   UPROPERTY()
   int32 mTypeID;

   UPROPERTY()
   UMaterialInstanceDynamic* mMaterial;
};
In the implementation file, as usual we begin with the includes:
#include "Block.h"
#include "PaperSpriteComponent.h"
#include "Materials/MaterialInstance.h"
#include "Materials/MaterialInstanceDynamic.h"
In the constructor we disable ticking, which we will manually perform only when necessary. Then we make sure the actor mobility is set to Movable:
ABlock::ABlock()
{
   PrimaryActorTick.bCanEverTick = false;

   if (RootComponent)
   {
      RootComponent->SetMobility(EComponentMobility::Movable);
   }
}
The Init() functions are pretty easy. As mentioned before, we deal with dynamic materials, so we create a new one, based on the specified material and then we tell to use this new dynamic one:
void ABlock::InitTypeID(int32 ID)
{
   mTypeID = ID;
}

void ABlock::InitMaterial(UMaterialInterface* Material)
{
   mMaterial = UMaterialInstanceDynamic::Create(Material, this);
   GetRenderComponent()->SetMaterial(0, mMaterial);
}
Finally, the "TypeID" queries, one for direct comparison and the other to actually return its value:
bool ABlock::IsSameType(ABlock* OtherBlock) const
{
   return (OtherBlock && mTypeID == OtherBlock->mTypeID);
}

int32 ABlock::GetTypeID() const
{
   return mTypeID;
}
For this part we don't need any more code in the Block class. Later on in the tutorial we will add more functionality.
Themes
A theme will be used to hold data primarily related to the visual appearance of the objects we want to display on screen. As part of the data, it should contain a collection of blocks that can be spawned, including the probability in which each block should appear. The way we will implement the theme system will allow us to define the themes from within the editor itself as assets. Unreal Engine contains the UDataAsset base class that serves to give a nice asset editor window that allows us to change the values of the various properties added into the derived classes. In other words, we will create a theme class derived from UDataAsset which will hold the data we require.
Since we are dealing with data only, we can create this through a single .h file, no .cpp file is needed. With that said, create the header file and begin with the usual #pragma once as well as the includes:
#pragma once

#include "CoreMinimal.h"
#include "Block.h"
#include "Engine/DataAsset.h"
#include "ThemeData.generated.h"
The theme class needs to hold a collection of the available blocks and each block needs its own set of data. More specifically, we require the block's probability weight, its class and the material. The probability weight will be used whenever we want to randomly select a block from the collection, the class is needed to actually spawn the block and the material gives the correct visual appearance of the block. All of those properties will be used at a later moment in the tutorial but we will add them here just to give an idea of what's to come. Nevertheless, since we will need this data per block in the collection, let's create an struct to hold those properties and then, in our theme, we hold an array of this struct. Let's add said struct:
USTRUCT(BlueprintType)
struct FBlockData
{
   GENERATED_USTRUCT_BODY()
public:
   FBlockData()
      : ProbabilityWeight(1.0f)
      , BlockClass(ABlock::StaticClass())
      , Material(nullptr)
   {}

   // Determines the probability weight which directly affects how often this block will spawn
   UPROPERTY(EditAnywhere, BlueprintReadWrite)
   float ProbabilityWeight;

   // Specifies the class of this block. It can be overridden if creating special blocks
   UPROPERTY(EditAnywhere, BlueprintReadWrite)
   TSubclassOf<ABlock> BlockClass;

   // The material of this block
   UPROPERTY(EditAnywhere, BlueprintReadWrite)
   UMaterialInterface* Material;
};
We can now add the actual theme class. In it we add an string that will be used to specify the theme's name which will be used within our user interface. APaperSpriteActor, the base class of our block, requires a valid sprite in order to be rendered at all. Interestingly this sprite can look completely different from whatever the block's material outputs. Because of that, we specify one sprite property in the theme that will be applied to all blocks at spawn time. And, of course, we have the array of FBlockData representing the collection of blocks available in the theme. With that said, let's add the class:
UCLASS(BlueprintType)
class UCOLUMNSTUTORIAL_API UThemeData : public UDataAsset
{
   GENERATED_BODY()
public:
   UThemeData()
      : BlockSprite(nullptr)
   {}

   // The name of the theme. This will be shown in the game menus
   UPROPERTY(EditAnywhere, BlueprintReadOnly)
   FString ThemeName;

   // The sprite actor needs an sprite. This value will be used in all blocks of this theme
   UPROPERTY(EditAnywhere, BlueprintReadWrite)
   class UPaperSprite* BlockSprite;

   // Specify the blocks that are part of this theme
   UPROPERTY(EditAnywhere, BlueprintReadWrite)
   TArray<FBlockData> BlockCollection;
};
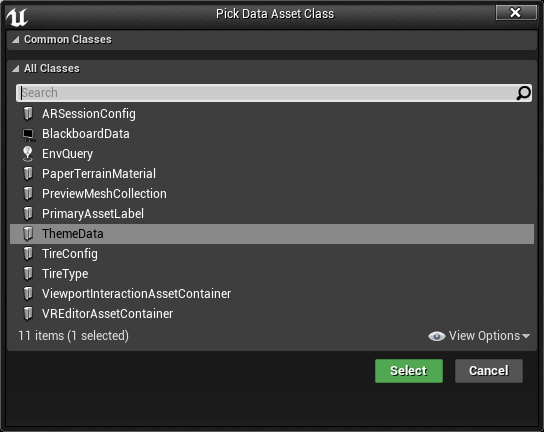
The project can be built at this moment and inside the editor we can now create Data Assets based on our ThemeData. To do so, in your Themes directory, add a new Data Asset, which is under the Miscellaneous category. A window will popup, asking the base class. In there, select ThemeData:
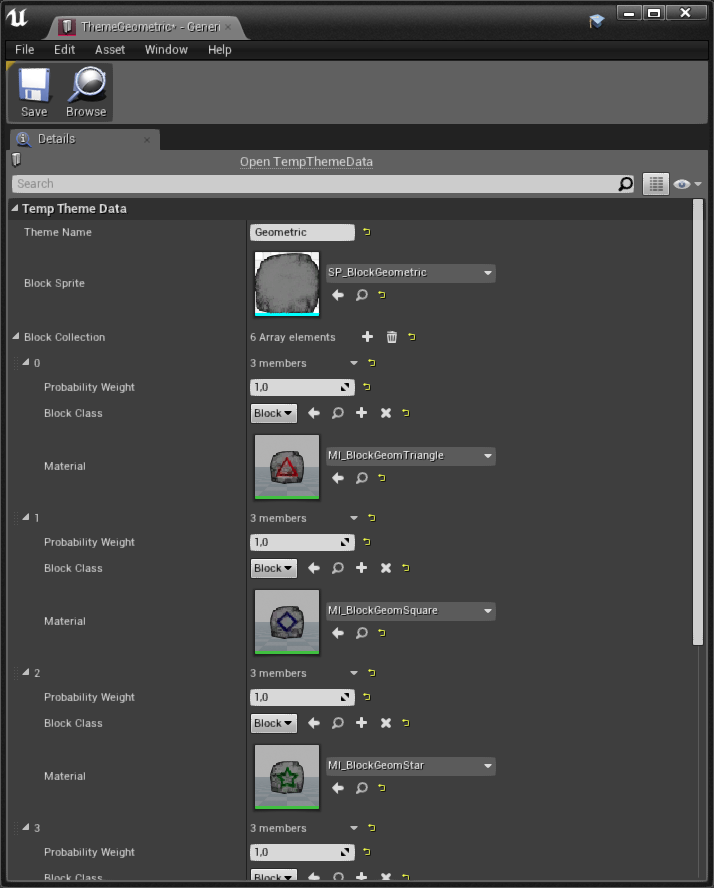
After you click Select you will be able to name your new asset. In my case I have named it ThemeGeometric. Double clicking to edit this new asset should give something like this:

The BlockSprite property can be set to the SP_BlockGeometric sprite asset created previously. And then, we can add (by clicking the "+" icon) 6 entries to the block collection. Each entry in the array should "point" to one of the material instances created. After filling all the necessary data, make sure to save the asset! Nevertheless, here is the same window, with the data added:
As you can see, it's pretty easy to define a new theme, provided the texture/sprite assets are available!
The visual theme is meant to be something selected by the player as an option. The usual flow in here is to select the theme in a menu and then transition to the gameplay map. This means that we need to keep the theme selection somewhere "persistent". For that, we already have already established the usage of game instance class. In other words, let's expand our UColGameInstance!
We begin by adding a property that will hold the desired theme, in the private section:
UPROPERTY(EditAnywhere, meta = (AllowPrivateAccess = true))
class UThemeData* mTheme;
At a later moment we will need to have access to this property, both for getting and setting. So, in the public section:
class UThemeData* GetTheme() const { return mTheme; }

void SetTheme(class UThemeData* NewTheme) { mTheme = NewTheme; }
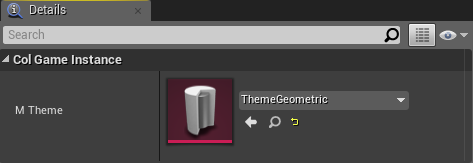
That's it for the C++ class. Build the project and let's perform some "final" configuration inside the editor. Open BP_GameInstance blueprint and now, in the properties section, there should be M Theme. If you already have multiple themes, select the one you wish to be the default one. Since I only have the one defined in here, I have selected it:
Compile and save the blueprint. Notice how simple and fast it is to change the default visual theme! We don't have to build the C++ project in order to do that, simply because we opted to extend the C++ game instance as a Blueprint.
Now, whenever we need information contained in the theme data, all we have to do is obtain the GameInstance and then call GetTheme() (Ok, not entirely true, we also have to cast the GameInstance to ColGameInstance).
A Few Tests
Ok, before finishing up this part, I add an optional "step". This is optional because what we will do is not definitive and is meant only to give some visual testing of the blocks. Inside the editor, in the Place Pallette there should be a Block entry:

Drag in 7 of those into the scene and make sure all of them are positioned in front of the background image, and one besides the other. In my case, the "first" one is located at (-320, 11, 450). From there on, only the X changes. Notice that because there is no sprite nor material set, there wont be anything to be seen. Selecting the relevant objects can be done from the World Outliner, like this:

By selecting one of these new objects, we can then edit the Source Sprite property. On each one of the new objects, select SP_BlockGeometric. You should now see the "generic" sprite, 7 times in the scene. Now, change the material, Element 0 of 6 of these objects. Each one with a material instance meant to visually represent each of the blocks. The end result should look something like this:
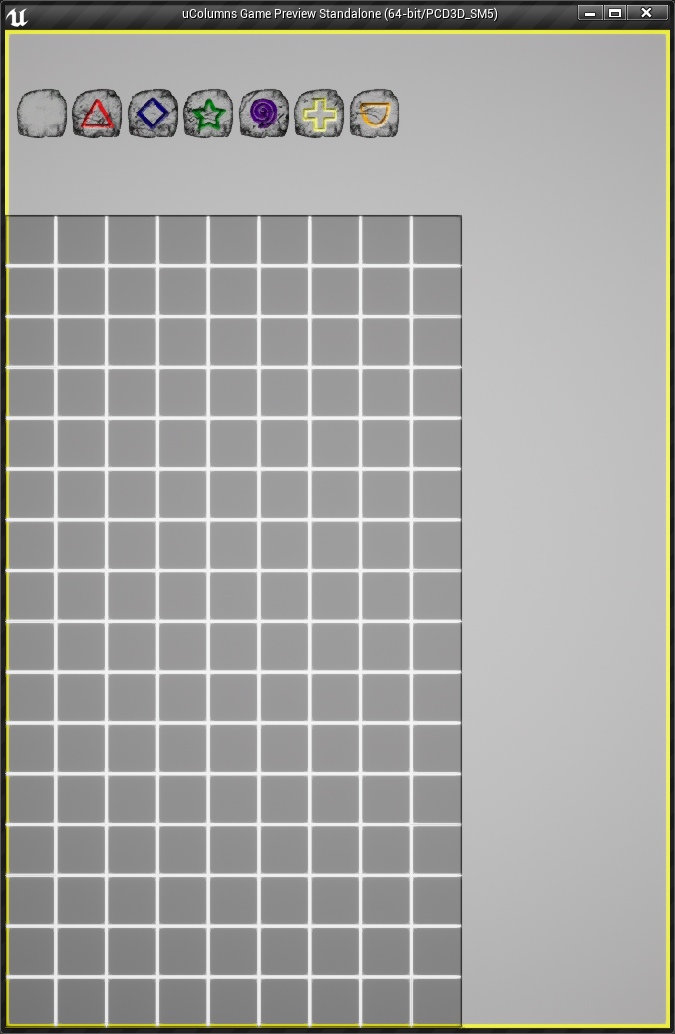
These blocks can be removed from the scene as they won't be necessary anymore.
Albeit what we have achieved with this part is not that fun to see, we are still adding the foundation to the game. Even if you skipped the optional test, you may have noticed (by just looking at the screenshot) the blocks aren't in the correct size. Indeed, that resizing is meant to be done when spawning the blocks. This test is only meant to showcase the fact that our block actors are displaying the correct texture images.
In the next part we will implement the block spawning code.