Part 1 - Project DetailsApril 11, 2019
In this part we will study the project from a theoretic point of view and then setup the Unreal Engine Project.
The first thing is to detail the game mechanics and possibly compare to similar games (specially the inspiration game - Columns). With that we can then (or at least try to) delineate the overall structure that must be developed.
Game Mechanics and Features
While in the introduction there was a brief description of the game mechanics, in here we need a somewhat more detailed information as it can help delineate the structure of the game code early on. This detailing comes here:
The player takes (limited) control over a piece that continuously drop (fall) inside a confined space, defined by a grid. This piece should be composed by at least 3 blocks of random types. These blocks are lined up in a column-like shape and thus, the player piece occupy a column in the grid. Once this piece reaches the "floor" of that column it's current in, all of its blocks are then placed into the grid and a new "floor level" is set, which corresponds to the top most block of the landed piece. At this moment if there are at least 3 matching types of blocks (horizontal, vertical or either diagonal directions), then the involved blocks are removed from the grid, awarding points to the player. If any gap is left, then the blocks above must "fall down" to cover those gaps. If those "fallen blocks" form new matching sequences, then the process of removing/awarding points continue in a chain. Once there is no more matching sequences a new piece is spawned and the player takes control of it. The game is lost once a new piece cannot be spawned at the designated column, that is, landed/placed blocks go high enough leaving no room for a new piece. The controls the player have over the falling piece are:
- Move it sideways as long as the movement of the piece don't collide with the "grid walls" or any other block that is already placed in the grid.
- Change the order in which the blocks are placed in the piece.
Once a piece "lands" the fall speed of the next piece should be slightly faster so the difficulty of the game gradually increases.
If this description seems a bit confusing, shortly there will be a few visual examples that, hopefully, will help understand those mechanics.
Definitions
With this description we can define how our different kinds of objects will be named/referenced within the project:
- Block: The various different types of objects meant to be matched by the player.
- PlayerPiece: A column like object controlled by the player, composed by at least 3 blocks.
- PlayField: The area where the blocks are placed at and the "box" confining the PlayerPiece.
- Grid: Subdivision of the PlayField in columns and rows.
Visual Examples
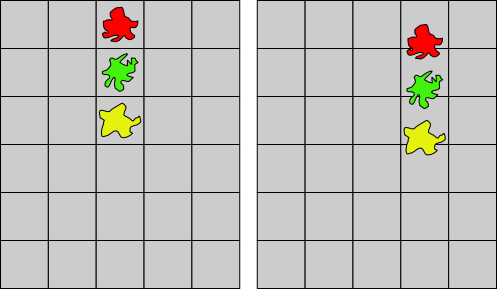
Let's see a visual example of this description. The following image shows the side movement (and a little of the vertical movement - falling). In other words, what happens when the player interacts with the game requesting the piece to move to the right:
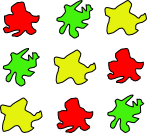
The order of the blocks can be changed as a "warped shifting", in either direction. In the case of the following images, from left to right, the player requested to "rotate up" twice. Notice how the top most block warps and becomes the bottom most one in the piece:
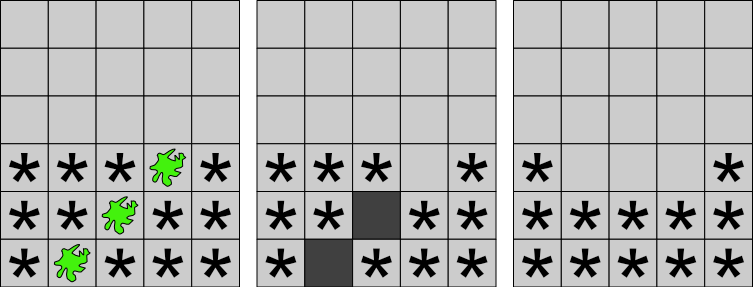
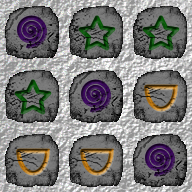
The next image highlights one cell of the grid, which is above the new floor level of the column where a piece has just landed:

The following image showcases a diagonal matching sequence in "three stages". The highlighted cells are showing the gaps that are left once the matched blocks are removed from the grid. The last part of the image shows the result of remaining blocks after filling the gaps. The * shaped thing are meant to represent any kind of block.
The Grid
So there is a grid. How big should it be? Although we will implement the game in a way that we can change the grid size by manipulating some variables, we still need some starting default values to begin the implementation and testings.
Let's take a look into games with similar characteristics. After a quick research on Tetris, it has some sort of a standard which defines that the grid should have 10 columns by 40 rows, while the top 20 rows should be visually obstructed so the player is tricked into thinking the grid is actually formed by 20 row.
In the original Columns, the grid has 6 columns and 13 rows ("in the default game mode). There are some other incarnations of the game with 7 columns while the number of rows vary from game to game, starting from 14.
Because our falling pieces should always occupy a single column we can, sort of, define how many columns our grid will have (again, at least as a default value). Let's think about the column where the piece should be spawned. If the grid has an even number of columns (like 10 for Tetris or 6 for Columns), we lose symmetry and have to choose if the piece should be spawned slightly to the left or slightly to the right of the grid. With an odd number of columns we end up with a "central column" to spawn the player's pieces. In my own implementation I decided to begin with 9 columns (so, I have the symmetry and it is somewhat in between Tetris and Columns).
How about the number of rows? In Columns the grid is always empty at the start of each game (in the "default" game mode). Since the player's piece is spawned in a way that its top most block is at the top of the grid, this gives 10 rows to fall in the initial "turns". Unlike Column, my idea is not to have an empty grid at the start of each game. If we initially occupy 3 rows and want to give the same 10 rows of "falling space" then, with some (very simple) math, we end up with a grid of 16 rows.
So, in short, our initial values will give us a grid of 9 x 16. If necessary, we then will tweak these values.
Player Piece
Earlier in the description it's said that the player piece should be composed by at least 3 blocks. This is the minimum number of blocks. The way the project will be implemented will provide means to tweak this value by changing a property within the Unreal Engine editor.
Perhaps a difficulty setting can be added allowing the player to choose how big the piece column should be!
Visual Theme
One of the features that will be implemented is the ability to change the visual theme which will only affect the graphical representation of the blocks that will be spawned as well as the background image. The game rules will not change with the theme.
Speaking of background image, what resolution should it be? Unfortunately there isn't a simple answer to this. Considering mobile support, we at least get some research starting point (if necessary of course). If you want to focus on iOS, you can check here. As for Android you can check here and here.
If you open Unreal Engine and go to Project Settings (Edit → Project Settings) you can verify, under the Platforms section, both Android and iOS settings. In there you have the opportunity (we will do that very late in the tutorial) to setup launch/splash and icon images. Hovering the mouse over those settings will give the required resolution sizes. For this project I will choose to use, primarily, the Android resolution, which is 720x1280. Please feel free to choose another if you prefer!
As a side note, I do not own any iOS device to test anything that will be said throughout the tutorial. As for the Android, yes, I have tested everything.
Music
We cannot forget about music. As the falling speed of the player's pieces increase, so should the tempo of the music! While we can't do that directly from Unreal Engine, we will (or at least try to) find one way to achieve this kind of result.
Project Structure
At this point we probably have enough details to delineate the general structure of the game code. Before we do so, please note one thing: most of the mentioned values will have room for "easy tweaking". This will be true for some other values and systems that we will come across the development of the project. The greatest thing is that we will be able to perform most of the tweaking inside Unreal Engine's Editor without the need to recompile our C++ code.
Each card follows the format shown bellow:
Class: NameOfTheC++Class
Derived from: if derived, name of the parent class
And a short description of what is the role of the class/struct within the project.
This is just a general overview of the classes and is not a comprehensive list of what we will create. The thing is, at this point we can't exactly predict everything that we will need.
Class: ABlock
Derived from: APaperSpriteActor
Controls the positioning (and movement) of each individual "sub-piece" in the grid. Considering the base class, graphical representation will also be done here too.
Class: AColCamera
Derived from: ACameraActor
Based on setup values, automatically compute Unreal Engine's camera settings that will ensure the grid occupies the most space possible inside the game window, while still keeping the correct aspect ratio.
Class: FPlayerPiece
Derived from: None (this is actually a struct)
Holds the individual blocks that are part of the piece controlled by the player.
Class: APlayField
Derived from: AActor
Builds the grid, compute its graphical dimensions and position. Provides necessary information to correctly position the blocks.
Class: APlayField
Derived from: AActor
Builds the grid, compute its graphical dimensions and position. Provides necessary information to correctly position the blocks.
Class: FPlayfieldCell
Derived from: None (this is actually a struct)
Holds necessary data related to a single cell within the grid.
Class: FPlayfieldColumn
Derived from: None (this is actually a struct)
Has a collection of FPlayfieldCell objects as well as a some extra data to help manage columns within the grid.
Class: FBlockData
Derived from: None (this is actually a struct)
Holds properties necessary to build an instance of ABlock.
Class: UThemeData
Derived from: UDataAsset
Defines a visual theme, which should allow the player to choose between different kinds of blocks.
Class: UColGameInstance
Derived from: UGameInstance
Mostly used to store/load data that must be valid throughout maps (game settings, high scores and so on).
Project Setup
Before finishing part 1, let's prepare/create the project under Unreal Engine so in Part 2 we can already begin coding the game. Launch the editor and create a new C++ empty (Basic Code) project, with no starter content. Don't forget to choose your preferred directory.

Once you click Create Project the launcher will create the initial files with basic default code. It will then compile this code and in the end open the editor. Once that happens, the next thing to do is to prepare the directory structure that will receive our assets as we develop them. Instead of me telling one by one, I will just show an screenshot of the structure that I have chosen for this project.
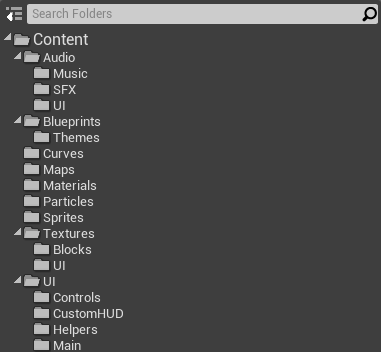
Notice the fact that I have multiple UI directories:
Content/Audio/UI: Holds audio assets meant to be played within the user interface.Content/Textures/UI: Texture images used to style the user interface.Content/UI: The actual user interface widgets.
I have presented this structure as a reference and not as a rule! Please use anything that helps in keeping your project organized!
Close the editor and go to Visual Studio (which should already be open with the solution created by Unreal Engine). In the Solution Explorer locate the file:
Games/{Project Name}/Source/{Project Name}/{Project Name}.Build.cs
In a project named uColumnsTutorial, as shown in the create project screenshot, the resulting path should be:
Games/uColumnsTutorial/Source/uColumnsTutorial/uColumnsTutorial.Build.cs
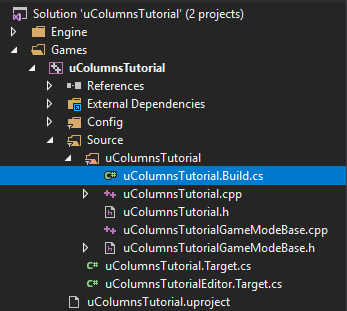
We need to edit this file to "tell" Unreal Engine that we want to use the plugin named Paper2D, which is the thing that will give us the ability to develop a 2D game. If we don't do this, trying to compile code requiring the plugin will result in linker errors when trying to build the project. In this file, locate the line that looks like this:
PublicDependencyModuleNames.AddRange(new string[] { "Core", "CoreUObject", "Engine", "InputCore" });
Just after the InputCore add a new entry, Paper2D, so your line becomes this:
PublicDependencyModuleNames.AddRange(new string[] { "Core", "CoreUObject", "Engine", "InputCore", "Paper2D" });
Project Settings
A few last preparations is to change a few settings that will help us greatly when developing the project. The first one relates to the resolution of the game window when we choose to test the game in Stand Alone mode or New Editor Window. If you have no idea about what I'm talking about, clicking the down arrow next to the Play button brings this dropdown menu:

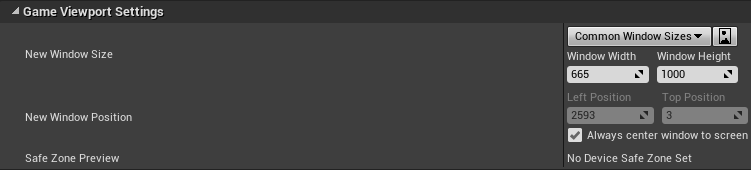
On this very same menu, clicking on the Advanced Settings... should open the Editor Settings window, automatically selecting the Level Editor/Play settings category. There are several options in there and I recommend you spend some time looking at each one if you don't know exactly what is in there. Nevertheless, what we are interested in for this project is the New WIndow Size property, which is under the Game Viewport Settings category. The default resolution 1280x720 (at least on my machine) is not exactly very good for a portrait image. Remember, early in this part I have mentioned the chosen resolution for the background image, 720x1280. However, the typical full screen resolution 1920x1080 will not vertically fit a window of that height (1280), meaning that we have to enter an smaller number. There is another thing to note, the resolution entered corresponds to the window size, including the decorations, meaning that the internal viewport will be slightly smaller than that.
After a few trials on the test project I have reached the 665x1000 resolution. Please note, while this seem like a hard coded value, much later in the tutorial we will calculate from code the best fitting resolution to run in windowed mode.
One last minor detail. Open the Project Settings window (menu Edit → Project Settings) and then select the Project/Description main category. In this window we can fill a few options related to the project, including the thumbnail that is displayed within the Epic Launcher. The thumbnail image must be 192x192 and this is the one I have used:
I know we haven't done much in this part, however we did cover a few important aspects of the project, such as the overall structure, list of classes as well as the actual "rules" of the game not to mention the initial Unreal Engine project. In the next part we add some foundation code, specifically the game instance, player controller and game mode classes. And then, the maps we will use throughout the project.
External links and extra reading
Tetris Guideline - Some sort of "standards" specifying how Tetris games should be implemented.
IOs Screen Sizes - Apple's guidelines to icon and image sizes within their devices.
Android Screen Sizes - Android's documentation over screen sizes.
Android Screen Densities - Android's documentation over screen densities.