Save/Load to/from File System In Godot HTML ExportFebruary 11, 2022(edited October 26, 2023)
Attention: This tutorial was written when Godot 4 was not released yet. While I have added code snippets for the newer version, screenshots are still for the older one.
In Godot Engine, when we use the HTML5 export, we can't use the FileDialog to access the file system. This happens because the application becomes sand boxed. This can be very limiting if we want to provide the user with the option to save and/or load data. Yet, we do have means to perform this task, although it requires a little bit of extra code. This is what I show here in this tutorial.
Everything boils down to the usage of the JavaScript singleton that becomes available when using HTML export. Documentation for the class defining this singleton can be found here.
If you are using Godot 4 this class has been renamed to
JavaScriptBridgeand its documentation can be found here.
Now please note something. Prior to Godot Version 3.4 this class offers a single function, eval(). In other words, before the mentioned version we are capable of calling java script functions from GDScript, but not the other way around. With the features introduced in version 3.4 we can use java script to call GDScript functions, which can make things a lot simpler! Not only that, the class now offers a function that almost fully automate the file saving process!
To exemplify the explanation given here we will work on a very basic plain text editor. This should give us enough to test the results while also allowing us to keep focused on the subject of this tutorial.
Project Setup
In here I will quickly go through the initial setup of the project without giving too much explanation, specially regarding the nodes used specifically to help with the layout, such as containers and so on. The names are important because we will reference those from the GDScript code. Feel free to use any name you prefer, just remember to change your code accordingly.
There is another thing that I want to mention: I will not cover the "non HTML part" of the project. I will mention some of the things that you can do in your Script to deal with such cases, but to simplify and help keep focus on the HTML side of things, I wont add FileDialog or additional Controls that would be used to deal with the other exports.
When the project is created, within the default starting scene, make its root node type as CanvasLayer (rename it to main) then save the scene. After that remember to open the Project Settings → Run and setup the default main scene as the one that you have just saved.
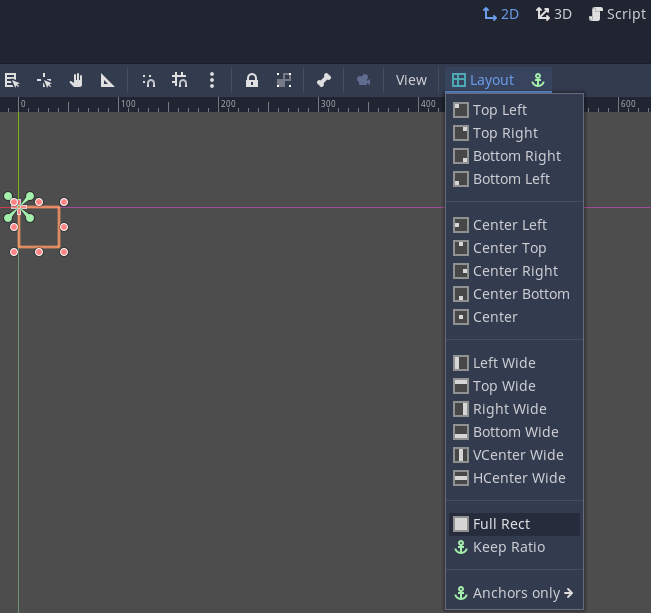
Add one VBoxContainer and rename it to vbox. Select this container and within the scene toolbar the Layout button should be shown. Click in it then, in the drop down menu, select Full Rect.
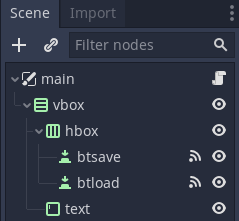
Into the vbox add two controls, one HBoxContainer (rename to hbox) and one TextEdit (rename to text). Attach two Button into the hbox and rename them to btsave and btload, respectively.
Select the text node. In the Inspector tab expand the Size Flags category and enable the Vertical Expand flag. This will make the text edit occupy the entire available space.
In Godot 4 you will find this vertical expand within Control → Layout → Container sizing.
Attach one empty script into the root node of this scene. The tree hierarchy should look like this:
Finally, open Project Settings → Export window. In it Add... the HTML5 preset, which will enable one button within the Godot editor that will allow us to test the project on the default web browser set within the operating system. For the moment leave the settings with the default values. Shortly we will open this window again and perform the necessary setup.
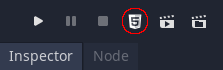
We now have the initial state of the project to work on. Please feel free to tweak things and if so desired, you can test this in your web browser by clicking the `Run exported HTML in the system's default browser" button:
If you don't see this button, did you create the HTML export in your project?
In Godot 4 that button is different and its tooltip says "Remote Debug". Clicking it will bring a drop down menu.
Options
As I have mentioned, we have to rely on the JavaScript class. It should be clear that we have to write Java Script code. Regarding this aspect, we have options here, some of which are:
- Use
JavaScript.eval()to "inject" the required code into the running page. - Create a custom .html file containing the required functionality.
- Provide the required code in a separate .js file and include it into the exported page through the export settings.
Obviously we can mix and match those, but I want to comment on a few things regarding each option.
In (1) we don't have to deal with additional non Godot files. At least not specifically to accomplish the task that we want here. However, Java Script code has to be given to the eval() function as a string. With this we sort of loose any kind of syntax highlighting, which can greatly help spot errors in our code. What happens is that editors will highlight the entire Java Script code as a single Godot String.
In (2) we have a very explicit separation of GDScript and Java Script codes. With an external editor we potentially have proper syntax highlighting of HTML, CSS and Java Script. Yet we have to code everything by ourselves. That means the loading progress bar, error handling and so on. On the other hand we have complete control/customization over the page layout and styling.
In (3) we can use the default shell page or even a custom one. We also get the benefit of being able to reuse the file in other projects. However, there is a problem here. We can't tell Godot that we want to include this .js file with the exported files. Well, we can, but it will be included into the .pck file, which is absolutely of no use for us. We can still manually copy the file into the exported directory and things will work. However, because Godot does not automatically include this file, when we click the Run exported HTML in the system's default browser button, things will not work because the minimal server wont find the required .js file. What this means is that if we go with this more flexible route we wont be able to test the web export directly from Godot.
In this tutorial I will use the feature that is required for option (3) in order to include the .js file, however the entire code will be stuffed into a box with absolutely no syntax highlighting at all. I have chosen this route because of how practical it is to perform the tests directly from a click within Godot and having the flexibility of being able to still add the java script code into any HTML shell, be it custom or the default one. Still, I did originally write the code in a .js file then copy pasted it into the appropriate box.
Saving
Let's begin with the saving process. Not only it's easier, it will provide us the data we want to load! If you have taken a look into the JavaScript documentation, then you probably seem that it provides the download_buffer() function. Basically, when we want to save the data we have to call this function. What will happen later then is that the web browser will prompt the user with a "download file" window. Let's see what we will provide in each of its 3 arguments.
First we have the data. In our test project we will take that from the vbox/text node. Basically we will take its text property and feed it into the download function. But wait, its data argument is a PoolByteArray, not text! Indeed. Luckily we can easily obtain such an array from String. We simply request an UTF-8 encoded buffer and we get this byte array!
The second argument is the default file name that will be suggested to the user to save the file. This will appear within the download prompt window in the web browser.
The third and final argument is the MIME type of the file. By default Godot assign a MIME appropriate for binary data or unknown file types. A list of common MIME types can be found here. Although we are providing UTF-8 encoded text data, for our testing purposes it should be OK to use text/plain as MIME. Please don't mix those two on a final product as UTF-8 is not "plain text".
All that said, we want to react to user requesting to save. That's the vbox/hbox/btsave button. Once clicked we want to start the saving process. So, add one function to handle the pressed signal of the mentioned button. Within the function we would typically display a FileDialog. For non HTML5 exports we still want that dialog. Yet we need specialized code for the web version. Indeed, we do need two different ways of handling file saving depending on the platform.
The test of which code we have to use is pretty straightforward. We simply use OS.get_name(). This will return HTML5 if the code is running in the web version. We still have to check if the JavaScript feature is available or not. This is important to prevent errors when using custom builds of the engine. The verification itself can be done with OS.has_feature("JavaScript").
In Godot 4
OS.get_name()returns "Web" if running in a web browser. TheJavaScriptBridgeis in the default builds of the engine, even though it can be disabled. However I haven't found a way to test its availability
In the snippet bellow, the first verification is in the contents of the TextEdit control. If it's empty we simply bail because there is no data to be saved. Then, provided we are running in HTML and JavaScript is available, we call download_buffer():
This is it for the saving process! You can already test it by clicking the button to run in the default browser. If you type something within the TextEdit control, the save button should result in the download prompt.
Loading
This process is slightly more complicated than saving. What happens is that we have to open and read the data from JavaScript. After that we have to give this data to the GDScript. Depending on the requirements, the JavaScript code might even perform some processing on the loaded data before relaying it into the GDScript part of the app/game. We wont to that in this tutorial though, as there is no need to.
Nevertheless, the first thing that we need to have is a JavaScript function that will create one <input> element with its type set as "file". We obviously have to set which types of files are accepted by this dialog. Then we have to trigger it so the dialog actually appears. The java script function then initially looks like this:
function loadData() {
   var input = document.createElement('input');
   input.setAttribute('type', 'file');
   input.setAttribute('accept', '.txt');
   input.click();
}
But, where does this thing go? Well, if you open the Project → Export... window and select the HTML5 export, there is an option named Head Include. Anything we add into this box will be appended into the <head> of the output .html file. In there we could easily add <script src="somescript.js" type="text/javascript"> and having the entire script within the somescript.js. However, as mentioned, this option makes it a little bit harder to test the project. So, instead, we stuff the script directly into that box:
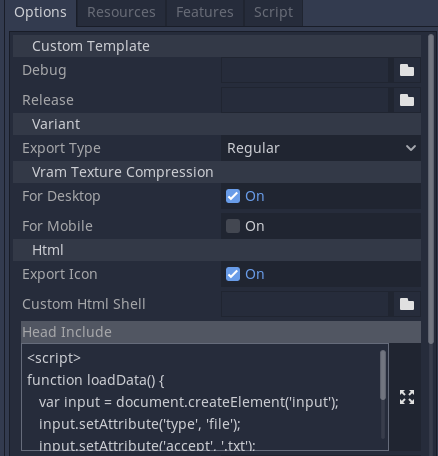
If you click that "4 arrows button" then an expanded text editor will appear, allowing for an easier overview of the script. Now, before we proceed there is something about the script shown that I would like to mention. We are dynamically creating an element and using it. In no moment we are removing. We don't have to! What happens is that garbage collection will perform this cleanup. We also don't have to worry about this not happening because we are never adding the element into the DOM.
Ok, now let's use that function. When we click the vbox/hbox/btload button we want to prompt the user with a "load dialog". So, add an event handler for the pressed signal of this button. We have to follow the same logic of the saving process by first checking if we are in HTML export and the JavaScript object is available. Provided both are true, we can use JavaScript.eval() to execute a java script code. In our case all we want is to execute the loadData() function that we have defined within the Head Include option of the export. This is the result:
If you test the project now, clicking the "Load" button will result in a file dialog appearing. However, regardless if we click "Ok" or "Cancel", nothing will happen. Indeed, we are not doing anything other than simply requesting the browser to open the filed dialog input. We have to load the data then relay it back into Godot. In order for our JavaScript code to be able to provide this data to Godot, we have to create a callback. This requires the following steps:
- In our JavaScript code we create an object that will hold a reference to the Godot function.
- In GDScript we create the callback object using
JavaScript.create_callback(). - Still from GDScript we retrieve the object from 1 with
JavaScript.get_interface(). - Assign the object created in 2 into the interface that we have got in 3.
We will now go into details for each one of the mentioned steps. Let's begin with 1. Before the loadData() function, we create an object named gd_callbacks. In it we add one field named dataLoaded and have its default value set to null. Later we will assign something into this field from GDScript. I'm stuffing callbacks within an object like this because I had absolutely no success while attempting to assign the callback directly into a variable. This is the declaration of the object:
var gd_callbacks = {
   dataLoaded: null
};
We can now move to step 2. The JavaScript.create_callback() function requires two arguments. The first one is the Object that contains the function we want to be called. The second argument is the name of said function. This means we have to create the GDScript function that will be used as the callback. One very important aspect of functions used as callbacks for JavaScript code is the signature. We always have to make it receive an Array as argument. Whenever we call the function from JavaScript, all arguments will be given to Godot through an array. If we change this the function wont be called, at all!
In Godot 4,
JavaScriptBridge.create_callback()receives as single argument, which is aCallable.
Because of the simplicity of our test project, we will basically take the received data, more specifically the first element of the array, and assign its value directly into the text property of the vbox/text node. So, lets create the GDScript function:
func _on_data_loaded(data: Array) -> void:
	# Make sure there is something
	if (data.size() == 0):
		return

	$vbox/text.text = data[0]
We can now reference this function within a callback. Now there is another important thing that we have to keep in mind. The object returned by JavaScript.create_callback() must remain valid for as long as the callback can be called from JavaScript. In other words, we have to keep a reference to it in our GDScript. That said, somewhere in the script we can declare the variable like this:
# Don't static type this because JavaScriptObject is not present on non HTML5 exports
var _on_data_loaded_callback = null
We have to initialize this variable, which will receive the return value of the create_callback() function. We will also perform tasks 3 and 4. In the _ready() function of the script we perform all of those:
A few things to note here:
- In larger projects, with multiple scenes, it would probably be a good idea to move the callback function, object and initialization into a different script, added into the auto load list. This would ensure the validity of the objects/functions for the entire project regardless of which scene is currently active.
- Notice the comment where I have purposefully mentioned callbacks, plural. Indeed, if needed, we can easily add more entries into the
gd_callbacksobject (in the Java Script code), create more variables to hold callbacks, and assign them using the same interface instance that we obtained withget_interface(). All we have to do is access the appropriate field within that object.
Excellent, now we have means to call Godot from the Java Script side. More specifically, the _on_data_loaded() function that we have defined early. What we want now is to handle the file dialog. When something is selected within it, we want to load data and then send it into Godot by using the callback assigned in gd_callbacks.dataLoaded.
What we have to do now is add an event handler to the change event of the input element we have created in the Java Script code. In this handler we get the first element within the files array within the input. Then we use this first entry and feed it into the file reader object. This file reader has an event that is fired when it ends loading the file. At that moment we can verify if the expected callback is valid and, if so, we call it providing the loaded data. The following snippet is added right after calling input.click() (again, in the Java Script code):
input.addEventListener('change', evt => {
   var file = evt.target.files[0];
   var reader = new FileReader();

   reader.readAsText(file);

   reader.onloadend = function(evt) {
      if (gd_callbacks.dataLoaded) {
         gd_callbacks.dataLoaded(reader.result);
      }
   }
});
That's it! We can now save text entered into the TextEdit node as well as load from a file, while running the project from HTML export! Just for reference, here is the entire code that is stuffed into the Head Include setting of the HTML export:
<script>
var gd_callbacks = {
   dataLoaded: null
}

function loadData() {
   var input = document.createElement('input');
   input.setAttribute('type', 'file');
   input.setAttribute('accept', '.txt');
   input.click();

   input.addEventListener('change', evt => {
      var file = evt.target.files[0];
      var reader = new FileReader();

      reader.readAsText(file);

      reader.onloadend = function(evt) {
         if (gd_callbacks.dataLoaded) {
            gd_callbacks.dataLoaded(reader.result);
         }
      }
   });
}
</script>
Happy forging!