Dedicated Server With a Single Godot ProjectOctober 30, 2020(edited November 19, 2020)
Attention: This tutorial was written when Godot 4 was not released yet. Moreover, networking has completely changed from Godot 3. While some information might still be valid, note that a lot of adaptation is expected.
Dedicated server, in this context, is a binary for the server, separated from the game itself, which is a different binary or at least a mode in which the execution of the binary leads to a completely different path dedicated to serve the game. The main goal of the server binary is basically to not perform any graphically intensive rendering. Granted, most dedicated server binaries don't even display anything at all! Yet, the server has to perform the game simulation and transmit enough data to the connected clients in order for them to rebuild the game state on their ends.
In this tutorial I show how to create a single Godot project that will generate both server and client binaries. After a little bit of theory I will show the idea in practice, splitting the development of the demo project into three major stages. The first one is something that can be used as a starting point to multiplayer games (a template if you will). The second part expands a little bit and incorporates the initial server/client (create/close server, connect to server etc) functionality. Finally, the third part adds some simple synchronization.
On parts two and three my networking addon will be used to greatly simplify the tasks shown, but if you don't want to use the addon I still believe you will be able to extract a few bits of information from the text, specially related to the way the scenes are built to help with the separation of client vs server resources.
I have a Github repository that contains the end result of the project described in the tutorial. The contents are meant to be used as reference material.
Now keep in mind that in this tutorial the server will be sort of a control panel that will allow whoever is running it to manage things. Note that it should not be a problem if headless server is necessary, as the Godot export for that will strip out any rendering anyway. Still, the demo project associated with this tutorial does have a server that don't display anything besides the basic user interface to perform management.
Another thing, when I say "bare bones", I mean it. While there will be basic functionality, I simply don't add any kind of polishing like confirmation dialogs and so on related to the majority of the stuff shown. This is on purpose in order to help focus on the relevant aspect of the code and also not completely explode the size of this tutorial.
Now note that what is shown here is meant to reach the following goals:
- Obtain a dedicated server and a client from a single code-base or, in other words, a single Godot Project.
- Strip out any graphically intensive rendering from the server just so you can use the default Godot build to export the project and still have something "lighter". This means that it will work even on the Windows build.
- The server will have an user interface to help manage things like opening/closing it and kicking players out.
- Setup things in a way that will cause minimal impact in the overall development workflow.
- Optionally allow server and client to be distributed together while minimizing data duplication within resource pack files.
Base Project
The easiest way to obtain a dedicated server with Godot is to actually have two separated projects, one for the server and another for the client. While this greatly help with the code separation, it also brings a few problems. To name a few:
- Level designing will require files to be copied from one project to another (client and serve).
- Client side prediction will generate duplicated code on both server and client, which obviously is not a good thing regarding maintenance.
- If scenes without visual representation are created for the server, the corresponding client ones would be almost identical requiring creating the "same thing" twice.
- Two code bases for a "single game project". Maintenance can potentially become an nightmare!
But we can have a single Godot Project and still be able to generate a dedicated server. In this topic I will cover the possible ways to reach this goal while also mentioning some of the things to keep in mind with each approach.
The very first thing that we have to know is related to the export process itself. What actually happens is that Godot take a pre-compiled binary file from the templates, copy it into the selected output directory with the provided file name then generate a resource pack with the same executable name (excluding the extension). When executed, this "specialized" binary will search for a pack file matching its own name. If one is not found then it will fail to launch.
This binary can in theory run pretty much any Godot game as long as it does not need any custom module that is not part of the build. So, in a way, the game itself is defined by the exported resource pack file. This means that when you want to export the project you can actually only take the binary file from the templates and from the editor only generate the resource pack file.
One interesting thing is that we can configure the exported pack to only contain the selected scenes/resources, which would allow us to generate a game distribution without any server code whatsoever. To make things easier in this regard we can create some subdirectories to help separate the files. Maybe client, server and shared. What should be placed on each one is pretty self explanatory, right? We could then create an export setting for client that only includes client and shared directories within its resource pack. Then, we could create another export setting for the server, which would only include the contents of the server and the shared directories.
But, to launch the game/server we have to specify the main scene! How to ensure the correct one is loaded? For that we can use a combination of the feature tags and the possibility to override project settings. In here each feature tag, including custom ones, is added into the list of configurations that would cause a project setting to be overridden. So, in this case we could set the main scene to be the client one by default and for a server tag we could override the main scene and set to be the server's main menu.
In here please be careful that Godot already has one Server tag that is present when using the Godot Server build. I would argue that it is not a good idea to reuse it nor create a server (lower case in this case) as it could easily create confusion between server and Server. Instead I would suggest a more descriptive name like dedicated_server or something like that.
Anyway, with this approach we create multiple export settings, server + client for each target operating system. This approach works really great if there is absolutely no intention of distributing the server with the client. The main thing that we have to keep in mind is to always ensure the resource list for the exported pack is correct during development. In this regard it would be really great if there was an option to select entire directories to be included in the pack file instead of individual scenes/resources.
But what if we actually want to distribute the server with client, just so players have the option to host their own servers? This approach of using feature tags and setting overrides becomes problematic because of the fact that each binary requires its own resource pack file, resulting in multiple of those. The problem is that the two files will most likely contain a lot of duplicated data.
The first idea that could come to mind in order to solve this is that we could instead have each export setting have the bare minimum files enabled (normally the main scene and the default_env.tres). After that create yet another export setting just to contain all of the resources and generate an extra resource pack file. When the server or the client binary is executed, the main minimal pack is loaded but the main scene will also dynamically load this extra resource pack. This approach works great until we start to add auto-load scripts. And things become if more problematic if those auto-load also use other scripts in the project. All of those files must be included in the bare minimum resource pack. As the project grows it will certainly lead to nightmares related to the proper configuration of the export settings!
So, what can be done? We can first think about the idea of having a single binary with a single resource pack! Later, through a command line argument like --server we can launch in "server mode". In this case we create a "central scene" where its script checks for the presence of the mentioned argument and, if it's there, then we open the server scene. It's a good idea to cache the result of this check to make things easier later when dealing with the game logic server vs client.
NOw one very interesting thing with this approach is that it does not prevent us from actually creating a separate binary file from a lighter Godot build. In that case we would have to specify the main pack file through the main-pack command line argument.
Because we are dealing with a single resource pack it should be clear that we don't have any problems of duplicated assets. Now suppose we want to support both Linux and Windows and also distribute a single package containing both binaries. During export we end up getting a resource pack for each supported system. And we can't exactly just use the same because there are tiny differences attached to those packs that are tied to the Godot build in use. In other words, for each operating system binary it will be necessary to also have a main pack.
But is it possible to do this kind of distribution without having duplicated data? Well, it actually is (almost) possible, however with the current feature set available, the setup is a little bit convoluted and there will be some (minimal) impact in how we code things. In this case, everything that is a singleton (auto-load script) in the project has to be removed from the list. Then we create one specialized auto-load script that will manually load the actual resource data pack (the one containing the rest of the project files) using ProjectSettings.load_resource_pack(). After that we manually create instances (and attach to the root of the tree) of any of the other scripts that were originally meant to be auto-loaded. In this way we ensure that the bare minimum of each pack will always be the main scene, the default_env.tres and this specialized auto-load script. All of the rest can be placed on a different central resource pack.
It should be noted that the auto-load feature also creates a name within the global space, allowing us easy access to that node. However, because we are manually instancing those scripts that were meant to be auto-loaded we have to access them as properties of the specialized auto-loaded script. There is more, we can't static type those properties because that would require the scripts to be loaded. Because of the lack of static typing we also loose auto completion for those nodes!
Albeit this approach is indeed a bit convoluted, specially in its setup, it also contains one interesting feature: we can generate a server binary containing its own main resource pack. In this case we could also use the feature tags functionality in order to automatically redirect to the appropriate scene instead of relying on command line arguments. The benefit of this is obviously that launching a server becomes very easy because we don't have to deal with several command line arguments.
Regardless of which approach is used it is very important to remember that the synchronization of the game is done through remote procedure calls (RPCs). When we perform this type of call, Godot will try to find a node with the exact same path on the remote machine. This means that it's very important that the node hierarchy is equal on both server and client when those nodes contain functions meant to be called remotely. Now note that the node types will not be verified, only their paths.
My networking addon perform the remote calls on internal nodes, meaning that the actual game can have different node hierarchies as long as no custom remote calls are done. The game nodes will still be located because the addon use unique IDs that are associated with internal references to the nodes themselves.
Ok, so before ending this topic I will recap all three mentioned scenarios with the usual suggested workflow. Note that it may be possible to mix and match some of the techniques.
(1) Separated Server from Client (Two Binaries Per Target System):
For each target operating system we simply create an export setting for server and another export setting for client. In here we have to take care of ensuring the server resources are not included with the client pack. This means that every time a new resource is added to the game the client export setting has to be updated. Again, if we could enable/disable entire directories instead of individual resources/scenes, this task would be incredible easier.
(2) Client And Server Together (Single Resource Pack Per System):
In this case we create a single export setting for each target operating system. Then we provide a command line script to automatically launch the binary using the argument to use server mode. A "central main scene" is used to check for the presence of this argument and open the appropriate scene based on this fact. If desired we can still provide a second binary for the server, using a different Godot build. In this case the command line script for the server also must include the main-pack argument, pointing to the resource pack containing the game data.
(3) All Target Systems Binaries Together (Multiple Resource Packs):
We still need a "central scene" to open the appropriate one based on the command line argument indicating if we want to launch as game or server. But the main pack file of each binary contains only the bare minimum resources for proper launching. We remove all auto-load scripts from the list and keep only a specialized one, that is meant to manually instance the other scripts that were meant to be auto-loaded. From this one node remaining as singleton we load the resource pack that contains the remaining game resources and instance the other scripts that were originally meant to be auto loaded.
Testing
One problem that arises is in how to test both client and server. In this regard dealing with two projects is slightly simpler as we could basically open two instances of the Godot Engine, one with the server project and the other with the client project. However, debugging will not fully work. Also, if you like to use print() function as a debug tool, it will also not work correctly.
There is an alternative way to launch the game without having to export the project. While it will allow print() to work, debugging through internal editor tools will still be problematic since technically speaking you are basically launching the game "without an editor window". To do this we have to use the command line, calling Godot editor while specifying the scene to be loaded. If no scene is given then the main one will be opened. Supposing you opened your command line directly in the project directory, you could run something like this to open the server's main menu:
> path_to_godot_binary/godot_binary server/main_server.tscn
Obviously you have to replace the path_to_godot_binary with the actual path and the godot_binary with the proper name, which usually is in the pattern Godot_v[version]-[build_type]_[OS]. So, as an example it could be Godot_v3.2.3-stable_x11.64 (latest Linux binary, as of this writing). Nevertheless, that command would basically launch the game directly using the server/main_server.tscn scene.
Obviously that if we are using the command line argument to drive how the game will be launched, then we can provide that:
> path_to_godot_binary/godot_binary --server
Lighter Server
The game representation on the server can completely go away from having any kind of visual asset which will certainly reduce its memory footprint. In this topic I intend to discuss this aspect because how to do so is not exactly trivial.
Most objects are usually composed of either a static, kinematic or a rigid body plus the collision shape. Those two (body + collision) must exist on both server and client as they are used by the code to perform the simulation. The visual representation (sprite, mesh...) can exist only on the client. But during development we usually need the visual representation to build the actual collision shape.
To strip out the visual representation we could create a base class extending one of the body types (kinematic, rigid, static...), containing the simulation script and would be placed within the shred directory. The collision shape node is added but the actual shape not set yet. Yes, the warning in the node hierarchy can be ignored.
Because the client needs visual representation, a new scene is created, inheriting from that base and added only on the client directory. In it the mesh or sprite is added and the collision shape can be set in order to match the graphical data. Now the client knows the collision shape but the server does not! How to solve this?
Remember, we can't trust clients, so no, the client cannot send the collision shape information to the server through the network. But, because the server can still have access to the local client directory, it would be possible to query the derived class for this information. Note that in this case this gathering would be done from local (server) data so at this point it should not be a problem regarding client trying to cheat by setting wrong collision data. Problem is, this would require instantiating the client class, which would also mean loading the visual nodes into memory, completely defeating the purpose of having a simplified base class without those.
A very easy solution here is to setup the collision shape when working on the inherited scene then save the result as a Godot resource within the shared directory, which can then be directly assigned within the parent scene.
With this we start to create the base scenes for both static and movable objects and when we start designing the levels we stumble into a problem. During this task we obviously want to see what is going on, meaning that if we work on the base level scene, the visual representations will have to be present, which is precisely what we are trying to avoid. If we shift to work on the inherited level scene, the server will loose a bunch of information. More specifically, the positions and orientations of the instantiated scenes, not to mention the actual scenes in their correct hierarchy.
The actual solution here is a bit strange and may perhaps seem somewhat convoluted, but it's simple enough to not be that problematic. Bellow is the basic workflow:
- Create the scene almost normally, without the visual representation node (
Sprite,MeshInstanceetc). - Attach a tool script (just place
toolat the top of the script, beforeextends ...) just so the next part of the script will run while in editor. - Add an exported property meant to indicate which asset should be assigned to the visual node, including a setter function.
- Within the
_ready()function check if code is running in editor or is not in the dedicated server, in which cases dynamically create the visual node and attach into itself. - Create a helper function that will check if the visual node exists and, if so, assign the relevant property using the exposed variable from 3.
- Within the setter defer the call to the function created in 5. Deferring here is necessary because often the setter is called before
_ready().
Probably those are all pretty straightforward to be done. However I believe the how to check conditions (4) might need some light. In order to check if we are in editor we simply run Engine.is_editor_hint(), which will return true only if the script is running in editor. Note that if you play from the editor (F5 shortcut key) then this function will return false, which is very interesting for this case. As for the dedicated server itself we have already seen how to perform the verification.
There is an alternative way to check if we are in editor, although it will have slightly different result. We could use OS.has_feature("editor") for this check, however it will only return false once we export the project. This means that if we run the game from the editor we will still get this as true, which depending on the case may not exactly be desireable.
For a more concrete example, bellow is code to dynamically create a MeshInstance node, saving it into an internal variable named _mesh_node that has default value of null:
func _ready() -> void:
	if (Engine.is_editor_hint() || !OS.has_feature("dedicated_server")):
		_mesh_node = MeshInstance.new()
		add_child(_mesh_node)
In the setter we update the property and defer the call to a helper function. In this helper function we basically check if _mesh_node is valid and, if so, change the node's mesh property:
func set_mesh(m: Mesh) -> void:
	mesh = m
	call_deferred("_check_mesh")

func _check_mesh() -> void:
	if (_mesh_node):
		_mesh_node.mesh = mesh
There is one caveat here. Because we are creating a tool script, we should be careful with the code within the _process() and/or _physics_process() functions in order to avoid some unnecessary computations when working in the editor. On a few cases we may want the code from those functions to run, but usually we don't. Luckily we can disable those using set_process() and set_physics_process(), and we can conditionally do so only if running in the editor. One thing to remember is that those two functions cannot be called before _ready(). The following snippet shows this:
func _ready() -> void:
	... Some other code
	# Disable _process() and _physics_process() if in editor
	if (Engine.is_editor_hint()):
		set_process(false)
		set_physics_process(false)
	... Some other code
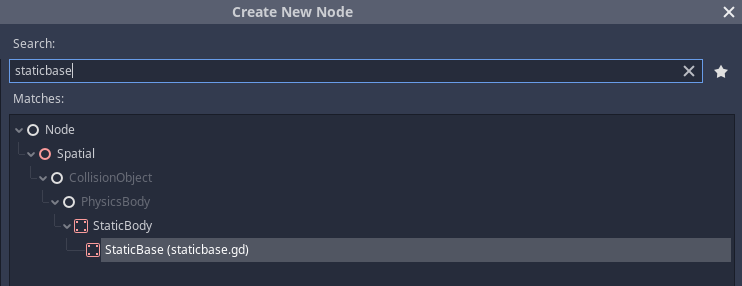
One little trick that we can do here is create base scripts deriving (extend) from the desired body type (StaticBod, KinematicBody etc) containing the script shown in this topic. Later, whenever one of the said bodies is needed we extend from the base script instead as it will perform the necessary setup for us. If necessary we can further extend that base script in order to add more code. I will shown this in more detail in the Synchronization topic.
An interesting aspect of this approach is that when working from the editor it will mostly seem like any other ordinary scene, except that when running in an exported dedicated server the visual nodes will never be created.
There is another caveat that must be mentioned here. With the shown code we won't see the instantiated MeshInstance in the node hierarchy tree, although it will still work - that is, display an assigned mesh. Not being able to see the node means that we won't be able perform any kind of adjustments to the transform (position, orientation). We can make the node visible if we add this line once the instance is created:
_mesh_node.set_owner(get_tree().edited_scene_root)
However, doing this is not completely free of problems. To be noted:
- Because the owner of the mesh instance is not the "script" anymore, the dynamically spawned visual representation node will not be deleted from the scene. Ok, it will as part of the cleanup but its existence will persist meaning that what we want to avoid will not occur. In other words, the server will still get the node if we don't ensure it is removed (maybe by deleting it within
_exit_tree()). Worse, every time the scene enters tree a new mesh instance will be created, and that will occur when the scene is opened in the editor potentially resulting in multiple instances of the mesh node. - When we ensure the node is properly removed so we don't get multiple ones and, of course, don't get any when in server mode, there is also another problem. Within the hierarchy there will be two nodes that when selected will provide a property to update the displayed mesh. One of them will persist (the one we are exporting) and the other will not. The second case occurs simply because we are indeed deleting the node when exiting tree.
Ok, so we decide to not make the mesh instance visible within the hierarchy, but what if we need to perform some adjustments to the transform of the visual node? One workaround here is that we can create a helper node that will serve as parent to the mesh instance. This helper node should be visible in the tree and we would perform any adjustments directly into it. Later in the Synchronization topic I will show this in more detail.
Edit (Nov 19, 2020): Actually, there is another option that I can probably say is a lot better than what has been shown. I argue it's better not only because it is simpler to use, it also aligns a lot more with the Godot Node philosophy!
The new way still uses the shown code to not instantiate the visual node. However, the major difference is that instead of using that script as base class it actually becomes the visual node that we want. So, in the end we design our scene classes exactly like we would, with the major difference that the Sprite, MeshInstance etc nodes won't be created if running in the dedicated server.
Once in the Synchronization topic I will explain this new way in more details. Because at that point things diverge a little bit from the old code, I will present both methods within tabs, defaulting to the new "architecture".
Bare Bones Project
With the theory out of the way, we can now build the basic project, which can also work as a template for client + dedicated server projects. In the theory section of the tutorial I did mention at least three possible scenarios with a brief description of the setup to achieve something under those requirements. I will not detail all three of those. Actually, I will detail a single one. For this specific demo I will go with the third scenario because it mixes a bunch of things of the other two mentioned scenarios, which allows me to more easily mention about those aspects during the development of the demo project.
All that said, if you already didn't, create a new Godot project like any other. At this point select an "ordinary" simple Node as parent for the scene. This will be our "central scene", which will redirect to the appropriate menu based on conditions that we will see shortly. Rename the parent node to entry. The scene can be saved, but we still don't have the subdirectories, so create client, server and shared, saving this entry scene somewhere under the shared one.
Now open the Project Settings window and set the main scene to be the entry.tscn. After setting it, close the window.
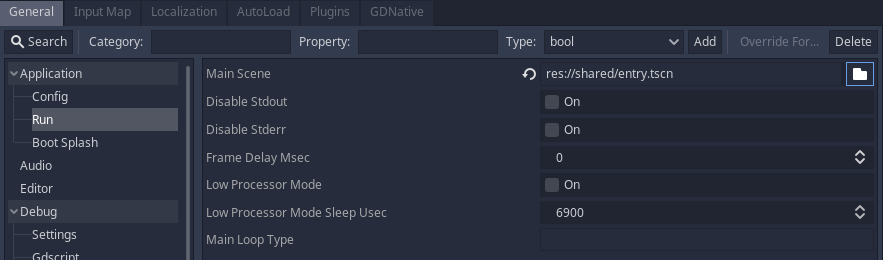
Create a new scene that will serve as the main menu for the "client mode". For the demo project I have chosen a 2D scene as parent and named it main_menu. Save the scene somewhere under the client directory with main_client.tscn name.
Then create a new scene that will serve as the main menu for the "server mode". In the demo project the parent node is a Node2D (just like the client's scene) and is named main_menu. The scene is saved as main_server.tscn under the server directory.
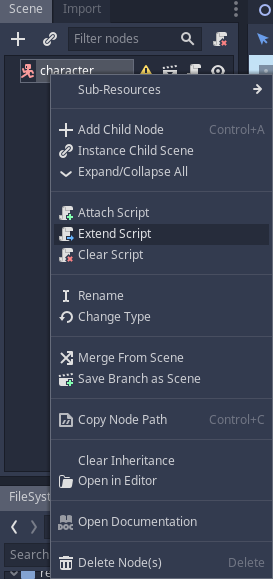
We need to attach a script to the entry.tscn scene, as it will immediately transition into either main_client.tscn or main_server.tscn. Once the script is added into the scene we have to decide how we are going to detect if we need to run in server mode or client mode. The solution path I have mentioned for the "first scenario" (two binaries) uses the feature tag functionality to determine this fact. The second scenario (single resource pack per system) uses a command line argument to determine which scene to load. Well, in this demo project we will use both. They are simple enough and will bring us some flexibility later.
That said, we will use a command line argument named --server to indicate that we want to run in server mode. We will also later create a custom feature tag named dedicated_server. In our check if any of these two is true (the argument exists or the feature tag exists) then we immediately transition into the main_server.tscn, otherwise we default to open the main_client.tscn. With this, the script is as simple as this:
func _ready() -> void:
	# By default open the client main menu
	var spath: String = "res://client/main_client.tscn"
	if ("--server" in OS.get_cmdline_args() || OS.has_feature("dedicated_server")):
		# Requesting to open in server mode, so change the string to it
		spath = "res://server/main_server.tscn"

	# And transition into the appropriate scene
	# warning-ignore:return_value_discarded
	get_tree().change_scene(spath)
We have to create the export settings now, which is where we can enter the custom dedicated_server tag. To do so, click the Project menu then Export .... The window that appears allow us to add multiple export settings which are based on installed templates. More information on this can be found in the documentation. For this demo we will create two export settings per target system, one for the client and the other for the server. To make things easier to identify I have appended either " - client" or " - server" to the names, which resulted in things like Linux/X11 - client and so on.
Select one of the server exports then open the Features tab. In it a line edit box allows us to enter custom tags. Just enter dedicated_server, like this:

Repeat this on all of the other "server" settings. Even if you intend to generate a single binary file per target operating system, there is no harm in adding extra export settings. Those only bring flexibility later if you change your mind and decide that an extra binary with a different Godot build is required.
At this point if there is any desire to completely separate client from server, select one of the client presets then open the Resources tab. In there change the Export Mode to either one of the other two then select only the resources that are under the client and the shared directories. While it is possible to also perform this removal from server data, it's not necessary and doing so will only bring more things to worry about when exporting the project. The thing is, whenever a new resource is added, this list must be updated. Again, it would be amazing if one of the export modes allowed us to select/deselect directories rather than individual files.
OK, in here this bare bones project is on track for either one of the first two scenarios I have mentioned at the Base Project topic. In other words, it can serve as a starting point for any of the two project requirements. However, as I have mentioned, in this demo we will go with the third option. This means we need some extra setup. Early I have said that we have to enable only the minimum required resources for the game to launch. Then use an auto-load script to load the rest of the resources as well as the instantiation of the rest of the scripts.
We could be tempted to perform this initialization from the entry.gd script. Resource loading from it would certainly work, however the instantiation of the other "auto-load" scripts would cause some problem. While the nodes will remain in the root of the tree when changing scenes, we loose a potential shortcut to access them. Because of that we will perform everything from this auto-load script. That said, create a new empty script derived from Node and name the file as loader.gd (saving somewhere under the shared directory).
Open the Project Settings window, move into the AutoLoad tab then add this new script into the list:

As mentioned, this script must load the additional resource pack file as well as instantiate any other script that would have been part of the auto-load list. The first task we only need (and want) to do if we are running in stand alone mode. The thing is, if we are running from the editor all of the resources will be available anyway so there is no need to load the pack. Besides that, if we try to load this pack file without any check, we will mostly likely get errors when trying to test the game from the editor because the chances are high that the file doesn't exist within the virtual resource directory tree. So, we will only perform this resource pack loading if we are in standalone exported binary. The other task, which is instantiating other scripts will be performed once we have any script with that requirement, which we don't at this point. That said, the script looks like this:
func _ready() -> void:
	# If in standalone mode (that is, exported binary), load the actual resource data pack
	if (OS.has_feature("standalone")):
		# Load the resource pack file named data.pck. The second argument is set to false in order to avoid
		# any existing resource to be overwritten by the contents of this pack.
		# NOTE: ideally this should check the return value and because this basically contains the core of the
		# game logic, if failed then a message box should be displayed and then quit the app/game
		# warning-ignore:return_value_discarded
		ProjectSettings.load_resource_pack("data.pck", false)
We can now go back to the export settings. In here we want each one of them to only have the bare minimum contents. Basically, those are entry.tscn, loader.gd and default_env.tres:

Note that we don't have to select entry.gd. As it's a dependency of the scene, Godot will automatically select it. Also, because the auto-load script is loaded before the entry scene, the actual resources will be present when the entry scene script finally runs. Ok, now we need an extra export setting meant to hold the actual resources of the game. At this point it is actually irrelevant which operating system is chosen as target, nevertheless, in the demo project I have chosen Linux and renamed it to Resources.
The recommendation is that we don't exactly generate packs for un-matching operating system, but because we are basically loading those without overwriting anything I believe we should be fine. Nevertheless, the overall steps to export the project now are as follows:
- Select the target then generate the resource pack file, matching the binary name.
- Do the same for the server if generating a separate binary for the server. This is useful primarily if using a different Godot template build, with a smaller file size.
- Select the Resources and export only the resource pack, with file name matching that one which we are loading.
That's it. This is the bare bones project, which can be used as a starting point for multiplayer games that require dedicated servers. If you want to test thing, put a few labels within the main menu scenes just to differentiate them and test away!
Basic Functionality
We now have a starting point for a project that allows us to obtain a dedicated server using the same code base of the game itself. We have the option to generate a single binary file and maybe even multiple resource packs in a way to reduce duplicated data as much as possible. But, that has almost zero functionality. In this topic we will use my Network Addon to perform the basics of allowing the server to start and close, as well clients to connect to the server. That said, install the addon and its dependency (which is part of the addon pack anyway).
If you follow installation instructions you will notice that this addon in particular requires activation from the project settings, more specifically from the Plugins tab. When this addon is activated like this, it will add several options into the project settings window and add a new script into the AutoLoad list. The auto load aspect should be fine if you are not aiming at the "third scenario" as described in the Base Project topic. In the case of this demo project, as we have seen, any auto-load script must be removed from the list and manually instantiated from the loader.gd script. That said, go ahead and manually remove the network addon from the AutoLoad list, leaving only the loader script that we added early.
If you are not aiming at the described situation you can skip the loader script but please at least read what is bellow Important information bellow, which comes after a few snippets before jumping into the next sub-topic.
Auto load scripts are basically nodes attached into the root of the tree, with a global name associated with them for easy access. What we will do is indeed create an instance of the network script and attach into the root, however we wont exactly have a global name for easy access. Still, because our loader script is an auto load one, and does indeed contain a global name, we can set the network instance as a property of this loader and use it as a shortcut. Shortly I will show how, but for now let's declare the property:
# This is the network addon.
var network: Node = null
Now, in the _ready() function, after we load the resource pack if necessary, we can instantiate the networking system. In the code we first load the script then create an instance of it saving directly into the declared property. After that we attach into the root of the tree:
func _ready() -> void:
	... previous code
	var root: Node = get_tree().get_root()

	var netclass: Script = load("res://addons/keh_network/network.gd")
	network = netclass.new()

	# At this point the tree is still being built, so defer the calls to add children to the root.
	root.call_deferred("add_child", network)
Important information bellow:
At this point we have the networking addon properly loaded. If you are not using the loader.gd script method, the way to access the functionality will be slightly different than most of the code that will be shown throughout the rest of the tutorial. So, the "snippet" bellow is meant to show the differences in how we will access the networking addon:
# If not using the loader script, that is if just activating the networking addon:
network.create_server(port, max_clients)
network.connect("signal_name", object, "handler")

# If using the loader.gd script, that is, manually loading the nodes
loader.network.create_server(port, max_clients)
loader.network.connect("signal_name", object, "handler")
Because the demo project is indeed using the loader.gd script, every time we need to access the networking addon we will use the loader's network property. In other words, we will always have to prefix the call with loader.network. So, if you are not using the loader.gd method, just remove loader. from the lines and you should be fine.
All that said, what will be shown in the rest of this topic is just the logic behind creating/closing a server and allowing clients to join it. While I use the addon here, it should be easy enough to use your own code to perform the tasks shown in this topic. However, for the basic synchronization code in the next topic things may get a little bit complicated to do without the addon.
Server
Let's work on the server main menu (main_server.tscn) so we can start the server itself. You can set the interface however you want, but in the demo project there is a button to actually start the server. Then a LineEdit control allowing the user to specify which port should be used and another LineEdit control to specify how many players should be allowed on the server. Something like this (note that in the demo project I have placed all widgets on top of a CanvasLayer node, named ui):

Once the desired widgets are placed we can start working on the code, so attach a new empty script into the parent node of main_server.tscn. We will override the _ready() in order to perform some initialization. For the moment we will basically add some event listeners to the server_created and server_creation_failed signals of the networking addon. We will work on the functions shortly:
func _ready() -> void:
	# Connect functions to the events given by the networking system
	# warning-ignore:return_value_discarded
	loader.network.connect("server_created", self, "_on_server_created")
	# warning-ignore:return_value_discarded
	loader.network.connect("server_creation_failed", self, "_on_server_creation_failed")
From that code it should be clear that we need to create two functions, _on_server_created() and _on_server_creation_failed(). When we request the network addon to create a server, one of these two events will be fired.
For the server_created we will basically transition into a different scene named game_server.tscn. This scene will be created shortly.
As for the server_creation_failed we will basically display a message box telling that it failed to create a server. For this dialog we add a new widget into the scene, more specifically of type AcceptDialog. The properties can be set according to the project needs. For reference, the text has been set to a very crude Failed to create server message and the Exclusive property has been enabled. The name of the node has been set to err_dialog. That said, the functions look like this:
func _on_server_created() -> void:
	# warning-ignore:return_value_discarded
	get_tree().change_scene("res://server/game_server.tscn")

func _on_server_creation_failed() -> void:
	$ui/err_dialog.popup_centered()
We are almost done with this scene. We have to make that button actually try to create the server. That said, select it and add a handler for the pressed event. The generated function will use the network addon to try to create a server, which is done by network.create_server(port, "server name", max_players). Since we have provided two line edit controls to allow us to specify the port and the maximum amount of players, we gather those values and convert into the correct types, which are integers for both parameters. For reference, the edit controls are named txt_port and txt_maxplayers. That said, the code looks like this:
func _on_bt_start_pressed() -> void:
	# This is the default value, which will be used in case the specified one in the line edit is invalid
	var port: int = 1234
	if (!$ui/panel/txt_port.text.empty() && $ui/panel/txt_port.text.is_valid_integer()):
		port = $ui/panel/txt_port.text.to_int()

	# Same thing for maximum amount of players
	var mplayers: int = 6
	if (!$ui/panel/txt_maxplayers.text.empty() && $ui/panel/txt_maxplayers.text.is_valid_integer()):
		mplayers = $ui/panel/txt_maxplayers.text.to_int()

	# Try to create the server
	loader.network.create_server(port, "Awesome Server Name", mplayers)
We now have a functional main menu. When the Create Server button is pressed, if the server is created successfully it will transition into a scene that we still don't have. That said, we have to create it. According to the code in the _on_server_created() function we are transitioning into a scene named game_server.tscn that is in the server directory. This scene is meant to somewhat hold the game logic, meaning that client will most likely need that code too.
One possible approach here would be to create a base scene with the script in the shared directory then create one inherited scene on the server and another in the client. Another option is to actually have a "main game scene" for the server and another for the client. Those will then instantiate the actual scene containing the logic.
We will go with the second strategy because it does have a "hidden" feature that can be helpful later. What happens is that those instantiated scenes can be areas where players are at. If one player transition into a different area we can simply instantiate that area, attach into the "main game scene" and then put that player into that area. As part of the logic of that area we can create timers in order to destroy those instances if there are no players there once the timer expires.
That said let's create the common scene, that will be stored somewhere in the shared directory. Name it game.tscn with parent being a Spatial node and naming it game. Attach an empty script into it and, for the moment, it is done.
After that we will create the actual game_server.tscn which can have whichever type as parent (but named game_center). In the demo project it is set as a common "ordinary" Node. Within the parent node, add one CanvasLayer naming it ui, which will hold the overall control panel UI of the server when the game is running. Then as a direct child of the game_center add an instance of the game.tscn. At this point the hierarchy of the game_server.tscn should look like this:

In the UI we will add at first two buttons (on top of a Panel for better visibility), one that will directly quit the server (bt_quit) and the other one that will go back to the main server menu (bt_menu). The snippet bellow shows the functions that are used to handle the pressed event of both buttons. On both cases we first close the server then perform the other necessary task, which are quit the app and the other is transition back to the main_server.tscn:
func _on_bt_quit_pressed() -> void:
	# Close the server
	loader.network.close_server()
	# Then quit the app
	get_tree().quit()

func _on_bt_close_pressed() -> void:
	# Close the server
	loader.network.close_server()
	# Return to the main menu
	# warning-ignore:return_value_discarded
	get_tree().change_scene("res://server/main_server.tscn")
The next step is that we will hold a list that will change as players join and leave the server. This list will basically display the client ID and one button that will kick that player. We could add another button to ban but I will not do so for this demo project. However, I will mention about banning under the topic Player Login and Credentials. That said, the idea here is that once a player joins we will instantiate a scene that contains the basic structure (label plus button) and add that object into a vertical box that is inside a scroll container.
That said, let's work on the player entry scene by first creating a new one, with Control as parent node. Set the name of this node to player then save the scene under the server directory with name player.tscn. Add one Label node and name it lbl_id. Finally add one button and name it bt_kick, positioning it bellow the label. The screenshot bellow shows how it was done for the demo project (with the grid enabled to help with positioning):

Now attach a script into this scene. At the top we will cache the ID of the player. We will initialize that through a function named set_data(), which will receive the value as argument. As part of the initialization we also change the label to match the given value. The script then looks like this:
extends Control

var pid: int = 0

func set_data(id: int) -> void:
	pid = id
	$lbl_id.text = str(id)
The last thing that we will do is answer to the "kick" button being clicked. That said attach a function to the pressed signal and, in it we use the network addon to kick the player. We first verify if the cached pid property is different from zero and, if so, we call the kick() function, which expects two arguments, the player ID and a reason for the kick that is sent to the kicked player, respectively. For this demo tutorial we just hard code the message:
func _on_bt_kick_pressed() -> void:
	if (pid != 0):
		# Bellow we could retrieve the message from a line edit instead of hard coding it.
		loader.network.kick_player(pid, "You have been kicked")
The last thing that must be done in this scene is set the minimum rect. Only the height is necessary as it will determine how the control will be distributed within the container later. The next image shows the settings for the demo project as a reference.

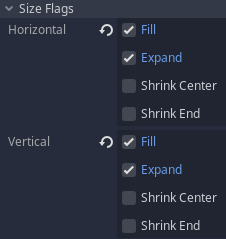
Now let's go back to the game_server.tscn. As mentioned we want to populate a list with instances of the ui_player.tscn whenever players join the server. To help with the layout we will use a ScrollContainer node (named scroll) that will hold a VBoxContainer node (named vbox). This last node will be the one to hold the instances of ui_player.tscn. To ensure the vbox node will fully occupy the scroll node, expand the Size Flags property and enable the Expand property on both Horizontal and Vertical, like this:
The network addon offers two signals to help us identify when a player joins or leaves the game, which are player_added and player_removed. A single integer argument is given to both signals, which is the ID of the player that caused the event. That said, we have to listen to those events meaning that in the game server script we add this:
func _ready() -> void:
	# warning-ignore:return_value_discarded
	loader.network.connect("player_added", self, "_on_player_added")
	# warning-ignore:return_value_discarded
	loader.network.connect("player_removed", self, "_on_player_removed")
Obviously we have to create the functions that will handle those events. When a player joins the game (_on_player_added()) we have to create an instance of the player.tscn, set its data then attach into the vbox node. To make things a lot easier when removing the instantiated node from the hierarchy we will cache the created node into a dictionary keyed by the player ID. This means we have to declare this dictionary. Another thing that we will do at the top of the script is pre-load the player.tscn scene. In code:
# Preaload the UI Player scene, which will be instantiated whenever a player joins the game
const uiplayer_scene: PackedScene = preload("res://server/ui/ui_player.tscn")

# Key = player ID
# Value = whatever data we need associated with the player.
var player_data: Dictionary = {}
Finally, to the functions. I mentioned that the dictionary will cache the created UI scene. It indeed will be, but as another dictionary. For the moment it will contain a single field, named ui_element. The choice of using a dictionary in here is that it allows us to easily expand things in case we need to. That said, the code:
func _on_player_added(pid: int) -> void:
	# Create instance of the UI element
	var uielement: Node = uiplayer_scene.instance()
	uielement.set_data(pid)

	# Attach it into the vbox
	$ui/panel/scroll/vbox.add_child(uielement)

	# Cache the node
	player_data[pid] = {
		"ui_element": uielement,
	}

func _on_player_removed(pid: int) -> void:
	# Obtain the player data
	var pdata: Dictionary = player_data.get(pid, {})

	# Bail if the obtained entry does not exist (IE.: it's empty)
	if (pdata.empty()):
		return

	# "ui_element" should point to the node within the vbox container. So, queue free it
	pdata.ui_element.queue_free()
	# Then erase from the cached data
	# warning-ignore:return_value_discarded
	player_data.erase(pid)
We are done with the server stuff! As mentioned in the Testing topic, we can use the command line to open a project "without tools". In this case we can also specify the "--server" argument in order to open the project in server mode. Something like this:
> path_to_godot/godot_binary --server
Client
For the client part we first work in the main menu (main_client.tscn). The idea here is that we allow the player to specify both the IP and the port corresponding to the server (a LineEdit control for each). A button is then used in order to trigger an attempt to join the specified server. The layout of the demo project looks something like this:
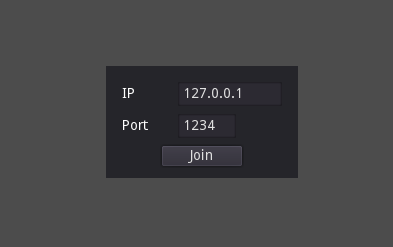
Notice that I didn't provide any other option, like name and such. Again, the intention here is to make the most basic of everything in order to focus in the overall workflow. Nevertheless, for reference the LineEdit controls and the button are named as txt_ip, txt_port and bt_join.
If you haven't done yet, attach an empty script into the scene so we can start with the code. When attempting to join a server, the answer is not immediate, meaning that we don't have a return value, which would basically halt the execution while awaiting. In case of a failure to join, the join_fail signal will be emitted, otherwise we get the join_accepted signal. This means we will connect a function to each one of those events:
func _ready() -> void:
	# warning-ignore:return_value_discarded
	loader.network.connect("join_fail", self, "_on_join_failed")
	# warning-ignore:return_value_discarded
	loader.network.connect("join_accepted", self, "_on_join_accepted")
In case of failure we will display an error message so, just like we did with the server, add one AcceptDialog node (named err_dialog) into the scene and set the message accordingly (the demo project has just Failed to connect to the server). We can obviously polish things here and add some more information, but for this demo it should be enough.
Now we can work on those two functions. In case of failure we just display the dialog and on success we simply transition into a scene named game_client.tscn (yes, we will create it shortly). The code to perform those tasks follows:
func _on_join_failed() -> void:
	$ui/err_dialog.popup_centered()

func _on_join_accepted() -> void:
	# warning-ignore:return_value_discarded
	get_tree().change_scene("res://client/game_client.tscn")
The last thing we need here is to handle the join button click. In the function we have to retrieve both IP and port from the line edit controls and plug those into the join_server() function, which requires the IP as a String and the port as an integer. In here it would be a good idea to validate the values of the controls but, again, for simplicity it will not be done in this tutorial. Nevertheless, here is the code:
func _on_bt_join_pressed() -> void:
	var port: int = 1234
	if (!$ui/panel/txt_port.text.empty() && $ui/panel/txt_port.text.is_valid_integer()):
		port = $ui/panel/txt_port.text.to_int()

	var ip: String = $ui/panel/txt_ip.text
	if (ip.empty()):
		return

	loader.network.join_server(ip, port)
We are done with the main menu. Now, remember that on join success we transition into game_client.tscn scene, which we have to create now. Set the parent to be an "ordinary" Node and name it game_center. Note that this name matches the parent node of game_server.tscn, which brings to this important note:
If you are not using the network addon, most likely children nodes will perform several remote calls, meaning that the paths must necessarily match and that begins with the parent nodes having equal names. Following this rule with the networking addon is not absolutely necessary but it was done so here mostly to help those who don't want to use the addon.
That said add one CanvasLayer node (named ui) and an instance of shared/game_base.tscn, both directly into the game_center. Finally attach an empty script into the scene. The resulting hierarchy should look like this (yes, it should look exactly like the server - in fact I'm even using the same image file!):
The only piece of code we will add here is to handle a disconnection, which should transition back into the main menu. Now note that when a player is kicked, it will trigger the kicked signal (which gives a single String argument with the reason) and after that the disconnected event is also triggered. So, to help things we will create a String property at the top of the script that will hold a basic "Disconnected from the server" message. If the kicked event is triggered we overwrite the value of this property with the reason. Then when handling the actual disconnection we display the value of the property within a message box. Once the box is closed we finally transition into the main menu.
All that said, fist create the dialog (as a child of the ui node) and name it dc_dialog. Once that is done we declare the property that will hold the message and connect to the kicked and disconnected events of the network addon:
var dc_message: String = "Disconnected from the server."

func _ready() -> void:
	# warning-ignore:return_value_discarded
	loader.network.connect("kicked", self, "_on_kicked")
	# warning-ignore:return_value_discarded
	loader.network.connect("disconnected", self, "_on_disconnected")
In the _on_kicked() function we simply assign the given argument into the dc_message property. As for the _on_disconnected() we first pause the entire simulation (in order to avoid any local errors), assign the dc_message into the text property of the dc_dialog node then display it:
func _on_kicked(reason: String) -> void:
	dc_message = reason

func _on_disconnected() -> void:
	set_pause_mode(Node.PAUSE_MODE_STOP)
	$ui/dc_dialog.dialog_text = dc_message
	$ui/dc_dialog.popup_centered()
Now, the last thing is that we have to connect a function to the confirmed signal of the dialog. That event is given whenever the Ok button is pressed within the dialog itself. So, when that happen we finally transition back into the main menu:
func _on_dc_dialog_confirmed() -> void:
	# warning-ignore:return_value_discarded
	get_tree().change_scene("res://client/main_client.tscn")
The basic functionality is pretty much done! If you launch the server, start it, then a few clients and join, the server should get the entries populated within the panel. Clicking the kick button on the server should result in the corresponding client's window showing the disconnection message box which, if the OK button is clicked, should bring back the client to the main menu. Note that when the client "connects", it is normal to see just a grey screen because we haven't added anything into the scene nor a camera.
Resetting
This quick sub-topic is mostly for those who have chosen to use the networking addon. When going back to the main menu it would be a good idea to reset the networking system. The reset_system() function is provided in order to perform this kind of operation. We want to do this on both server and client, however if we do this on the game.gd script we potentially get a problem. As I mentioned, the suggested architecture in this tutorial allows us to create instances of the game level (in this case just the game.gd) that could easily be areas in which players could be in. As players change areas we can create more instances representing those. If we reset the system when one of those instances is destroyed we risk having some problems with the synchronization. Because of that we will have to place this "one liner" on both game_server.gd and game_client.gd scripts.
func _exit_tree() -> void:
	loader.network.reset_system()
From the server, when transitioning back into the main menu we are already ensuring the server is being closed. In the client code we can ensure it gets disconnected from the server when going back to the main menu. In the server we do this based on a button press. As for the client we will actually use _exit_tree():
func _exit_tree() -> void:
	loader.network.reset_system()
	# No harm if already disconnected
	loader.network.disconnect_from_server()
Synchronization
The synchronization is perhaps the most difficult aspect of creating multiplayer games, specially if there is any intention of incorporating strategies with the objective of hiding latency, such as client side prediction. Because the main topic of this tutorial is about dedicated servers and not exactly synchronization, I will simply not talk about the techniques to perform such things. Nevertheless, the network addon greatly simplify this task by automating most of the process of sending snapshots through the network, while requesting game logic code to perform any correction when necessary. Because of that I can add a sample synchronization which do use client side prediction in this tutorial.
Edit (Nov 19, 2020): As I have mentioned in the Lighter Server topic, there is a new and better method of stripping out unnecessary node from the dedicated server. I want to keep the old information still present in this page. So, to help better separate things I will present the old and the new methods within tabs when things diverge.
Input
When dealing with authoritative servers, clients have to send input data to the server, which in turn use it to calculate the simulation. The networking addon deals with the task of exchanging input data, however it must know which input maps are used in order to properly encode and decode the data. This is done by registering the project's input maps. But then, we still don't have any in our project yet! So, let's first create them.
For simplicity we will only deal with basic movement (forward/backward, left/right) and jumping. That said, open the Project Settings window and select the Input Map tab in order to add several actions maps (move_forward, move_backward, move_left, move_right and jump). Assign at least one button to each of those mappings just so it can be tested later. For reference, in the demo project W, S, A, D and Space bar are used, respectively.

We now have to "tell" the networking addon that we want those maps to be encoded and decoded. Although the server will not exactly directly gather input, it must know which ones are encoded within the data. For the client, it indicates which data will be encoded, while on the server it tells which data will be decoded. In other words, both server and client need this information, meaning that the code to register the input maps within the networking addon is in the "shared". We have at least two options here:
- Take advantage of the fact that the shared/game.gd is run on both server and client and contains the "core" of the game, we can add the input registration within this script. In this case the registration will occur every time the scene is loaded, meaning that if a "back to main menu" is used then "open the game again" happens or if we indeed create multiple instances of the game to represent different areas, the registration will be performed multiple times.
- We create a new "auto-load script" that will hold the "game state". Within it we can perform some other kinds of initializations if desired.
In 1 we potentially "register" the input mappings multiple times within the networking addon. Depending on the project there is no harm in doing so but it's not needed. In this case we can take advantage of the script that already exists. As for 2, while we do have to create yet another script, we end up getting a place to perform actions that will persist during scene transitions. Even if we go with 1, a "game state" script will most likely be created at some point. Because of that we will go with 2.
Now remember that the route we are taking with this demo is that any auto-load script should be manually loaded through the loader.gd instead. Also remember that if you chose a different route you can simply add the script into the AutoLoad list. Also always remember that any resource file added to the project requires an update to the export settings when server and client are meant to be separated.
That said, somewhere within the shared directory create a new empty script, inheriting Node, naming the file gamestate.gd. If you are adding this to the AutoLoad list make sure it is added after the networking addon if you are also using it. Otherwise we have to ensure it is loaded within the loader.gd script. We already know the steps so I will just dump the loading snippet, which saves the instance into a property named gamestate:
func _ready() -> void:
	... previous code
	var gstateclass: Script = load("res://shared/scripts/gamestate.gd")
	gamestate = gstateclass.new()

	root.call_deferred("add_child", gamestate)
As for the gamestate.gd, in the _ready() function we will perform the input registration within the network addon. This is done through the function register_action() that is part of the network script. This function requires two arguments, the name of the map (move_forward, move_backward...) and a flag indicating if this map will be used as a boolean or as a float. For simplicity we will deal with all five of our maps as booleans (second argument set to false). That said, the script looks like this:
func _ready() -> void:
	# Register input within the network system
	loader.network.register_action("move_forward", false)
	loader.network.register_action("move_backward", false)
	loader.network.register_action("move_left", false)
	loader.network.register_action("move_right", false)
	loader.network.register_action("jump", false)
The input map registration within the network system is done!
Server Mode
In this demo project we are using two different methods to verify if we are in server or client mode. One of those methods is checking for the presence of the --server command line argument. The other is the feature tag dedicated_server. Shortly we will need to determine if we are in server or not but instead of performing this check again, we will cache the result of it in a property of the actual auto load script (loader.gd). That said, let's declare this property:
# Chache if we are in server or client mode, assuming client
var is_dedicated_server: bool = false
We are checking those mentioned conditions from the entry.gd script. Since the property is assuming we are in client mode, we have to update it only if we are actually in server mode, so we can simply add one extra line after we set the path of the scene that should be opened, like this:
func _ready() -> void:
	... previous code
	if ("--server" in OS.get_cmdline_args() || OS.has_feature("dedicated_server")):
		# Requesting to open in server mode, so change the string to it
		spath = "res://server/main_server.tscn"
		# Cache that we are indeed in server mode
		loader.is_dedicated_server = true

	... previous code
Visual Representation
In here the first divergence comes from the old to the new method of stripping out nodes when running in the dedicated server.
Environment
All that said, we first need some environment, but to simplify things we will just add a flat floor to allow characters to walk around. This floor will be built by combining a few static bodies together.


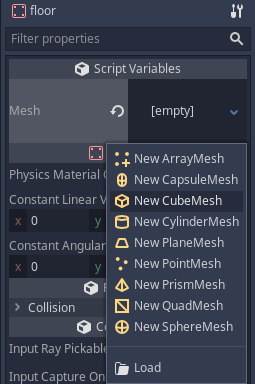
Yes, it doesn't look like a floor so let's flatten it. Click the cube preview within the Inspector tab, which will expand the settings for the mesh itself. Change the size property to x = 10, y = 0.2, z = 10. If desired create a new SpatialMaterial just so we can assign a color to the "floor" (in the demo project it was set to a green color). The result should look like this:

Now that we have a visual guide we can setup the collision shape, so select the collision node then create a new BoxShape:

Click the value of the property itself within the tab in order to edit the Extents properties. Those must be half of what was set in the flattened cube, like this:

The result of this should be a barely visible blue contour on the flattened cube edges. Ok, this basic floor scene is ready to be used within our game.tscn. So, open it and add a few instances of the floor.tscn into it, positioning them however you want. The important thing here is to have a floor where characters can "walk" around.
Characters
Next we will work on a very simplified character just so we can have something that moves around to test the synchronization and exemplify the code within this architecture. For this demo we will use kinematic body as base for the characters.
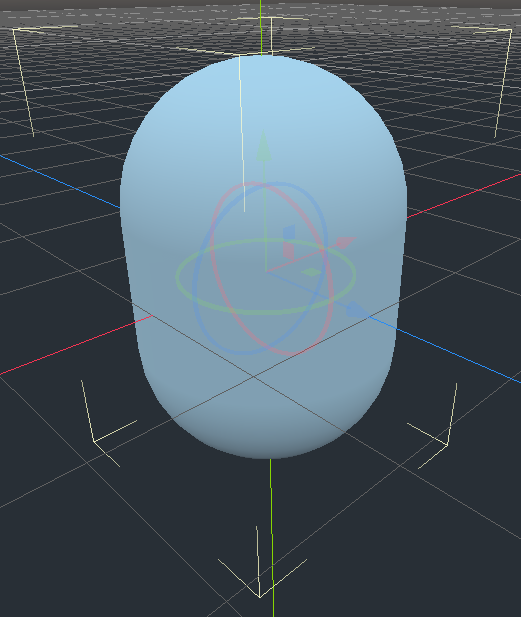

We now can deal with that warning within the node hierarchy. It basically tells that we need a CollisionShape node, so add one and rename it to collision. With it selected, create a new CapsuleShape in the Shape property. The generated capsule is also "Pointing sideways", so rotate it 90 degrees around the X axis.
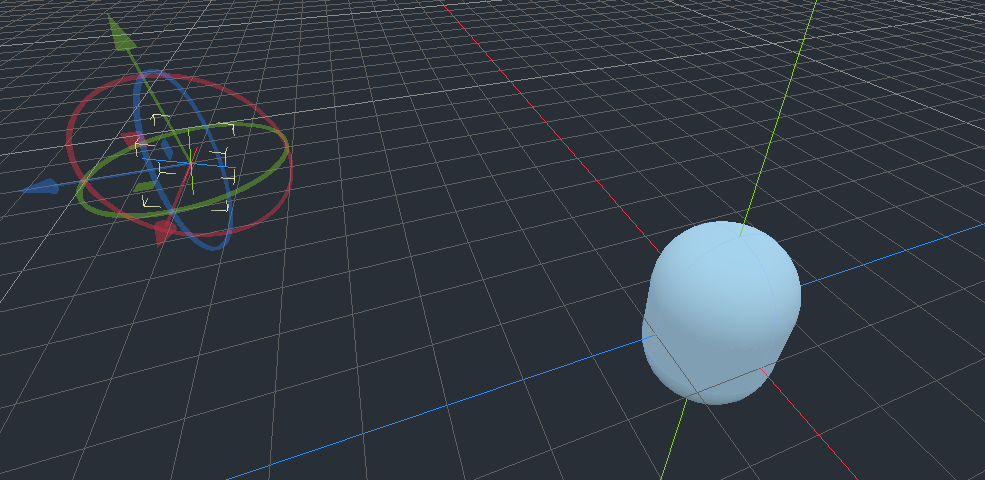
At this point we have a (simplistic) visual representation for the character and a "physical body shape" that will be used to perform the simulation. However, when running the game we won't be able to see anything because we are lacking a camera. We also don't exactly want to create one within the server. This means that we will create a camera node from the script. To help with positioning, we can create another "helper node", of the Position3D type. Name it camera_pos then position it "behind" and up the character (remember, negative Z is forward). Then do a small rotation in the X axis as if you wanted to tilt the camera a little toward the character. To better help here, we can temporarily attach a camera to this helper node and use the preview mode to test if it's as desired. This is somewhat how it looks in editor;
For reference, the camera_pos node has translation x = 0 | y = 3.7 | z = 5.2 and rotation of -20 degrees in the X axis. We can now start coding our character. Because the character movement code is not exactly the topic of this tutorial (at all), I will just dump in here an initial code that performs the basic input handling and all. Then, I will slowly change it to incorporate the functionality to deal with the network/synchronization. That said, the initial character script looks like this:
Please notice the temporary code that is calling the _handle_input() function. This is mostly to cause the "gravity" to be simulated in case you want to test if something is happening with current code. Although it is not exactly dealing with the input, it should move the character to the floor.
Snapshot Entities
As mentioned, the networking addon synchronizes the game through snapshots. While the process of encoding and decoding the data sent through the network is automated by the addon itself, we have to "tell it" what this data is. The first thing that we must do is create a "thin" class that will serve to bridge the game logic state with the networking system. This class must be derived from SnapEntityBase, containing several properties (that will be replicated) and it should override a function named apply_state(Node).
During the simulation we create an instance of this class, set the properties with the values representing the state in the game world and provide this object to the network system, which will automatically take care of it. On a client, when snapshot data arrives, the network system will compare with the internal simulation state and when something is not correct it will call the apply_state(). At this point we can correct the client state based on the incoming data.
One important thing here is that we have to static type the properties within the class, as those are used as hints to encode/decode the data using the correct amount of bytes. As we progress with the code I will explain things in more details, but for now let's work on the snapshot entity class. We want to use it to represent our characters within the snapshots so, with this in mind, we can sort of define which properties we have to add.
Another thing is that I strongly recommend adding a class_name to the created class as it will greatly help with the code later, specially when interacting with certain functionalities of the addon.
We know that orientation and position are two very important state properties of the characters, specially because they directly affect the rendering. This means we have to add two properties for those states, one is a Vector3 and the other a Quat (yes, we will use quaternions to represent the orientation as it is much smaller than a Basis).
Since we are accumulating the vertical velocity we have to also replicate it. If we don't, when a correction is applied we will still have something wrong directly affecting the movement of the character. Depending on the situation it may lead to visual glitches when the character is jumping or falling. This can be replicated through a simple float.
For this demo we don't need anything fancy so all the data that we will replicate for characters will be those, position, orientation and vertical velocity. As for the apply_state() function, when it is called the argument that is given is the node that requires correction. When that happens the internal properties are already in the correct state. The task here is to transfer those into the given node. In this demo project this will be done by calling a function within the node class with the state stuffed into a dictionary. We will work on that function shortly.
All that said, somewhere in the shared directory create an empty script extending SnapEntityBase naming the file snapcharacter.gd. Add a line to indicate the name of the class, class_name SnapCharacter. Declare the three mentioned properties. The base class declares the _init() function with two arguments, the unique entity ID and a "class ID" (which is named class hash within the code), meaning that we must give those two to the base class. In this demo we will not use the "class ID" so we will just send in 0. As for the unique ID we will take it through an argument. In our _init() itself, besides relaying the entity ID to the base class, we will initialize the internal properties.
In the apply_state() function we will first check if the given node is of KinematicBase type and if it contains a method named apply_state(). If so, then we call the function giving a newly created dictionary with the internal properties assigned to fields in this dictionary. The entire script looks like this:
Again, if you are separating client from server, don't forget to update the export settings to include this new script!
Snapshot Cycling
While the network addon automates the encoding, decoding and replication of the snapshot data, we have to explicitly request the creation of a new snapshot object. Normally we do this at the start of a game loop within our game logic code. This task is performed by network.init_snapshot() and ideally should be one of the first things done within the game loop.
Again, with the architecture that is being presented, the game.tscn can easily be a region and we can potentially have multiple scenes like this instantiated and added into the "game center" scenes (client and server). This means that if the game does indeed use that strategy to represent multiple areas in the game then the ideal is that we initialize the snapshots on both game_client.gd and game_server.gd scripts. Obviously that if just a single scene is used for the game then it can hold this code.
Nevertheless, when we call network.init_snapshot() the addon will create a blank snapshot object that will be ready to receive entity data. It will also perform internal preparations that once the loop ends the snapshot will be automatically "closed" and dispatched to the clients. If the code is running on the client, the snapshot will serve as a comparison point to perform corrections if necessary.
All that said, we will use the _physics_process() function on both mentioned scripts in order to perform this snapshot initialization, which will look like this on our demo project:
func _physics_process(_dt: float) -> void:
	# Request initialization of the snapshot for this physics frame
	loader.network.init_snapshot()
The snapshots are empty and we must fill them with data. We will see how to do that in the Client Correction sub-topic.
Spawning The Characters
The characters must be spawned as players join the server, meaning that we can't exactly "pre-add" them within the game levels. Instead we need to place a few spawn points where the characters can appear. That said open the game.tscn scene and add a few Position3D nodes, spreading them around the place. When we come to actually spawn the character we will take one of those points and, based on the transform, we can apply into the initial transform of the spawned node. For reference I have added 8 of those nodes as children of a Spatial node named spawn_points. The Position3D nodes are named directly as numbers, from 0 to 7.
The next thing is that we need to do is register "network spawners" within the network addon. In this case we will only need one, for the character. Basically this tells the networking system how nodes should be spawned and where in the hierarchy to attach them.
On the server we will explicitly spawn the nodes. On the client, it depends. If we want to incorporate entity spawning as part of the prediction code, then on the client we also explicitly spawn the entities, otherwise we let the synchronization mechanism trigger the spawning.
There are two things to keep in mind regarding this entity spawning thing, server only vs shared space.
- If we incorporate spawning on the client as part of the prediction, we must ensure that we will be able to compare it with the correct entity within the incoming server data. If you are manually dealing with the synchronization through remote class, the node paths must match, meaning that how the spawned nodes are named must be consistent. If dealing with the networking addon, then the unique entity ID's must match.
- On certain projects, it is desireable to keep portions of the code only on the server, without being distributed with the client code. It is possible that the entity spawning code is part of this requirement, meaning that this cannot be part of the prediction.
That said, solving the problem of 1 is not exactly an easy task. Because of that, on most projects a particle effect (and maybe an audio) is used to sort of hide the fact that the spawning is slightly delayed by the network latency. With this in mind I will add the explicit entity spawning as part of the server, outside of the client code.
But first we have to register the spawners, which must be done on both server and client. During this registration we have to provide a node that will be the parent of the dynamically spawned ones. Because we need this node, we can't perform this initialization from the gamestate singleton. Instead we will use the script attached to the game.tscn, which is the game.gd file. From its _ready() function we will call the spawner registration function register_spawner() that is part of a property within the network singleton.
The register_spawner() requires four arguments, plus an optional one. The first argument is the "name" of the class derived from the SnapEntityBase representing the node that we want to spawn. In this case, the class representing our characters is the SnapCharacter (which we created in the Snapshot Entities sub-topic). Note that this is not a String, but directly the class itself (that's why I recommended adding a class_name within the class' script). The second argument is the class ID (hash) which we are not using in this demo so we will send 0. The third argument is an instance of a class derived from NetNodeSpawner. Depending on the complexity of the process it may be needed to create a custom spawner, but for our needs the NetDefaultSpawner should be enough. The fourth argument is the node that will hold the spawned character. For this project we will simply attach the characters into game scene itself, but I believe it would be a good idea to create a node specifically for the characters (it may help with hierarchy organization). Finally, the optional argument is a function reference, pointing to a... err.. function that will be called as soon as the node is spawned. We will not use it.
And so, the code looks like this:
func _ready() -> void:
	# The default spawner require the scene, so load it
	var charscene: PackedScene = load("res://shared/scenes/character.tscn")
	# Register network entity spawner for the characters
	loader.network.snapshot_data.register_spawner(SnapCharacter, 0, NetDefaultSpawner.new(charscene), self)
Now that the network system knows which scene to spawn, which snapshot object represents it and where to attach the node to, we need the information of where in the game world the node should be positioned at. We already added some preparations to retrieve this information, which are the position nodes added into the game.tscn. To make things easier we will create a function within this scene's script that will return a (global) position given the node's index. It should be pretty straightforward so I will just dump in this snippet:
func get_spawn_position(index: int) -> Vector3:
	# Just some boundary check. If there is any intention to change the number of spawn points during development,
	# perhaps it would be a better idea to put those nodes into a group and use the size within this check
	if (index < 0 || index > 7):
		return Vector3()

	# Locate the spawn point node given its index
	var p: Position3D = get_node("spawn_points/" + str(index))
	# Provide this node's global position
	return p.global_transform.origin
As mentioned, the actual spawning will be performed as server only code, which means that we will deal with this from the game_server.gd script. Because the main server's game scene game_server.tscn holds an instance of the game.tscn, it should not be a problem to perform the character spawning from the game_server.gd script.
To explicitly spawn a node using the network system we call the function spawn_node() which is part of a property of the network singleton. This function requires 3 arguments. The first is the snapshot entity class (in the same way that was done with the spawner). The second argument is the unique entity ID that will be attached to the spawned entity. The third argument is the class hash, which we are not using in this demo so we will set it to 0.
Within the game_server.gd we already deal with the event of a player joining the game, in the _on_player_added() function. We can add code in here to spawn the player. Note in this case that we don't have to cache the spawned node for later cleanup as the network system already contains this information, which can be then processed by using the unique ID. Speaking of that, we will reuse the network ID as the character ID.
The last thing before dumping the snippet that spawns the character is related to the index of the spawn point node. It's a good idea to perform checks if the region of the spawn point is empty so the character can be spawned at that place but we won't do so in this demo for simplicity. That said, we will simply take the amount of connected players and use that as the index. Now please note that the networking system counts the server as a player so we have to subtract one from the obtained value. So, right after we attach the UI element into the tree, we can add this to spawn the character node:
And then, when the player leaves we want to de-spawn the node. We can use the _on_player_removed() function to perform this task, which is done through the despawn_node() function. This one requires two arguments. First the snapshot entity class then the entity unique ID. We already have both of those so we can just append this code into the function:
func _on_player_removed(pid: int) -> void:
	... previous code

	# De-spawn the player character
	loader.network.snapshot_data.despawn_node(SnapCharacter, pid)
Client Correction
So, the server is now spawning the character nodes and attaching those into the game scene. However, clients are still not in sync. There are two things that we are missing here. The first one is a requirement of the networking addon, which is the client notifying the server that snapshot data can be sent in its way. This is required because if the server starts to send data right away, the client may not be ready to process it (transitioning into the game scene as an example). The second thing is that we have to apply the server state into the client. If you are not using the networking addon, this synchronization is probably already being done through remote calls, however the presence of the nodes (as well as the correct paths) must be ensured anyway.
Let's fix the first issue and notify the server so it can start sending snapshot data. We will do this by simply calling the notify_ready() function that is part of the network singleton. We will do this once the game client scene is ready. So, just after adding functions to handle kicked and disconnection events we notify the server:
func _ready() -> void:
	... previous code

	# Notify the server that this client is ready to receive snapshot data.
	loader.network.notify_ready()
When nodes are spawned through the network system, those will always get at least one meta data attached to them as part of the spawning process. This meta data is the unique ID of the entity and it is named uid. If the class hash is in use then this meta data will also be created and will be named chash. We are not directly using this hash but we didn't disable it, so the meta data will be present and will always be 0, which is the value we have used within the spawners. I'm mentioning this fact because we will use the unique ID and, to make things easier, we will cache the value into a property. So, declare it near the top of the character script:
# Cache the entity unique ID in here
var _uid: int = 0
Within the _ready() function we initialize it:
func _ready() -> void:
	... previous code

	# Retrieve the entity unique ID, caching it for easier usage later
	if (has_meta("uid")):
		_uid = get_meta("uid")
Now we can move into applying the server state into the client once the data arrives. As mentioned before, in the Snapshot Entities sub-topic, the snapshot entity object will call a function named apply_state() within the character node. This means that we have to create this function. This is part of the correction that should be performed on the client, which in turn serves to keep the client state in sync with the server. Well, almost, because client will always be slightly behind the server.
Nevertheless, when server data arrives and the network system notifies the game logic code that a correction is necessary, chances are high the simulation is in between two updates. Because of that we can't immediately apply the incoming state, instead we have to cache it and set a flag indicating that there is correction data to be applied. In the next physics update we check if we are in this situation and, if so, apply the state. That said, let's declare a dictionary that will hold this correction data, somewhere near the top of the character.gd script:
# Cache incoming server state. It includes a flag telling if the data is actually a correction or not
var _correction: Dictionary = { "has_correction": false }
We now move onto the apply_state() function. From the snapshot entity class (refer again to the snapcharacter.gd script) we are providing a dictionary with the relevant replicated state. So we basically assign that into our cached dictionary, like this:
func apply_state(state: Dictionary) -> void:
	# Take the server state and cache it
	_correction["position"] = state.position
	_correction["orientation"] = state.orientation
	_correction["vert_velocity"] = state.vert_velocity
	# And set the flag indicating that a correction is necessary
	_correction["has_correction"] = true
In the physics update, before we can calculate the frame's simulation we have to check if there is any correction and, if so, apply it. This should be pretty straightforward as most of what we have to do is check the flag and if it's true, transfer into the character state, like this:
func _physics_process(dt: float) -> void:
	# Check if there is any correction to be done
	if (_correction.has_correction):
		# Yes, there is. Apply it
		global_transform.origin = _correction.position
		global_transform.basis = Basis(_correction.orientation)
		_vert_vel = _correction.vert_velocity
		# Reset the flag so correction doesn't occur when not needed
		_correction.has_correction = false

	# Temporary code to handle "input"
	_handle_input(dt, InputData.new(0))
This part of the correction still lacks one important piece of code, which we will see shortly when actually dealing with the input. For now let's move to one aspect that is necessary in order for the synchronization to start occurring. Up to this point our code is indeed creating snapshots, but they are empty. We have to fill the snapshot with instances of the snapshot entity class. In our simple example objects of SnapCharacter. Basically once the simulation of the physics iteration ends we have to create an object of this type and give it to the network system. To help with this task we will first create a function meant to create those objects, with the correct data:
func generate_snap_object() -> SnapCharacter:
	# Second argument, class hash, is required but we don't use it, so setting to 0
	var snap: SnapCharacter = SnapCharacter.new(_uid, 0)

	# Transfer the character state into the object
	snap.position = global_transform.origin
	snap.orientation = global_transform.basis.get_rotation_quat()
	snap.vert_velocity = _vert_vel

	return snap
Then, the last thing we do in the _physics_process() is actually call this new function and provide the returned object to the network system, using the snapshot_entity() function. It only requires a single argument, which is exactly the instance of the snapshot object:
func _physics_process(dt: float) -> void:
	... previous code

	# Snapshot current state
	loader.network.snapshot_entity(generate_snap_object())
With this the character is now being replicated through the network!
Input and Camera
At this point in theory the client should be in sync with the server (besides the slight delay caused by the network latency). However, not only we can't see anything, we can't interact either. We can't see anything because we don't have a camera and we can't interact because we are not obtaining the correct input data yet.
Let's first deal with the camera. When we created the character scene, we didn't add the camera because the server does not need it, although we did create a helper node to be used as position and orientation for the camera. Another aspect is that we probably want the camera to be created only for the local client, not the others. If we want some sort of "spectator mode" then we indeed need to create a camera for each spawned character, but must ensure the current active one belongs to the local client. Still, in this code we will only create the camera for the local client. This check can be done using the is_id_local() function that is part of the network singleton.
That said, from the _ready() function of the character we add code to check this condition and in case we are in local client, we create a camera and attach into the camera_pos node:
func _ready() -> void:
	... previous code

	if (loader.network.is_id_local(_uid)):
		# Create the camera
		var cam: Camera = Camera.new()
		# Attach to the node hierarchy
		$camera_pos.add_child(cam)
		# Ensure it is the active one
		cam.current = true
If you hit the F6 key (Play Scene button), then nothing will be shown. There are two reasons for this:
- When playing in this mode, there is no server set, which is the one performing the character spawning.
- Even if the character were spawned in this mode, we are defaulting the cached unique ID to 0 which is not exactly a valid value. In this case defaulting to 1 (which is the ID assigned to servers), would result in the
is_id_local()check to return true, which in turn will spawn the camera.
Now for the input data. In this case we have to take it from the networking system, which will generate an object of Input containing the registered mapped input. The input data must be requested from the networking system because it will be able to prepare things to send the information to the server. That said, when we need input data we request from the server using the player ID. We don't have to perform any kind of check related to this ID when requesting the input information because the network system will return null if that client is not meant to deal with input for that ID.
Nevertheless, we request input data using the function get_input(), which is part of the network object and requires a single argument which is, as mentioned, the player ID. With the input object we can directly plug it into the _handle_input() function that we have implemented early. That said, in our _physics_process() function, substitute that temporary call to the input handler placing this instead:
# Handle input
_handle_input(dt, loader.network.get_input(_uid))
There is one last aspect that must be dealt with, which is related to the input and the correction. When a correction is applied, it normally happens based on a previous state of the game. Remember, client is locally simulating the game, so it is usually a few frames ahead of the received snapshot data. If we blindly apply the correction, those frames will be lost and for the local characters, that are directly influenced by player input will most likely result in a very glitchy movement. What happens is that when a correction is applied we have to re-play the same input objects that were used after that reference snapshot.
Within the network addon, each player will generate an internal PlayerNode object, which in turn contains a function named get_cached_input_list(). This function returns an array of all input objects that were not confirmed by the server yet, meaning that they correspond to the snapshots after the reference point that triggered the correction.
We have to replay those input objects only for the local player, meaning that we have to check if the cached _uid corresponds to that player. Then, for each object in the array we directly plug into the _handle_input() function.
Lastly, in order to avoid further corrections we have to update the local snapshot corresponding to the input used, since the new corrected state is most likely different from what is in the local snapshot history. This internal data correction is performed by calling the correct_in_snapshot() function, which is part of the network object. This function requires an instance of the snapshot entity class and the input object. The network system will take care of locating the proper snapshot corresponding to that input object.
All that said, in our character code, after we apply the correction we replay the input objects while also correcting local data like this:
func _physics_process(dt: float) -> void:
	# Check if there is any correction to be done
	if (_correction.has_correction):
		... previous code

		# Replay input objects within internal history if this character belongs to local player
		if (loader.network.is_id_local(_uid)):
			var input_list: Array = loader.network.player_data.local_player.get_cached_input_list()
			for i in input_list:
				_handle_input(dt, i)
				loader.network.correct_in_snapshot(generate_snap_object(), i)

	... previous code
Player Login and Credentials
In order to have a player login system we need a database containing registered players. Normally this database is filled with information given by a user interacting with a web page (or something like that). However, the problem is in how the data is stored, more specifically the password. This is a ridiculously complex subject.
When researching about this, we find that there are different techniques that have been tested and shown to work. Then, there are newer techniques that shows promises but specialists in the area say that those are new and need testing. Because of this, a lot of developers end up not using the new technique and deploy the older ones. Yet, the same specialists say that it's a matter of time to break the older tested techniques, meaning that new ones are need. Still, the newer ones are not exactly recommended or "denied"!
That said, the usual method begins with player registration. The common steps are somewhat like this:
- Through a form, user enters details.
- That information is encrypted and sent to the server, preferably with SSL.
- Server takes the password, salt it, hash it then store in the database, including the used salt.
Then, when the player attempts to login, the usual steps are as follow:
- User enters the details (normally login + password) in a form.
- That information is encrypted and sent to the server, preferably with SSL.
- Server takes the login and search in the database. In case it's there, take the stored salt, use it to apply into the received password, hash the result then compare with the stored password for that login.
Based on those steps you may say "wait, that doesn't look complicated!". Well, unfortunately, the problem is in the details, more specifically in the password hashing function. One very important thing here is that password hashing has to be slow (please, don't use String.hash()). For this task there is bcrypt, which is considered the tested technique and, by design, it allows specification of how slow it must run. A newer technique is named Argon but, again, specialists still say it's too new and needs testing. Yet, none of those techniques are given by Godot out of the box, meaning that a GDNative plugin or a C++ Module is required.
Because the password hashing algorithm has to be slow, ideally this part of the credential checking has to happen on a separate thread in order to not completely halt execution of the server, specially because it may already be serving data to other clients.
Ok, now, I will not show any implementation for this task. The reason is because I'm very far from an expert in this subject and chances are incredible high I will screw something up in a ridiculously sensitive (and maybe dangerous) aspect of a project. Instead I will place bellow a few links that can serve as a starting point for research:
Two articles, How to Safely Store Passwords and How to Store a Password in Database.
There is a very interesting answer on Stack Exchange, albeit a bit old, about password storage.
Wikipedia bcrypt entry and an implementation by OpenWall, which is used by PostgreSQL.
If you are interested, here is Argon.
There is a Microsoft article on this subject.
Finally, there is something specific for Godot. First an article about SSL Improvements, with the Crypto Class documentation and the StreamPeerSSL documentation. And the SSL Certificates Documentation.
Before ending, as promised, I will talk a little bit about a banning system. Provided we already have the user database, when a client attempt to login, before verifying the password we can check a flag indicating if the user is banned or not. If the user is banned we can reject the connection (normally by just forcefully disconnecting that peer). Yes, this is the easy part of the user credentials!
Conclusion
In this slightly bigger than anticipated tutorial I have shown, in three major stages, a sample implementation of a single Godot project that can generate both client and dedicated server. This means that there is no need to maintain two different code bases for the same game project, which greatly help with reducing duplicated code!
I also have shown how to strip out any visual representation from the server while still keeping a workflow that is very close to what would be in a common project, specially regarding level designing.
While I didn't implement anything related to player login, I have at least mentioned the basics of what is behind the task and explained the reason for not delving into it in this tutorial. Obviously, to not leave you completely empty handed here, I provided several links to material that can be used to start research on this subject.
I truly hope you find this information useful! Don't forget to grab the reference material from GitHub.
Happy forging!